1. Introduction
This manual provides detailed instructions for the safe installation, operation, and maintenance of your LEDLUX 84-inch Industrial Ceiling Fan, Model SYCF8403. Please read this manual thoroughly before installation and retain it for future reference. This fan features a reversible DC motor, 6-speed remote control, and 8 durable aluminum blades, designed for efficient air circulation in large residential or commercial spaces.

Image 1.1: Overview of LEDLUX 84-inch Ceiling Fan features.
2. Safety Information
WARNING: To reduce the risk of fire, electric shock, or personal injury, always turn off the main power at the circuit breaker before installation, removal, or maintenance.
- All electrical connections must be in accordance with local codes, ordinances, and the National Electric Code. If you are unfamiliar with electrical wiring, consult a qualified electrician.
- Ensure the installation site can support the fan's weight (approximately 33.2 pounds) plus the dynamic load of operation.
- Mount the fan with the blades at least 7 feet (2.1 meters) from the floor.
- Do not operate the fan with damaged blades or housing.
- Avoid placing objects in the path of the fan blades.
- Use only the remote control provided with the fan.
3. Package Contents
Verify that all components are present before beginning installation:
- DC Motor Assembly
- 8 Aluminum Blades
- Canopy and Mounting Bracket
- Downrods (4.5", 12", 24")
- Remote Control with Wall Mount
- Hardware Pack (screws, washers, wire nuts)
- Instruction Manual
4. Specifications
| Brand | LEDLUX |
| Model Name | SYCF8403 |
| Electric Fan Design | Ceiling Fan |
| Color | Black |
| Size | 84 inches |
| Product Dimensions | 84"D x 84"W x 12.7"H (minimum height with shortest downrod) |
| Item Weight | 33.2 pounds |
| Power Source | DC (12 Volts) |
| Control Method | Remote |
| Number of Power Levels | 6 |
| Special Feature | Heavy Duty, Reversible DC Motor |
| Indoor/Outdoor Usage | Indoor (suitable for covered outdoor areas) |
| Finish Type | Powder Coated |

Image 4.1: Fan dimensions and downrod options for flat and sloped ceilings.
5. Setup and Installation
Professional installation is recommended for this large ceiling fan. Ensure power is disconnected at the circuit breaker before proceeding.
5.1 Pre-Installation
- Unpack all components and verify against the package contents list.
- Choose an appropriate downrod length (4.5", 12", or 24") based on your ceiling height. The fan is suitable for high, low, and slanted ceilings.
- Ensure the electrical box is securely mounted and capable of supporting the fan's weight.
5.2 Mounting the Bracket
- Attach the mounting bracket to the ceiling electrical box using the provided screws and washers. Ensure it is firmly secured.
5.3 Assembling the Fan
- Feed the electrical wires from the motor assembly through the chosen downrod.
- Secure the downrod to the motor assembly with the provided pin and screws.
- Carefully attach each of the 8 aluminum blades to the motor housing using the blade screws. Ensure all screws are tightened securely.
5.4 Wiring
- Hang the fan assembly onto the mounting bracket.
- Connect the fan's electrical wires to the household wiring according to the wiring diagram in the separate installation guide (if provided) or standard electrical practices (e.g., black to black, white to white, ground to ground). Use wire nuts to secure connections.
5.5 Securing the Canopy
- Slide the canopy up to the ceiling and secure it to the mounting bracket with the canopy screws, ensuring all wires are tucked neatly inside.

Image 5.1: Fan installation suitability for various ceiling types.
6. Operating Instructions
Your LEDLUX ceiling fan is operated using the included remote control.
6.1 Remote Control Functions

Image 6.1: Remote control functions.
- Power On/Off: Press the power button to turn the fan on or off.
- Speed Control (1-6): Use the speed buttons to select one of six fan speeds. Speed 1 is the lowest, and Speed 6 is the highest.
- Forward/Reverse: Press the forward/reverse button to change the blade rotation direction.
- Timer Settings: Select 1H, 2H, 4H, or 8H to set the fan to automatically turn off after the specified duration.
- Natural Wind Mode: Activates a mode that simulates natural breezes by varying fan speed.
6.2 Reversible DC Motor Function
The reversible DC motor allows for year-round comfort:
- Summer Mode (Counter-clockwise): Blades rotate counter-clockwise, pushing air downwards to create a cooling effect.
- Winter Mode (Clockwise): Blades rotate clockwise, drawing air upwards to circulate warm air trapped near the ceiling, helping to regulate room temperature.
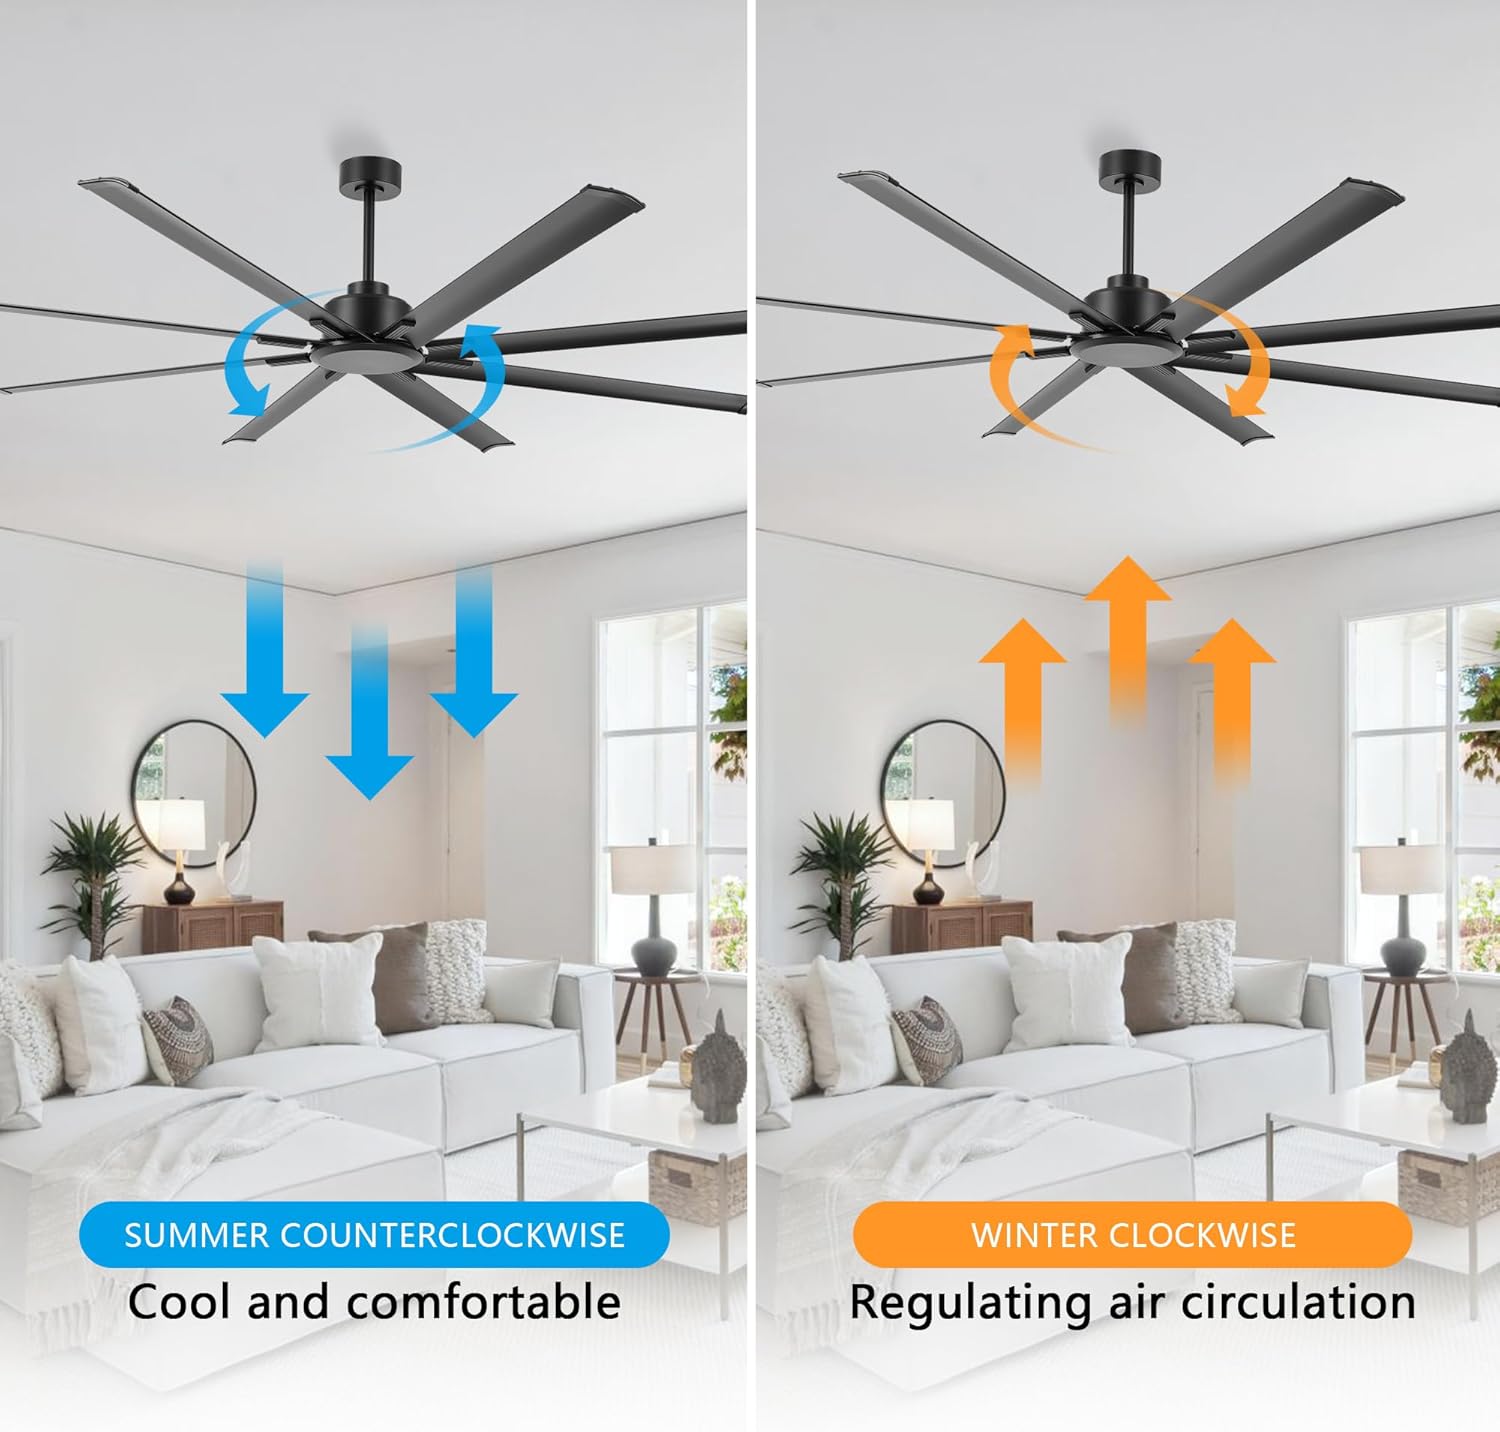
Image 6.2: Reversible function for summer and winter operation.
6.3 Quiet Operation
The DC motor is engineered for quiet operation, with sound levels typically below 35dB, ensuring minimal disturbance even at higher speeds.

Image 6.3: Quiet operation and timer setting feature.
7. Maintenance
Regular maintenance ensures optimal performance and extends the lifespan of your ceiling fan.
- Cleaning: Periodically wipe the fan blades and motor housing with a soft, damp cloth. Do not use abrasive cleaners or solvents. Ensure the fan is turned off and power is disconnected before cleaning.
- Tightening Screws: Check all screws and connections annually to ensure they are secure. Loose connections can cause noise or wobbling.
- Blade Inspection: Inspect blades for any damage or warping. Damaged blades should be replaced immediately to prevent imbalance and potential hazards.
8. Troubleshooting
If you encounter issues with your fan, refer to the following common problems and solutions:
| Problem | Possible Cause | Solution |
|---|---|---|
| Fan does not start | No power to the fan; Loose wire connections; Remote control battery low or not paired. | Check circuit breaker; Verify all wire connections are secure; Replace remote battery or re-pair remote. |
| Fan wobbles | Loose blade screws; Unbalanced blades; Loose mounting bracket. | Tighten all blade screws; Check for bent blades and replace if necessary; Ensure mounting bracket is securely fastened. |
| Noisy operation | Loose screws; Motor housing rubbing; Incorrect installation. | Check and tighten all screws; Ensure no parts are rubbing; Re-check installation steps. |
| Remote control not working | Battery depleted; Remote not paired; Obstruction between remote and receiver. | Replace battery; Re-pair remote control (refer to remote pairing instructions); Ensure clear line of sight to fan receiver. |
9. Warranty and Support
LEDLUX stands behind the quality of its products.
- Motor Warranty: This fan includes a 10-year warranty on the DC motor.
- Parts Warranty: All other parts of the fan are covered by a 3-year full warranty.
For warranty claims, technical support, or replacement parts, please contact LEDLUX customer service through the retailer where the product was purchased or visit the official LEDLUX website for contact information.

Image 9.1: LEDLUX Warranty Information.


