
1. Introduction
This manual provides comprehensive instructions for the installation, operation, and maintenance of your YUXIANG Helicopter Camera. This camera module is specifically designed for use with YUXIANG F09S, F09H, and F11S RC Helicopters, enabling aerial photography and video recording capabilities.
Please read this manual thoroughly before installation and operation to ensure proper use and to maximize the lifespan of your product.
2. What's in the Box
Upon opening the package, please verify that all components are present and in good condition:
- YUXIANG Helicopter Camera Module
- Mounting Screw (if applicable, based on image)
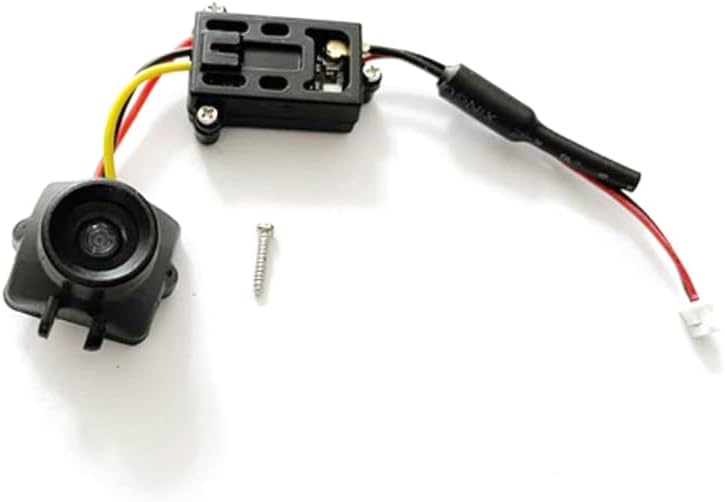
Figure 2.1: The YUXIANG Helicopter Camera module, showing the lens, circuit board, connecting wires, and a small mounting screw. This image displays the complete camera unit as it would appear out of the box.
3. Safety Information
No Warning Applicable for this product as per manufacturer's safety information. However, general safety precautions for handling electronic components and RC models should always be observed:
- Keep out of reach of small children due to small parts.
- Handle with care to avoid damaging sensitive electronic components.
- Ensure proper power connection to prevent short circuits or damage.
- Do not attempt to modify the camera module.
4. Setup and Installation
This camera module is designed for easy replacement or installation on compatible YUXIANG RC Helicopters (F09S, F09H, F11S). Follow these steps for proper installation:
- Prepare the Helicopter: Ensure your RC helicopter is powered off and the battery is disconnected before beginning any installation.
- Locate Mounting Point: Identify the designated camera mounting point on your YUXIANG F09S, F09H, or F11S helicopter. This is typically on the underside or front of the fuselage.
- Connect Wiring: Carefully connect the camera's wiring harness to the corresponding port on the helicopter's flight controller or designated camera port. Ensure the connector is fully seated and oriented correctly to avoid damage. The wires are typically color-coded (e.g., red for power, black for ground, yellow for video signal).
- Secure the Camera: Use the provided small screw (if applicable) or existing mounting hardware to secure the camera module firmly in place. Ensure the camera lens is unobstructed and facing the desired direction for recording.
- Verify Connection: After installation, double-check all connections to ensure they are secure.

Figure 4.1: A detailed view of the camera module, highlighting the compact circuit board and the three-wire connector (red, yellow, black). This image is useful for identifying the connection points during installation.
5. Operating Instructions
Once the camera is installed, its operation is typically integrated with the helicopter's flight control system or remote controller. Refer to your specific YUXIANG F09S, F09H, or F11S helicopter manual for detailed instructions on camera control.
- Power On: Connect the helicopter battery. The camera will power on automatically with the helicopter.
- Video Recording/Photo Capture: Depending on your helicopter model, there will be a dedicated button or switch on your remote controller to initiate video recording or capture still photos. Consult your helicopter's manual for specific button assignments.
- Storage: Video and photo files are typically stored on a micro SD card (not included) inserted into a slot on the camera module or the helicopter's flight controller. Ensure a compatible micro SD card is inserted before flight.
- Downloading Files: To access recorded media, remove the micro SD card and insert it into a card reader connected to a computer, or connect the helicopter directly to a computer via USB if supported.
6. Maintenance
Proper maintenance ensures the longevity and optimal performance of your camera module:
- Lens Cleaning: Gently clean the camera lens with a soft, lint-free cloth. Avoid abrasive materials or harsh chemicals.
- Storage: When not in use, store the helicopter and camera in a cool, dry place away from direct sunlight and extreme temperatures.
- Connection Check: Periodically inspect the wiring connections for any signs of wear or looseness.
- Avoid Impact: Protect the camera from physical impacts, which can damage the lens or internal components.
7. Troubleshooting
| Problem | Possible Cause | Solution |
|---|---|---|
| Camera not powering on. | Loose connection; Helicopter not powered; Damaged wiring. | Check all wiring connections; Ensure helicopter battery is charged and connected; Inspect wires for damage. |
| No video signal/recording. | SD card not inserted or full; Incorrect SD card format; Camera not activated. | Insert a formatted micro SD card; Ensure SD card is correctly formatted (e.g., FAT32); Refer to helicopter manual for camera activation. |
| Poor image quality. | Dirty lens; Low light conditions; Vibration. | Clean the camera lens; Operate in well-lit conditions; Ensure camera is securely mounted to minimize vibration. |
8. Specifications
| Feature | Detail |
|---|---|
| Product Dimensions | 1 x 2 x 1 inches |
| Country of Origin | China |
| ASIN | B0DS5GZFKW |
| Manufacturer | YUXIANG |
| Compatibility | YUXIANG F09S, F09H, F11S RC Helicopters |
| Included Components | Camera Module |
9. Warranty and Support
Specific warranty information for this product is not provided in this manual. Please refer to the product packaging or the seller's website for details regarding warranty coverage and terms.
For technical support or further assistance, please contact the seller or manufacturer directly. Contact information may be available on the product packaging or the point of purchase.
Manufacturer: YUXIANG
Brand: STASRC