
GODOX iA32
Contents
Godox iA32 Mini Camera Flash Instruction Manual
Model: iA32
Introduction
The Godox iA32 Mini Camera Flash is a compact and versatile speedlite designed to provide enhanced lighting for various camera models. It features a single-contact hot shoe for broad compatibility, adjustable power levels, and flexible angle adjustments to suit diverse photographic needs. This manual provides detailed instructions for the proper setup, operation, and maintenance of your iA32 flash.
Product Features
- Wide Compatibility: Features a single-contact hot shoe design, making it compatible with most mirrorless and film cameras, including models from Sony (e.g., ZV-1, ZV-E10), Ricoh (e.g., GR3), Canon, Nikon, Fuji, and Olympus. Note: Not compatible with Sony ZV-1F, A9III, A99, A77, A350, and other cameras without a universal touch point.
- Efficient Power: Powered by two AA batteries, providing up to 490 flashes at full power with a quick recycle time of approximately 2.5 seconds.
- Adjustable Power Levels: Offers 8 power levels, ranging from 1/128 to full power (1/1), allowing precise light output control for various scenes.
- Optimal Lighting Quality: Delivers natural lighting with a guide number (GN) of 15 and a color temperature of 6500K±200K, enhancing photographic results.
- Versatile Modes: Supports both Auto and Manual modes for flexible shooting requirements.
- Flexible Angle Adjustment: The flash tube can be adjusted from -7° to 90° via a side dial, enabling bounce flash effects and varied lighting options.
- Compact Design: Integrated flat design for easy portability and attachment to your camera.
Package Contents

The package includes the following items:
- Godox iA32 Flash Body x 1
- Storage Bag x 1
This image shows the Godox iA32 flash unit alongside its included storage bag, illustrating the complete contents of the product package.
Parts Identification
Familiarize yourself with the different parts of your Godox iA32 flash unit:

This diagram labels the key components of the Godox iA32 flash, including the display, buttons, optical sensor, flash tube, hot shoe, and battery cover.
- Display
- Power Switch/Test Button
- MODE Button
- < - > Button
- < + > Button
- Optical Sensor
- Flash Tube Angle Adjust Dial
- Hot Shoe
- Hot Shoe Locking Ring
- Flash Tube
- Battery Cover
- Auto Light Meter
Setup
1. Battery Installation
The Godox iA32 flash requires two AA batteries for operation.
- Locate the battery cover (Part 11 in the diagram) on the side of the flash unit.
- Open the battery cover.
- Insert two AA batteries, ensuring correct polarity (+/-) as indicated inside the battery compartment.
- Close the battery cover securely.

This image illustrates the Godox iA32 flash unit with its battery compartment open, showing the insertion of AA batteries.
2. Mounting on Camera
To attach the iA32 flash to your camera:
- Slide the hot shoe (Part 8) of the flash into your camera's hot shoe mount.
- Once fully inserted, rotate the hot shoe locking ring (Part 9) clockwise to secure the flash firmly in place.
- To remove, rotate the locking ring counter-clockwise and slide the flash off.
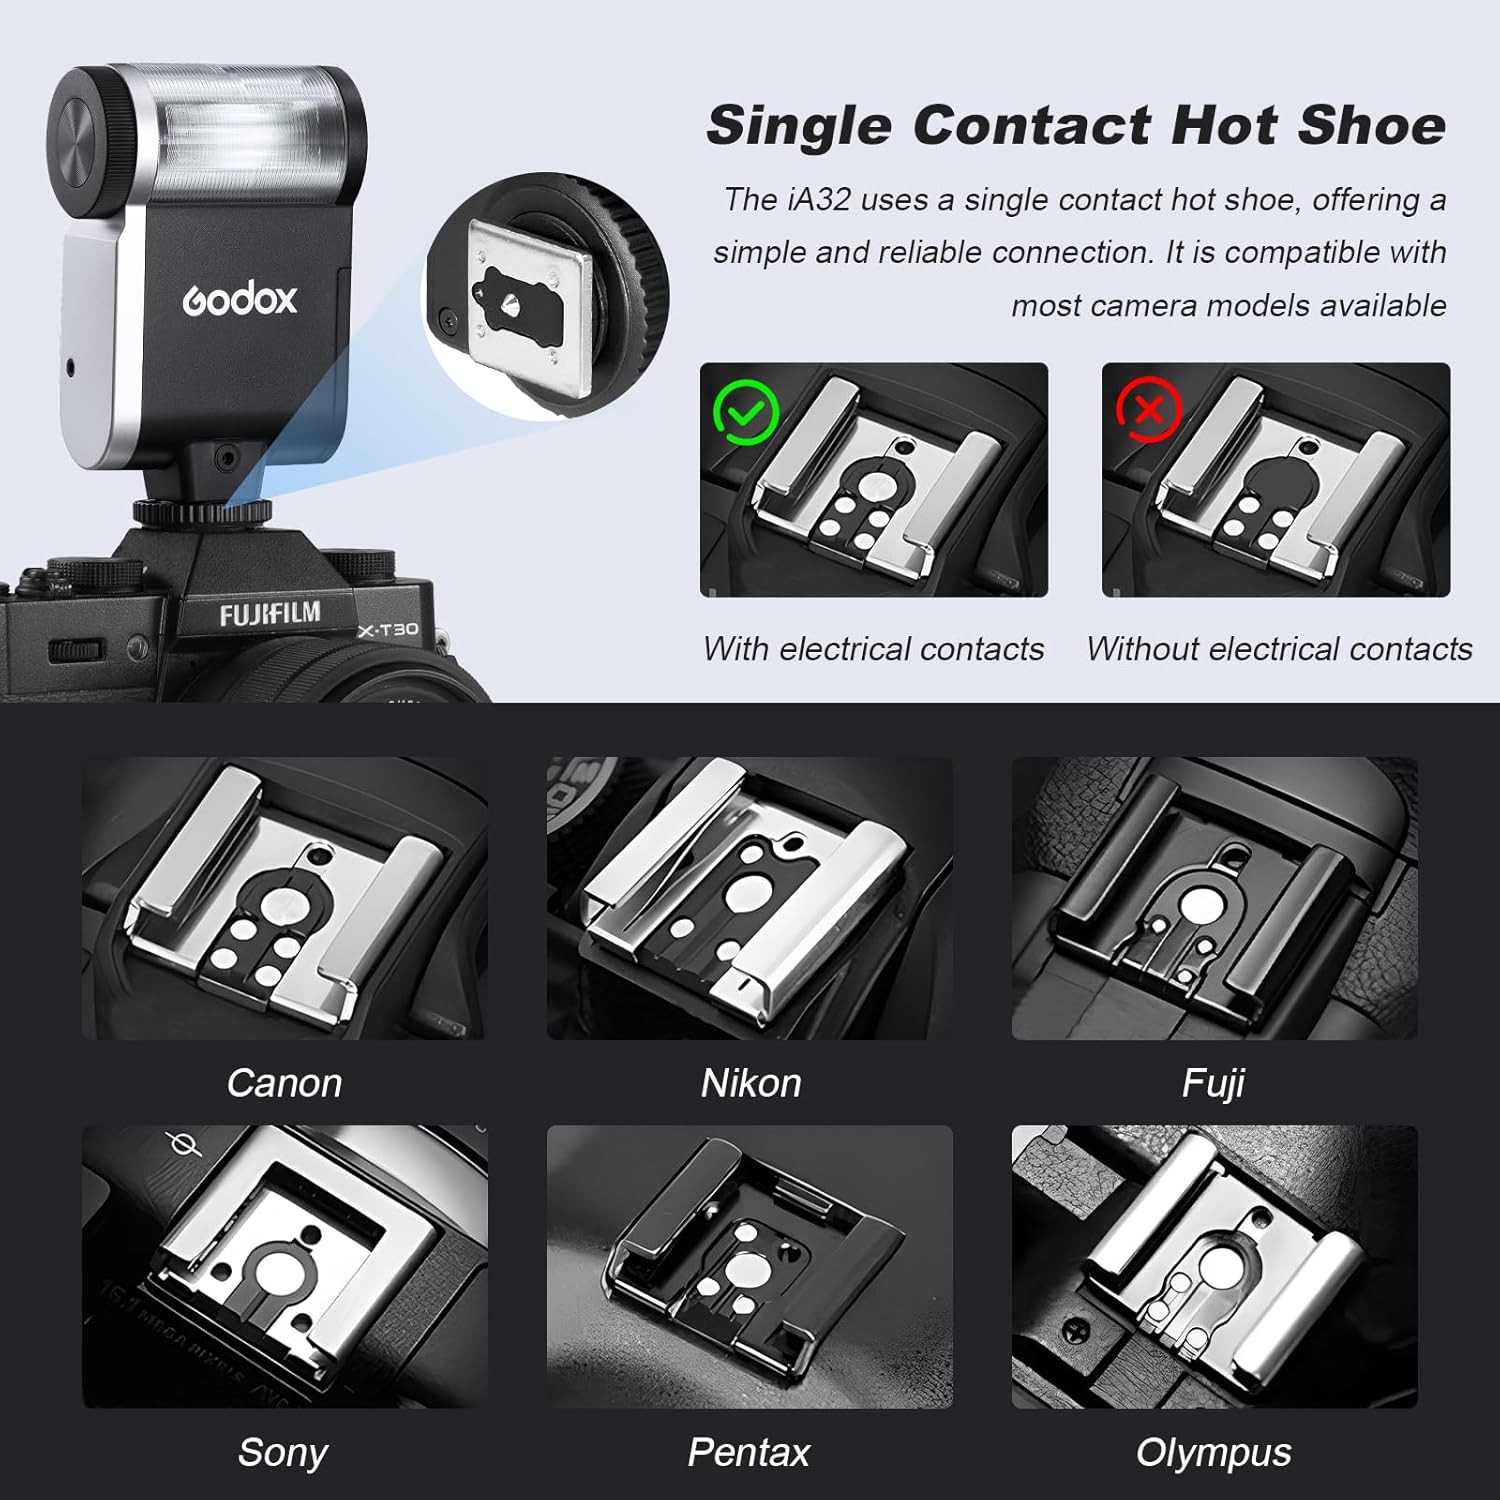
This image demonstrates the single-contact hot shoe of the Godox iA32 and its compatibility with various camera brands, showing both compatible and incompatible hot shoe designs.
Operating Instructions
1. Power On/Off
- Press and hold the Power Switch/Test Button (Part 2) to turn the flash on or off.
- A short press of the Power Switch/Test Button will fire a test flash.
2. Mode Selection (Auto/Manual)
The iA32 supports both Auto and Manual modes.

This image displays the Godox iA32's screen in both Auto Mode (left) showing ISO, aperture, and recommended distance, and Manual Mode (right) showing flash power level.
- Press the MODE Button (Part 3) to switch between Auto and Manual modes.
- Auto Mode: In this mode, you can set ISO and aperture values on the flash. The display will show the recommended shooting distance.
- Manual Mode: Allows you to manually adjust the flash power level.
3. Adjusting Power Levels (Manual Mode)
In Manual Mode, you can select from 8 power output levels.

This image demonstrates the effect of different power levels (from 1/1 to 1/128) on a subject, illustrating the range of light output from the Godox iA32 flash.
- Use the < - > Button (Part 4) and < + > Button (Part 5) to cycle through the power levels from 1/128 to 1/1 (full power) in 1/3-step increments.
- Select the appropriate power level based on your desired exposure and lighting conditions.
4. Adjusting Flash Head Angle
The flash tube can be adjusted to direct light as needed.
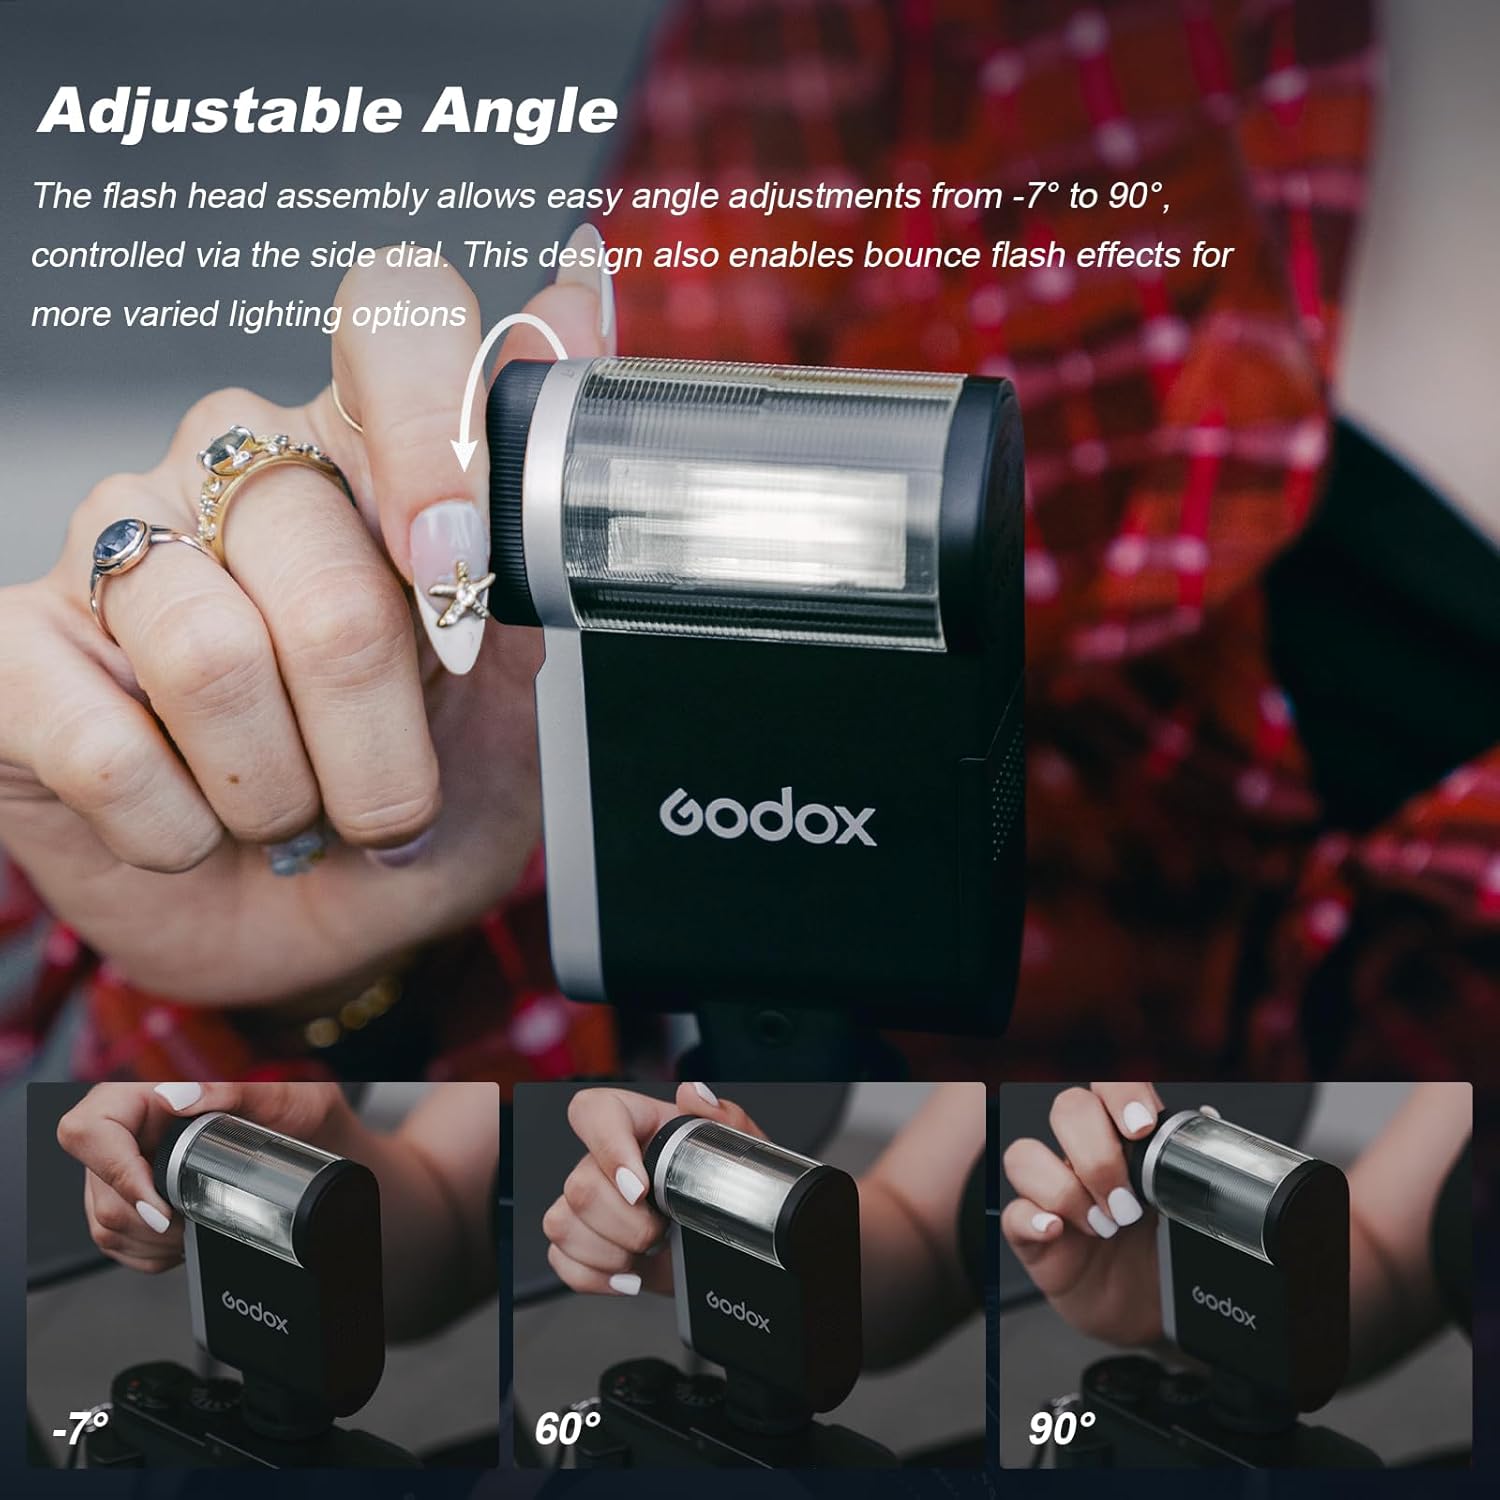
This image shows the Godox iA32 flash head being adjusted, with illustrations of its tilt capabilities from -7 degrees to 90 degrees, allowing for bounce flash.
- Use the Flash Tube Angle Adjust Dial (Part 7) on the side of the unit to tilt the flash head.
- The flash head can be adjusted from -7° to 90°. This allows for direct flash or bounce flash off ceilings or walls for softer lighting.
Compatibility
The Godox iA32 Mini Camera Flash is designed with a single-contact hot shoe for broad compatibility with various camera systems. It is generally compatible with most mirrorless and film cameras that feature a universal hot shoe with electrical contacts.
Compatible Brands: Sony (e.g., ZV-1, ZV-E10), Ricoh (e.g., GR3), Canon, Nikon, Fuji, Olympus, Pentax (with universal touch point).
Known Incompatibilities: Sony ZV-1F, A9III, A99, A77, A350, and other cameras that do not feature a universal hot shoe with a central electrical contact.
Always ensure your camera's hot shoe has a central contact for proper flash synchronization.
Maintenance
- Cleaning: Use a soft, dry cloth to clean the flash unit. For stubborn dirt, a slightly damp cloth can be used, followed by immediate drying. Avoid using strong detergents or solvents.
- Storage: When not in use for extended periods, remove the AA batteries to prevent leakage and store the flash in its provided storage bag in a cool, dry place.
- Handling: Handle the flash with care. Avoid dropping it or subjecting it to strong impacts, which can damage internal components.
- Environmental Conditions: Do not expose the flash to water, high humidity, extreme temperatures, or direct sunlight for prolonged periods.
Troubleshooting
| Problem | Possible Cause | Solution |
|---|---|---|
| Flash does not power on. |
|
|
| Flash does not fire. |
|
|
| Flash output is too bright/dark. |
|
|
| Long recycle time. |
|
|
Specifications

This image displays a table of key specifications for the Godox iA32 flash, including battery type, guide number, recycle time, flash modes, and dimensions.
| Feature | Detail |
|---|---|
| Model | iA32 |
| Battery | Two AA NiMH batteries (or alkaline) |
| Guide Number (ISO 100, in meters) | 15 |
| Full Power Flashes | Approx. 490 |
| Recycle Time | Approx. 2.5s |
| Flash Power Steps | 8 levels: 1/128 ~ 1/1 |
| Flash Modes | M Mode / AUTO Mode, Optical Trigger S1/S2 |
| Dimension | Approx. 2.56" x 4.53" x 1.38" (65mm x 115mm x 35mm) |
| Net Weight | Approx. 117g (without batteries) |
| Flash Sync Speed | 1/250s |
Warranty and Support
For warranty information and technical support, please refer to the official GODOX website or contact your local distributor. Keep your purchase receipt as proof of purchase for any warranty claims.
GODOX is committed to providing high-quality products and customer service. Should you encounter any issues not covered in this manual, please reach out to their support channels for assistance.
Ask a question about this manual
Ask about setup, troubleshooting, compatibility, parts, safety, or missing instructions. Manuals+ will review the question and use this page’s manual context to help answer it.