1. Introduction
This manual provides essential information for the proper installation, operation, and maintenance of your SPTBMDJ J02A bicycle disc brake pads. These pads are designed for specific Shimano ICE-TECH disc brake systems, offering reliable braking performance and enhanced heat dissipation through integrated cooling fins. Please read this manual thoroughly before installation and use to ensure safety and optimal performance.
2. Product Overview
2.1 Key Features
- Integrated cooling fins for improved heat dissipation.
- Durable resin and metal compound for consistent braking.
- Designed for long service life.
- Simple and fast installation process.
- Exquisite workmanship for reliable performance.
2.2 Compatibility
These brake pads are compatible with the following Shimano ICE-TECH disc brake models:
- BR-M9000, BR-M9020, BR-M8000, BR-M7000, BR-M6000
- BR-M987, BR-M985, BR-M785, BR-M675, BR-M666, BR-M615
- BR-S700, BR-R785, BR-RS785
3. Package Contents
Verify that all components are present in the package:
- 2 x Disc Brake Pads with Cooling Fins (J02A)
- 1 x Spring
- 1 x Cotter Pin

Image 1: Contents of the SPTBMDJ J02A brake pad set, showing two pads, a spring, and a cotter pin.
4. Setup and Installation
Safety Warning: If you are unsure about any part of the installation process, consult a professional bicycle mechanic. Improper installation can lead to brake failure and serious injury.
- Prepare the Bicycle: Secure the bicycle in a repair stand. Remove the wheel from the frame or fork where the brake caliper is located.
- Remove Old Brake Pads:
- Locate and remove the cotter pin or retaining bolt that holds the brake pads in place.
- Carefully pull the old brake pads out of the caliper. Note their orientation.
- Clean the Caliper: Use a clean cloth and isopropyl alcohol to clean any brake dust or residue from inside the caliper. Do not use petroleum-based cleaners.
- Install New Brake Pads:
- Compress the brake caliper pistons fully using a plastic tire lever or a dedicated piston press tool. This is crucial to create space for the new, thicker pads.
- Insert the new SPTBMDJ J02A brake pads into the caliper, ensuring the spring is correctly positioned between them. The cooling fins should face outwards.
- Reinsert the cotter pin or retaining bolt to secure the pads. Bend the cotter pin ends to prevent it from falling out.
- Reinstall Wheel and Adjust: Reinstall the wheel. Spin the wheel to check for rotor rub. If necessary, loosen the caliper mounting bolts slightly, squeeze the brake lever firmly a few times to center the caliper, then retighten the mounting bolts.

Image 2: Detailed view of the brake pad components, including the spring and cotter pin, essential for correct assembly.
5. Operating Instructions
5.1 Brake Pad Bed-In Procedure
New brake pads require a proper bed-in (break-in) procedure to achieve optimal performance and prevent glazing. This process transfers a thin layer of pad material to the rotor, improving friction and reducing noise.
- Find a safe, open area with no traffic.
- Accelerate to a moderate speed (approximately 15-20 mph).
- Apply the brakes firmly and consistently until you are almost at a walking pace. Do not come to a complete stop.
- Release the brakes and allow them to cool for a short distance.
- Repeat this process 10-20 times for each brake (front and rear).
- After the bed-in process, the brakes should feel more powerful and consistent. Avoid hard braking or prolonged dragging of the brakes immediately after installation until they are properly bedded in.
6. Maintenance
Regular maintenance ensures the longevity and safety of your brake system.
- Regular Inspection: Periodically check the brake pads for wear. Replace pads when the pad material is worn down to approximately 0.5mm or less, or if the cooling fins show significant damage.
- Cleaning: Keep brake calipers and rotors clean. Avoid getting oil or grease on the brake pads or rotors, as this can severely reduce braking performance and contaminate the pads.
- Rotor Condition: Inspect rotors for excessive wear, warping, or contamination. Replace damaged rotors.
- Brake Fluid: For hydraulic disc brakes, ensure brake fluid levels are correct and bleed the system as recommended by the brake manufacturer.
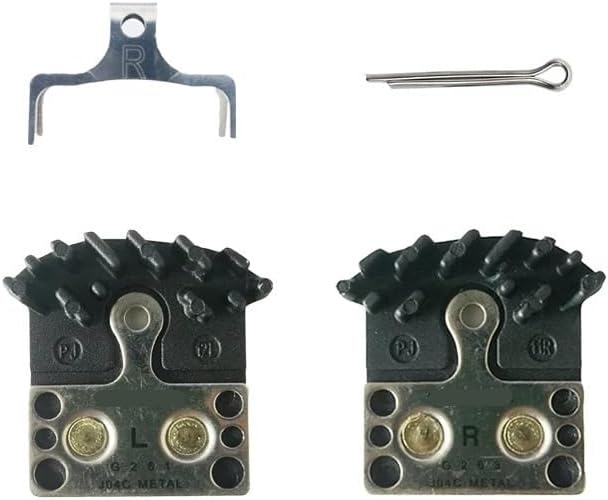
Image 3: Underside of the brake pads, illustrating the contact surface and metal backing.
7. Troubleshooting
Here are some common issues and potential solutions:
- Squealing Brakes:
- Ensure pads are properly bedded in (see Section 5.1).
- Check for contamination on pads or rotors (oil, grease). Clean with isopropyl alcohol or replace if contaminated.
- Verify caliper alignment.
- Reduced Braking Power:
- Pads may not be bedded in.
- Pads or rotors may be contaminated.
- Pads may be excessively worn.
- Brake system may need bleeding (for hydraulic brakes).
- Brake Rubbing:
- Caliper may be misaligned. Re-align the caliper (see Section 4.5).
- Pistons may be stuck or not retracting fully. Consult a professional mechanic.
- Rotor may be warped.
8. Specifications
| Attribute | Value |
|---|---|
| Model Number | J02A (SPTBMDJ124) |
| Brand | SPTBMDJ |
| Material | Resin & Metal Compound |
| Features | Cooling Fins |
| Package Dimensions | 1.18 x 0.79 x 0.39 inches |
| Item Weight | 1.76 ounces |
| Number of Pieces | 1 Set (2 pads, 1 spring, 1 pin) |
9. Warranty and Support
For warranty information or technical support, please contact your retailer or the manufacturer directly. Keep your proof of purchase for any warranty claims.