Introduction
This manual provides detailed instructions for the installation, operation, and maintenance of your HIDALIFE HL-669K Keyless Entry Door Lock. Please read this guide thoroughly before installation and use to ensure proper function and security.
Setup and Installation
1. Package Contents
Verify all components are present before beginning installation:
- Exterior Assembly (Keypad with Handle)
- Interior Assembly (Backplate with Battery Compartment)
- Latch
- Strike Plate
- Strike Box
- Keys (2)
- Latch/Strike Screws (4 PCS)
- Interior Assembly Screws (3 PCS)
- Backplate Screws (4 PCS)
2. Door Preparation and Measurement
Before installation, ensure your door dimensions are compatible with the lock. Refer to the diagram below for measurements.

Image Description: A diagram illustrating key door measurements for lock compatibility. It shows door holes (2-1/8" or 54mm recommended, 1-1/2" or 38mm not compatible), door thickness (1-3/8" to 2" or 35mm-50mm), and backset (2-3/8" or 60mm, or 2-3/4" or 70mm). It also indicates compatible latch hole shapes (rectangular) and incompatible lock types (Rim Cylinder, Mortise, Integrated).
- Door Holes: 2-1/8" (54mm) is compatible. 1-1/2" (38mm) is not compatible.
- Door Thickness: 1-3/8" (35mm) to 2" (50mm).
- Backset: Adjustable for either 2-3/8" (60mm) or 2-3/4" (70mm).
- Latch Hole: Compatible with rectangular latch holes.
3. Installation Steps
Follow these steps for proper installation:
- Install the Latch: Ensure the beveled edge of the lock latch faces the direction the door swings shut. If the backset is 2-3/4" (70mm), extend the latch before installation. Secure with latch screws.
- Install the Exterior Assembly: Carefully feed the wires through the door hole. Align the exterior assembly with the latch and door.
- Install the Backplate: Align the backplate with the screw of the latch and secure it.
- Install the Interior Assembly: Connect the wire terminals, plug the wires into the door opening, and close the interior assembly to the door panel. Fix the screws of the interior assembly.
- Insert Batteries: Insert four AA batteries into the battery compartment and close the battery cover.
Video Description: An official HIDALIFE installation demonstration for the HL-669K door lock. This video guides users through measuring door dimensions, installing the latch, exterior and interior assemblies, and inserting batteries. It highlights important steps like ensuring the correct latch direction and aligning components.
Operating Instructions
1. Default Settings
Upon initial setup or after a factory reset, the lock uses default codes:
- Default Programming Code (PC): 000000
- Default User Code (UC): 1234
The door will automatically lock after 5 seconds when closed. This auto-lock time can be adjusted from 2-99 seconds.
Video Description: An official HIDALIFE programming demonstration for the HL-669K door lock. This video covers restoring default settings, using default codes, and the basic unlocking mechanism.
2. Changing the Programming Code (PC)
The Programming Code is used to manage lock settings. It must be different from the first four numbers of any user code. If not, the programming code cannot be changed.
- Enter the current Programming Code + #. (Wait for 1 green light + 1 beep).
- Press 1 + #. (Wait for 1 green light + 1 beep).
- Enter your New Programming Code (six numbers) + #. (Wait for 1 green light + 1 beep).
Video Description: An official HIDALIFE video demonstrating how to change the programming code on the HL-669K door lock. It outlines the sequence of key presses and expected feedback.
3. Adding User Codes (UC)
You can add up to 20 user codes. User Codes must be different from the first four numbers of the programming code.
- Enter the Programming Code + #. (Wait for 1 green light + 1 beep).
- Press 2 + #. (Wait for 1 green light + 1 beep).
- Enter your New User Code (four numbers) + #. (Wait for 1 green light + 1 beep).
Video Description: An official HIDALIFE video demonstrating how to add a new user code to the HL-669K door lock. It shows the step-by-step process for programming new access codes.

Image Description: An illustration highlighting the ability to manage up to 20 user passcodes for various individuals such as roommates, tenants, family, guests, tutors, and domestic service providers.
4. Deleting User Codes (UC)
If you delete all user codes, the default code 1234 will be reactivated. Entering a deleted code will result in a red light and an error message.
- Enter the Programming Code + #. (Wait for 1 green light + 1 beep).
- Press 3 + #. (Wait for 1 green light + 1 beep).
- Enter the unwanted User Code (four numbers) + #. (Wait for 1 green light + 1 beep).
5. Adding One-Time Codes
One-time codes are valid for a single use and will be invalid afterward. They must be different from any existing user codes.
- Enter the Programming Code + #. (Wait for 1 green light + 1 beep).
- Press 6 + #. (Wait for 1 green light + 1 beep).
- Enter the One-time Code (four numbers) + #. (Wait for 1 green light + 1 beep).
Video Description: An official HIDALIFE video demonstrating how to add a one-time code to the HL-669K door lock. This feature is useful for temporary access.
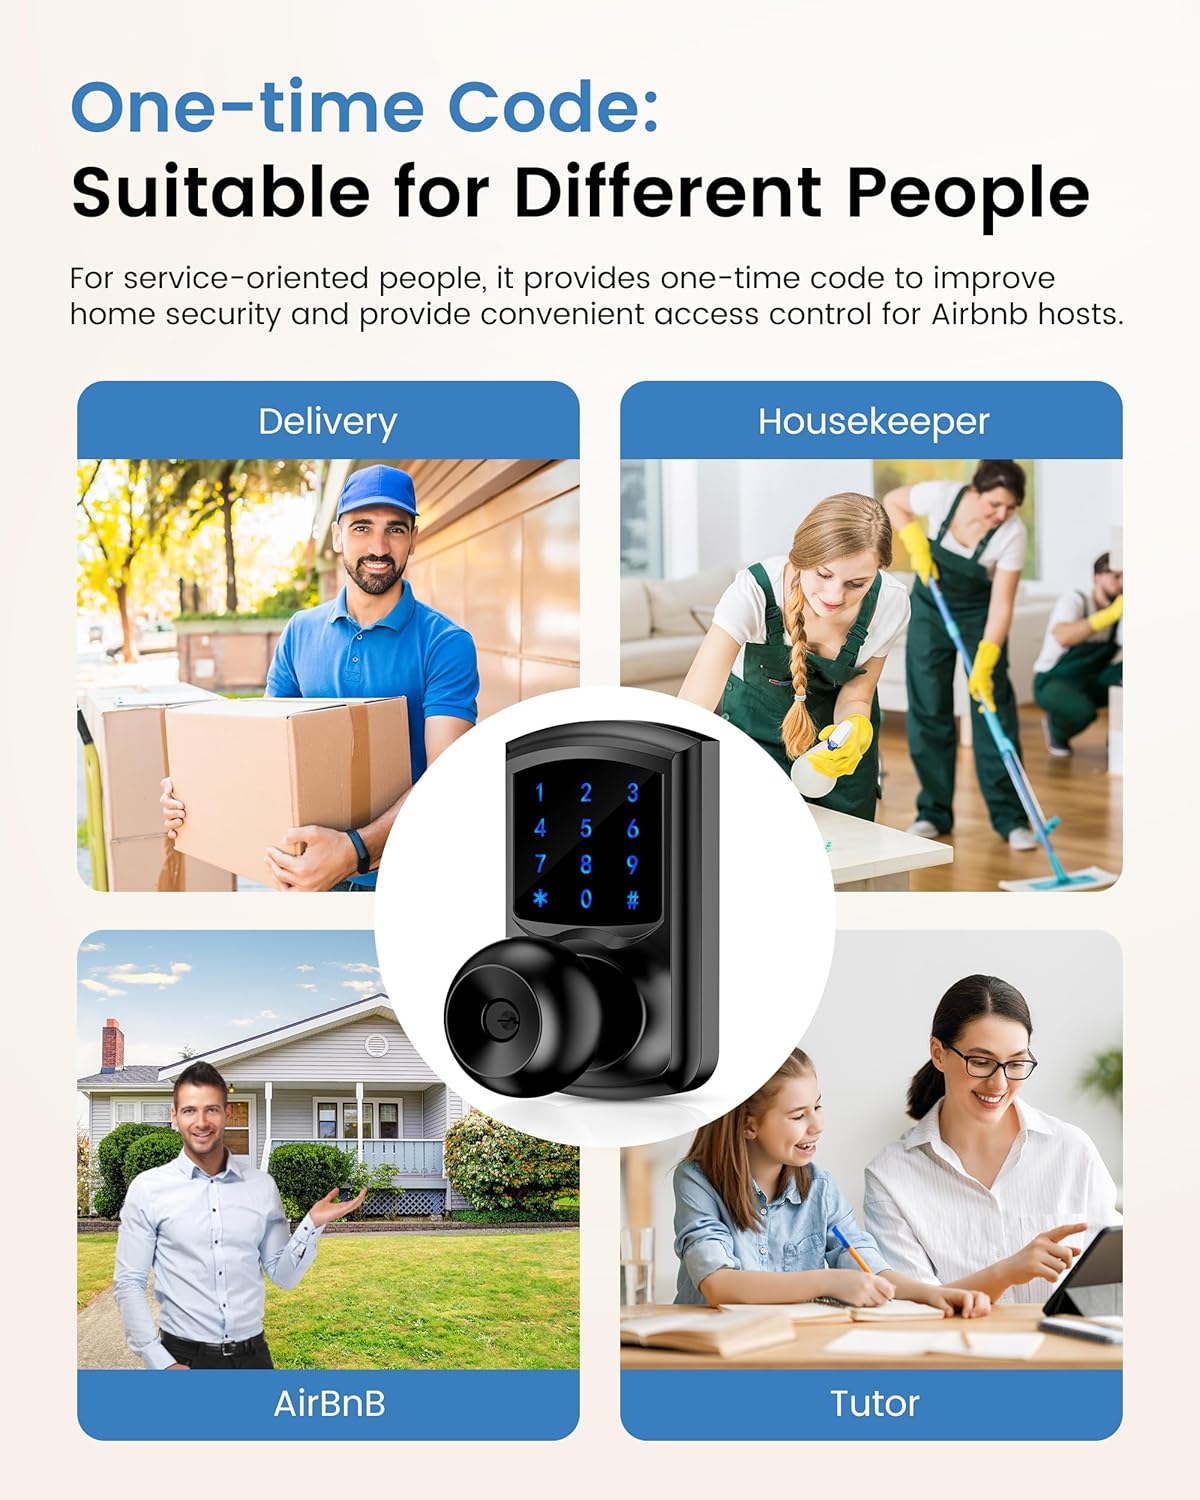
Image Description: A visual representation of how a one-time passcode can be shared via text message for convenient temporary access.
6. Setting Auto-Lock Delay Time (2-99s)
You can adjust the time before the door automatically locks after being opened.
- Enter the Programming Code + #. (Wait for 1 green light + 1 beep).
- Press 7 + #. (Wait for 1 green light + 1 beep).
- Enter the desired delay time (between 2-99 seconds) + #. (Wait for 1 green light + 1 beep).
Video Description: An official HIDALIFE video demonstrating how to set the auto-lock delay time (2-99 seconds) for the HL-669K door lock. This allows customization of how quickly the lock re-engages.

Image Description: A visual illustrating the adjustable auto-lock time feature, allowing users to set the delay from 2 to 99 seconds for convenience, such as when carrying groceries.
7. Enable/Disable Silent Mode
Silent mode disables all beeps and sounds from the lock.
- Enter the Programming Code + #. (Wait for 1 green light + 1 beep).
- Press 4 + #. (Wait for 1 green light + 1 beep).
Video Description: An official HIDALIFE video demonstrating how to enable or disable silent mode on the HL-669K door lock, which controls audible feedback.
8. Passage Mode
Passage mode allows the door to remain unlocked for continuous access without needing a code. This is useful for gatherings or when frequent entry/exit is required.
- Enable Passage Mode: Slide the Auto-lock/Passage Mode switch on the interior assembly to the "ON" position (green indicator).
- Disable Passage Mode: Slide the Auto-lock/Passage Mode switch on the interior assembly to the "OFF" position (red indicator).

Image Description: A visual guide demonstrating how to quickly switch to Passage Mode by toggling the ON/OFF button on the back panel of the lock, eliminating the need for complex programming.
9. Vacation Mode
When vacation mode is set, only the Programming Code (PC) or physical key can unlock the door. User Codes (UC) will not work. To turn off vacation mode, enter the PC code once.
- Enter the Programming Code + #. (Wait for 1 green light + 1 beep).
- Press 5 + #. (Wait for 1 green light + 1 beep).

Image Description: An image illustrating the "Vacation Mode" feature, which disables user codes and allows only the administrator code or mechanical keys to unlock the door, enhancing security while away.
10. Anti-Peeping Password
To prevent others from guessing your code, you can enter random digits before or after your actual code. The lock will still open as long as the correct code sequence is embedded within the longer entry.

Image Description: A diagram explaining the Anti-Peep Password feature, where random digits can be entered before and after the correct password to obscure it from onlookers, enhancing privacy and security.
Maintenance
1. Battery Replacement
The lock will beep 10 times after unlocking to remind you to replace the batteries when they are low. Replace all four AA batteries promptly to ensure continuous operation.

Image Description: A visual indicating the low-power alarming feature, where the lock beeps to alert users when batteries need replacement. It also highlights the touchscreen keypad's features like larger key spacing and visibility in low light.
2. Cleaning
Clean the lock's exterior with a soft, damp cloth. Avoid abrasive cleaners or solvents that could damage the finish or electronic components.
Troubleshooting
- Lock not responding: Check battery levels. Replace batteries if low.
- Code not working: Ensure you are entering the correct code. If all user codes were deleted, the default code (1234) is reactivated.
- Door not locking/unlocking: Verify the latch is installed correctly and not obstructed. Check the Passage Mode switch on the interior assembly.
- Keypad not lighting up: Tap the keypad to wake it up. If it still doesn't light up, check battery connections.
Specifications
| Feature | Detail |
|---|---|
| Brand | HIDALIFE |
| Model Name | HL-669K |
| Lock Type | Keypad |
| Material | Zinc |
| Color | Matte Black |
| Control Method | Touch |
| Special Features | Anti-Bump, Anti-Peeping Password, Auto-Lock, One-Touch Lock, Touchscreen |
| Item Dimensions (L x W x H) | 7.5 x 3.46 x 8.38 inches |
| Item Weight | 3.08 pounds (1.4 Kilograms) |
| Power Source | 4 AA Batteries (not included) |
| User Codes Supported | Up to 20 |
| Auto-Lock Delay | Adjustable 2-99 seconds |
Warranty and Support
For technical assistance, warranty inquiries, or any questions regarding your HIDALIFE HL-669K Keyless Entry Door Lock, please contact our support team:
Email: support@hidalife.com
When contacting support, please provide your order number for faster service.


