Introduction
Thank you for choosing the SMALLRIG RF10C Photography Flashlight and RA-S200 Light Stand bundle. This manual provides detailed instructions for the proper setup, operation, and maintenance of your new photography equipment. Please read this manual thoroughly before use to ensure optimal performance and longevity of your products.
Package Contents
The SMALLRIG RF10C Photography Flashlight and RA-S200 Light Stand bundle includes the following items:
- 1 x SMALLRIG RF10C Photography Flashlight
- 1 x SMALLRIG RA-S200 Light Stand
- 1 x Metal Ball Head (for RA-S200)
- 1 x Carry Bag (for RA-S200)
Setup
1. Unpacking
Carefully remove all components from the packaging. Inspect all items for any signs of damage. If any components are missing or damaged, please contact customer support.
2. Assembling the RA-S200 Light Stand

Figure 1: SMALLRIG RA-S200 Light Stand components. The RA-S200 Light Stand is shown alongside its convenient carry bag and the detachable metal ball head, highlighting the portability and key accessories.
- Place the RA-S200 Light Stand on a flat, stable surface.
- Gently spread the legs of the stand outwards until they are fully extended and locked into place. The twisting lock mechanism at the base ensures stability.
- Extend the telescopic sections of the stand upwards by releasing the flip locks on each section. Extend one section at a time, then secure the flip lock firmly before extending the next.
- Attach the metal ball head to the 1/4"-20 adapter at the top of the light stand by screwing it clockwise until secure.

Figure 2: Close-up of locking mechanisms. Close-up views of the RA-S200 Light Stand's locking mechanisms: the efficient On/Off Flip Lock for quick height adjustments and the firm and reliable Twisting Lock Mechanism for securing the leg spread.
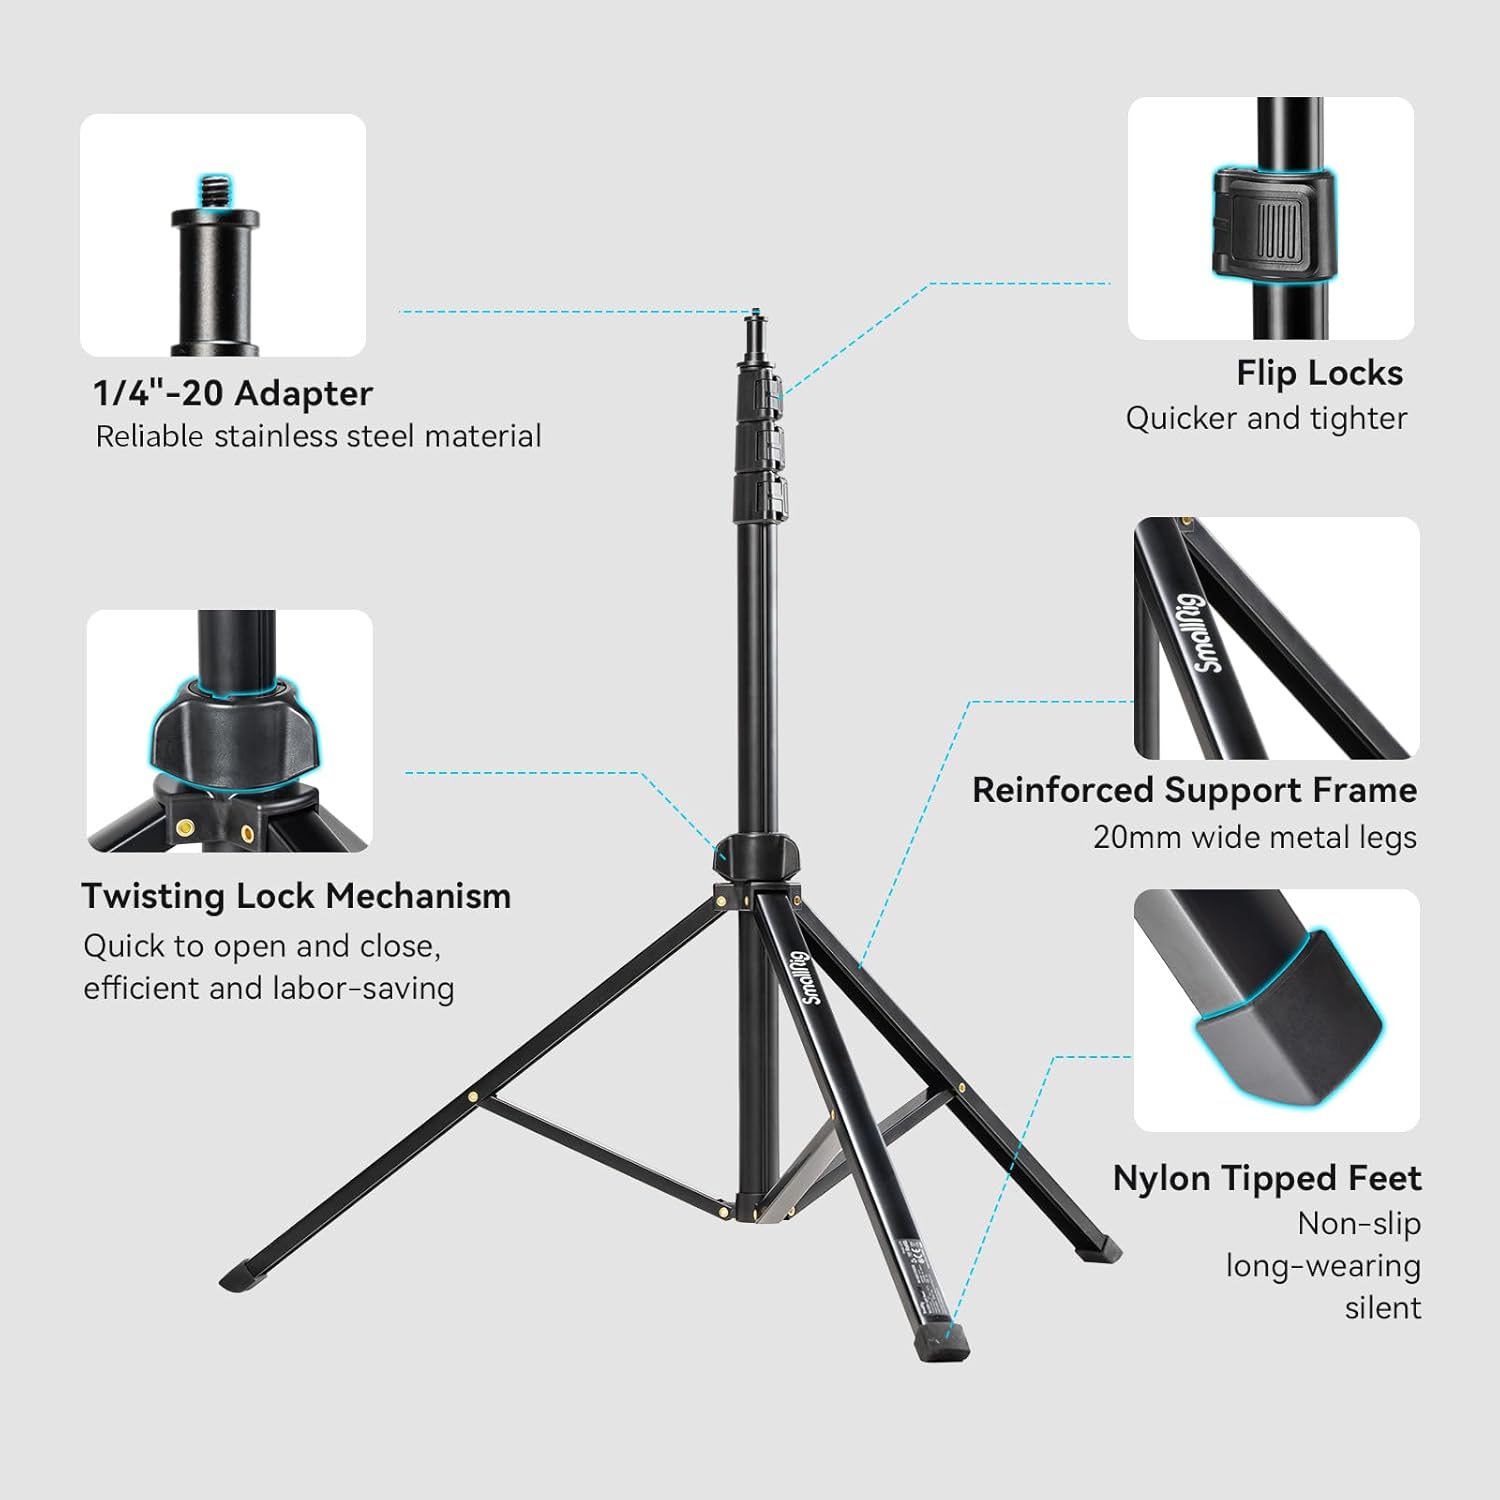
Figure 3: RA-S200 Light Stand features. This detailed diagram highlights key features of the RA-S200 Light Stand, including the 1/4"-20 adapter, efficient flip locks, twisting lock mechanism, reinforced support frame with 20mm wide metal legs, and non-slip nylon tipped feet.
3. Attaching the RF10C Photography Flashlight

Figure 4: RF10C Flashlight mounted on RA-S200 Light Stand. This image displays the complete SMALLRIG bundle, featuring the RF10C Photography Flashlight securely attached to the top of the RA-S200 Light Stand, ready for use.
The RF10C Photography Flashlight can be mounted directly onto the metal ball head's 1/4"-20 screw. Ensure the flashlight is securely tightened to prevent accidental detachment.
Operating Instructions
1. Adjusting Stand Height

Figure 5: Adjustable height range of RA-S200 Light Stand. This diagram visually demonstrates the adjustable height range of the RA-S200 Light Stand, from a compact 56cm (22in) folded length to an extended 200cm (79in). It also indicates a maximum load capacity of 4kg (8.8lbs).
To adjust the height of the RA-S200 Light Stand, release the flip locks on the desired telescopic sections. Carefully extend or retract the sections to the desired height (ranging from 56cm to 200cm). Once the desired height is achieved, firmly secure all flip locks to prevent the stand from collapsing.
2. Using the Metal Ball Head

Figure 6: Versatility with metal ball head. This image illustrates the versatility of the RA-S200 Light Stand, showcasing its compatibility with various photography accessories like video lights, softboxes, ring lights, and reflectors, thanks to its stainless steel 1/4"-20 thread adapter and metal ball head.
The included metal ball head allows for flexible positioning of your RF10C Flashlight or other compatible accessories. Loosen the knob on the ball head to adjust the angle, then tighten it firmly to lock the position. Ensure any attached equipment does not exceed the stand's maximum load capacity of 4kg (8.8lbs).
3. Operating the RF10C Photography Flashlight
Refer to the separate user manual provided with the SMALLRIG RF10C Photography Flashlight for detailed instructions on its power functions, brightness adjustments, and mode selections. Ensure the flashlight is fully charged before use for optimal performance.
Maintenance
To ensure the longevity and proper functioning of your SMALLRIG equipment, follow these maintenance guidelines:
- Cleaning: Wipe down the light stand and flashlight with a soft, dry cloth after each use to remove dust and dirt. For stubborn grime, a slightly damp cloth can be used, followed by immediate drying. Do not use harsh chemicals or abrasive cleaners.
- Storage: When not in use, collapse the RA-S200 Light Stand to its folded length (56cm/22in) and store it in its carry bag in a cool, dry place away from direct sunlight and extreme temperatures.
- Inspection: Periodically check all locking mechanisms, screws, and joints for tightness and wear. Tighten any loose parts and replace any worn components if necessary.
Troubleshooting
If you encounter any issues with your SMALLRIG RF10C Photography Flashlight and RA-S200 Light Stand, please refer to the following common troubleshooting steps:
- Light Stand Instability: Ensure all leg sections are fully extended and the twisting lock mechanism at the base is securely tightened. Verify that the load on the stand does not exceed the maximum capacity of 4kg (8.8lbs).
- Difficulty Adjusting Height: Check that the flip locks are fully disengaged before attempting to adjust the telescopic sections. If stiff, apply a small amount of silicone lubricant to the moving parts.
- Flashlight Not Powering On: Ensure the RF10C Flashlight is fully charged. Refer to the flashlight's specific manual for power-on procedures and battery indicators.
- Accessory Not Secure on Ball Head: Ensure the 1/4"-20 screw is fully tightened into the accessory and the ball head's locking knob is firmly secured.
If problems persist after attempting these steps, please contact SMALLRIG customer support for further assistance.
Specifications

Figure 7: RA-S200 Light Stand detailed parameters. This diagram provides specific dimensions for the RA-S200 Light Stand, including the diameters of its telescopic poles (Ø16mm, Ø19mm, Ø22mm, Ø25mm), its total weight of 1kg (2.2lbs), and a base diameter of 2ft (60cm).
| Feature | Specification |
|---|---|
| Product Name | SMALLRIG RF10C Photography Flashlight and RA-S200 Light Stand Bundle |
| Model Numbers | RF10C, RA-S200 |
| RA-S200 Adjustable Height | 56cm - 200cm (22in - 79in) |
| RA-S200 Folded Length | 56cm (22in) |
| RA-S200 Max Load Capacity | 4kg (8.8lbs) |
| RA-S200 Weight | 1kg (2.2lbs) |
| RA-S200 Base Diameter | 60cm (2ft) |
| RA-S200 Pole Diameters | Ø16mm, Ø19mm, Ø22mm, Ø25mm |
| Mounting Thread | 1/4"-20 (stainless steel adapter) |
| Date First Available | January 2, 2025 |
Warranty and Support
SMALLRIG products are designed and manufactured to high-quality standards. For information regarding warranty coverage, technical support, or service inquiries, please visit the official SMALLRIG website or contact their customer service department directly. Please retain your proof of purchase for warranty claims.


