
GIGABYTE B860 DS3H
Contents
GIGABYTE B860 DS3H Motherboard User Manual
Model: B860 DS3H
Introduction
This manual provides detailed instructions for the installation, operation, maintenance, and troubleshooting of your GIGABYTE B860 DS3H Motherboard. Designed to support Intel Core Ultra CPUs, this motherboard features advanced technologies such as Hybrid 8+1+2+2 Phases 50A PPAK VRM, Dual Channel DDR5 memory, PCIe 5.0 x16, and M.2 Gen5 support. Please read this manual thoroughly before proceeding with installation to ensure proper setup and optimal performance.
1. Setup and Installation
Proper installation is crucial for the stability and performance of your system. Always ensure your system is powered off and unplugged before handling components.
1.1 Unboxing and Inspection
Carefully remove the motherboard from its packaging. Inspect for any visible damage during transit. Ensure all accessories listed in the package contents are present.

Image 1.1: The GIGABYTE B860 DS3H Motherboard alongside its retail packaging, showcasing the product and its branding.
1.2 Installing the CPU
The GIGABYTE B860 DS3H Motherboard uses an LGA 1851 socket. Follow these steps to install your Intel Core Ultra CPU:
- Locate the CPU socket on the motherboard.
- Gently push down the load lever and pull it to the side to open the CPU socket cover.
- Align the triangular mark on the CPU with the mark on the socket.
- Carefully place the CPU into the socket without forcing it.
- Close the load plate and push the load lever back into place until it clicks.

Image 1.2: A detailed top-down view of the GIGABYTE B860 DS3H Motherboard, highlighting the CPU socket, RAM slots, and PCIe slots.
1.3 Installing DDR5 Memory
This motherboard supports Dual Channel DDR5 memory across four DIMM slots. For optimal performance, install memory modules in matched pairs.
- Open the clips at both ends of the DIMM slot.
- Align the notch on the DDR5 memory module with the key in the DIMM slot.
- Insert the memory module firmly into the slot until the clips snap into place.
1.4 Installing M.2 SSDs
The motherboard features M.2 Gen5 slots with EZ-Latch Plus for easy installation.
- Locate the M.2 slots on the motherboard.
- Remove the M.2 heatsink if present.
- Insert the M.2 SSD into the slot at a slight angle.
- Gently push down the SSD and secure it with the EZ-Latch mechanism or a screw.
- Reattach the M.2 heatsink for thermal management.
1.5 Installing Expansion Cards (PCIe)
The motherboard includes a PCIe 5.0 x16 slot with PCIE UD Slot & EZ-Latch for graphics cards and other expansion cards.
- Align the expansion card with the desired PCIe slot.
- Press down firmly until the card is fully seated in the slot and the retention clip locks.
- Secure the card to the chassis with a screw.
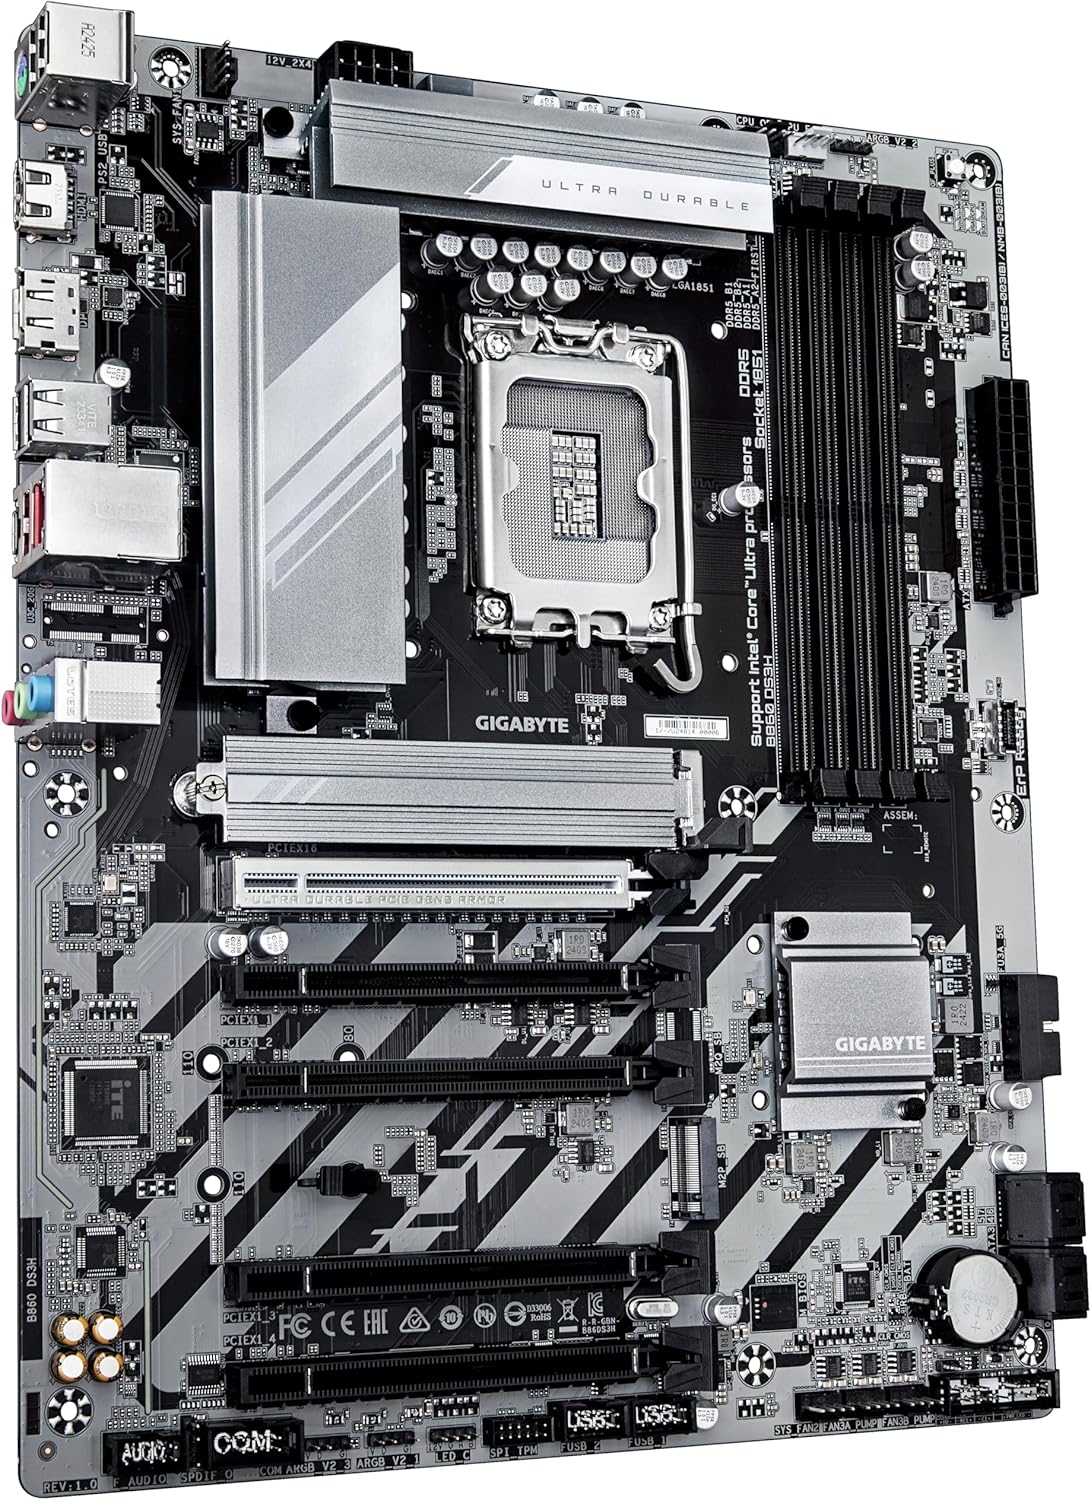
Image 1.3: An angled perspective of the GIGABYTE B860 DS3H Motherboard, providing a clearer view of the various ports and components, including the VRM heatsinks and PCIe slots.
1.6 Connecting Power Supply
Connect the 24-pin ATX main power connector and the 8-pin CPU power connector from your power supply to the corresponding ports on the motherboard.
1.7 Connecting Front Panel Connectors
Connect the power button, reset button, HDD LED, power LED, and front panel USB/audio connectors to their respective headers on the motherboard. Refer to the motherboard's silkscreen labels for correct pin alignment.

Image 1.4: A close-up view of the rear I/O panel of the GIGABYTE B860 DS3H Motherboard, showing various USB ports, LAN port, and audio jacks.
2. Operating Instructions
Once all components are installed, you can proceed with initial system boot-up and configuration.
2.1 Initial Boot-Up
After connecting all necessary peripherals (monitor, keyboard, mouse) and power, press the power button on your PC case. The system should power on and display the GIGABYTE splash screen.
2.2 BIOS/UEFI Setup
To enter the BIOS/UEFI setup utility, press the DEL key repeatedly during the initial boot-up sequence. In the BIOS/UEFI, you can configure boot order, system time, fan speeds, and other advanced settings.
- Boot Order: Set the primary boot device (e.g., USB drive for OS installation, or your SSD/HDD).
- XMP Profile: Enable XMP for your DDR5 memory to run at its advertised speeds (up to 9066MHz).
- Q-Flash Plus: Utilize Q-Flash Plus for convenient BIOS updates without installing a CPU, memory, or graphics card.
2.3 Operating System Installation
Insert your Windows 10 or Windows 11 installation media (USB drive or DVD) and follow the on-screen prompts to install your preferred operating system.
2.4 Driver Installation
After OS installation, install the necessary drivers for your motherboard components. These typically include chipset drivers, LAN drivers (for 2.5GbE LAN), audio drivers, and USB 3.2 Gen2x2 drivers. Drivers can be found on the GIGABYTE support website for your specific model.
3. Maintenance
Regular maintenance helps ensure the longevity and stable operation of your motherboard.
3.1 Cleaning
Periodically clean dust from your PC case and motherboard components using compressed air. Ensure the system is powered off and unplugged before cleaning.
3.2 BIOS Updates
GIGABYTE regularly releases BIOS updates to improve compatibility, stability, and performance. Check the official GIGABYTE website for the latest BIOS version for your B860 DS3H motherboard. Use the Q-Flash Plus utility for safe and easy updates.
4. Troubleshooting
This section addresses common issues you might encounter.
4.1 No Display Output
- Check if the monitor is properly connected and powered on.
- Ensure the graphics card (if dedicated) is fully seated in its PCIe slot and has adequate power.
- Verify that RAM modules are correctly installed in their slots.
- Try clearing the CMOS (refer to motherboard manual for specific jumper/button location).
4.2 System Instability or Crashes
- Ensure all power connectors are securely attached.
- Check CPU and GPU temperatures to prevent overheating.
- Verify that RAM is compatible and running at stable speeds. Disable XMP if instability persists.
- Update BIOS and all relevant drivers to the latest versions.
4.3 Peripherals Not Detected
- Try connecting the peripheral to a different USB port.
- Ensure USB drivers are installed.
- Check BIOS settings for USB port enablement.
5. Specifications
Key technical specifications for the GIGABYTE B860 DS3H Motherboard:
| Feature | Specification |
|---|---|
| Brand | GIGABYTE |
| Model Name | B860 DS3H |
| CPU Socket | LGA 1851 |
| Compatible Processors | Intel Core Ultra CPUs (Series 1) |
| Chipset Type | Intel B860 |
| RAM Memory Technology | DDR5 |
| Memory Speed | Up to 9066 MHz |
| Memory Slots | 4 x DIMM (Dual Channel) |
| Max Memory Capacity | 256 GB |
| PCIe Slots | 1x PCIe 5.0 x16, 1x PCIe 4.0 x16 (x4 mode) |
| M.2 Slots | M.2 Gen5 (Up to 25110) |
| LAN | 2.5GbE LAN |
| USB | USB 3.2 Gen2x2 Type-C, USB 3.2 Gen2, USB 3.2 Gen1, USB 2.0 |
| VRM | Hybrid 8+1+2+2 Phases 50A PPAK VRM |
| Dimensions (LxWxH) | 9.61 x 12.01 x 1.38 inches |
| Weight | 2.95 pounds |
| Platform Support | Windows 10, Windows 11 |
6. Warranty and Support
GIGABYTE products are designed for reliability and performance. For specific warranty terms and conditions, please refer to the warranty card included with your product or visit the official GIGABYTE website.
For technical support, driver downloads, and BIOS updates, please visit the official GIGABYTE support page:
You may also contact GIGABYTE customer service for further assistance.
Ask a question about this manual
Ask about setup, troubleshooting, compatibility, parts, safety, or missing instructions. Manuals+ will review the question and use this page’s manual context to help answer it.