
1. Introduction
The Proster RJ45 Crimp Tool Kit, Model NSS-468, is a comprehensive solution for network and telephone cable management. This 3-in-1 tool is designed for cutting, stripping, and crimping 8P CAT5, CAT5e, CAT6 Ethernet cables, and 6P RJ11, RJ12 telephone cables. The kit also includes a cable tester for verifying connection continuity, 50 gold-plated CAT6 connectors, 50 protectors, 5 spare blades, and a mini wire stripper.
This manual provides detailed instructions for the proper use, maintenance, and troubleshooting of your Proster RJ45 Crimp Tool Kit.
2. Safety Information
- Always handle the crimp tool and blades with care to prevent injury. The cutting blades are sharp.
- Keep the tool out of reach of children.
- Do not use the tool on live electrical wires. Ensure all cables are disconnected from power sources before working.
- Wear appropriate personal protective equipment, such as safety glasses, when cutting or stripping cables.
- The cable tester requires batteries (not included). Ensure correct battery polarity when inserting.
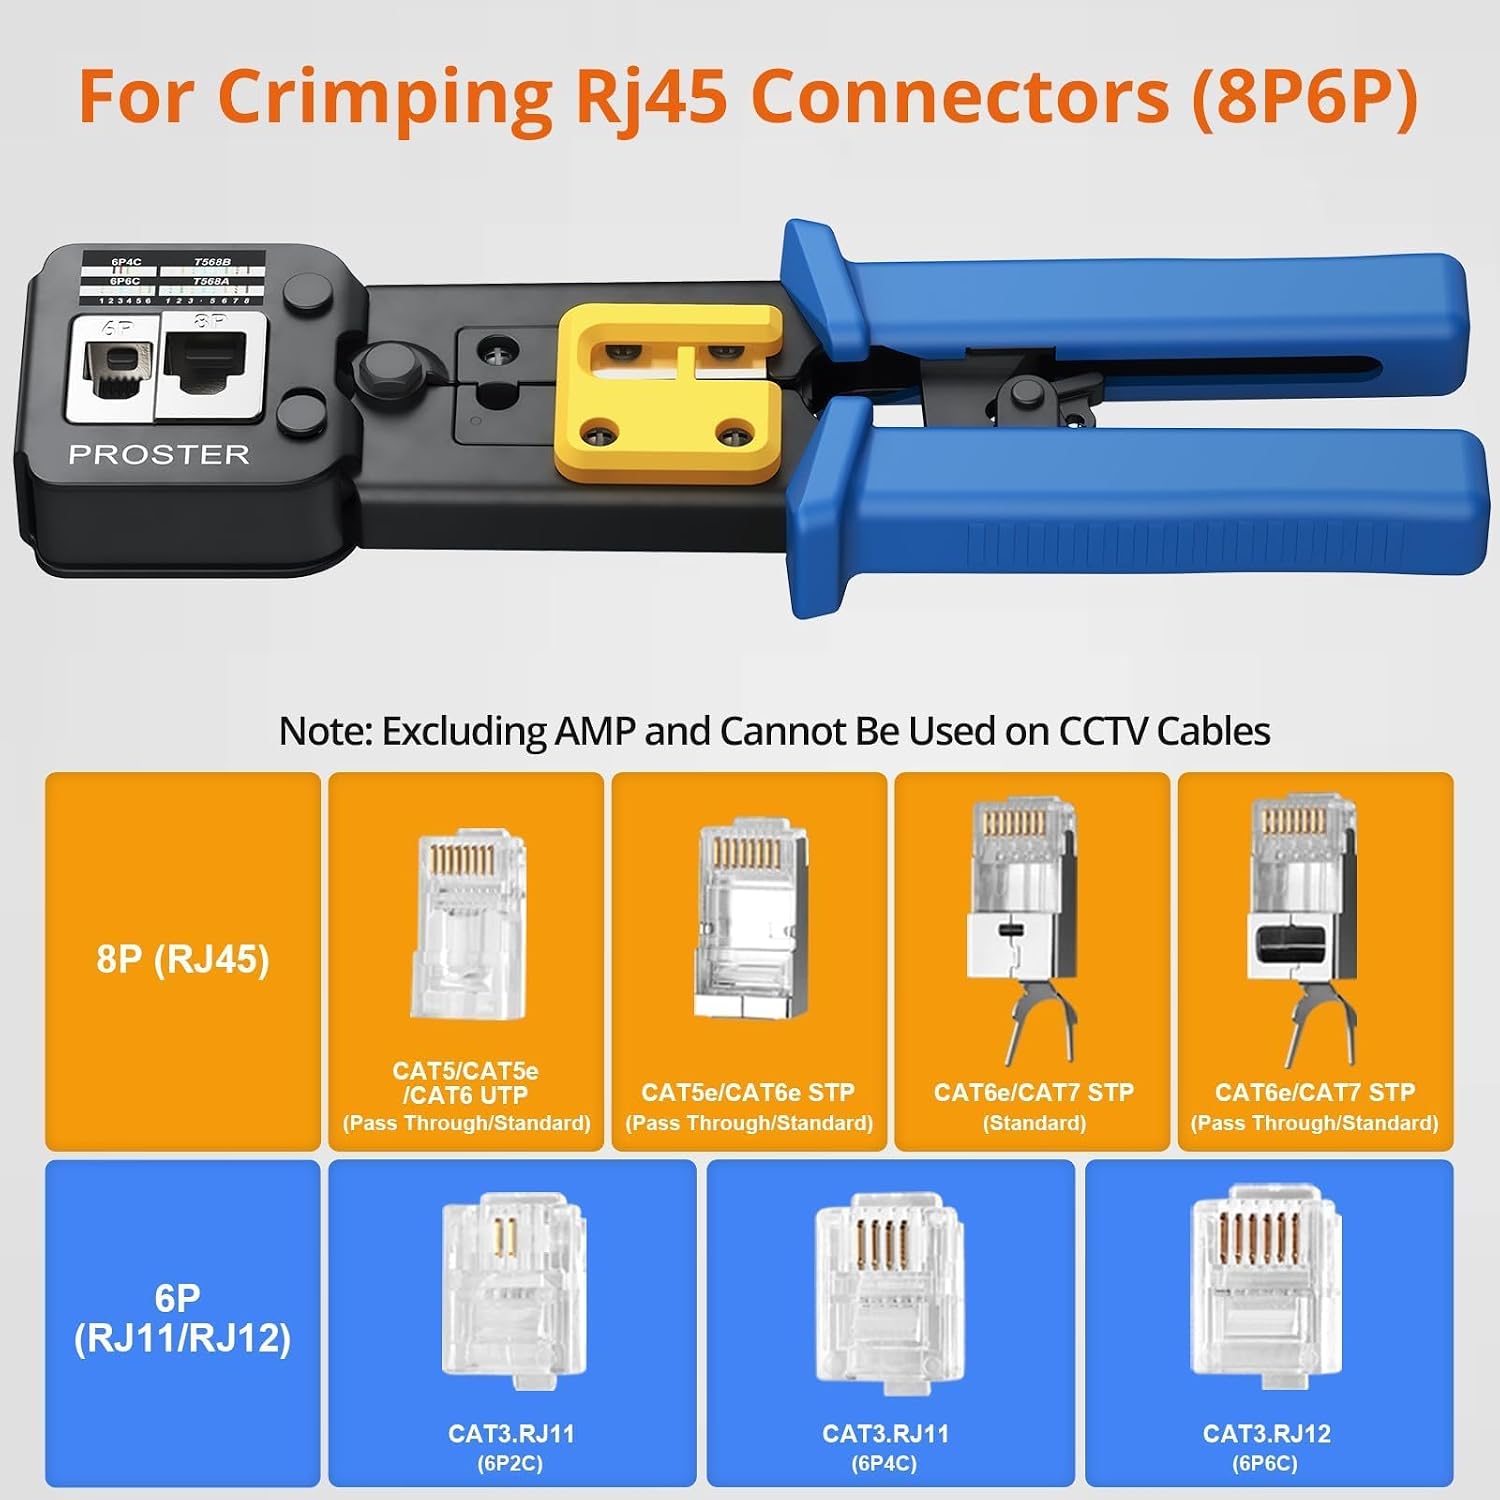
- This tool is not designed for use with AMP connectors or CCTV cables.
3. Package Contents
Verify that all items listed below are present in your kit:
- 1 x RJ45 Crimp Tool
- 1 x Cable Tester (requires AA batteries, not included)
- 50 x Gold-Plated CAT6 Pass-Through Connectors
- 50 x RJ45 Connector Protectors (Boots)
- 5 x Spare Blades for Crimp Tool
- 1 x Mini Wire Stripper

4. Components Overview
The Proster RJ45 Crimp Tool features a 3-in-1 design for versatility and efficiency. Key components include:
- Cable Cutter: For precise cutting of network and telephone cables.
- Round Cable Stripper: For removing the outer jacket of round cables.
- Flat Cable Stripper: For removing the outer jacket of flat cables.
- 8P RJ45 Crimp Cavity: For crimping 8-position RJ45 connectors (CAT5, CAT5e, CAT6).
- 6P RJ11/12 Crimp Cavity: For crimping 6-position RJ11/RJ12 telephone connectors.
- Rachet Mechanism with Quick Release: Ensures a complete crimp cycle and allows for easy release.
- Ergonomically Designed Handle: Provides a comfortable, non-slip grip for reduced fatigue during use.

The included gold-plated CAT6 connectors feature a pass-through design for simplified wire insertion and trimming, enhancing signal transmission stability and oxidation resistance.

5. Operating Instructions
This section details the steps for preparing cables, crimping connectors, and testing network cables.
5.1. Cable Preparation (Cutting and Stripping)
- Cut the Cable: Use the integrated cable cutter on the crimp tool to cut the network cable to the desired length. Ensure a clean, straight cut.
- Strip the Outer Jacket:
- For round cables, insert the cable into the round cable stripper slot and rotate the tool around the cable to score the jacket.
- For flat cables, use the flat cable stripper slot.
- Untwist and Straighten Wires: Untwist the individual wire pairs and straighten them out. Arrange the wires according to the desired wiring standard (e.g., T568A or T568B).

5.2. Crimping RJ45/RJ11/RJ12 Connectors
The crimp tool supports both 8-position RJ45 (CAT5/5e/6) and 6-position RJ11/RJ12 connectors.
- Insert Wires into Connector: Carefully insert the straightened and ordered wires into the pass-through connector. Push them all the way through until the cable jacket is seated firmly inside the connector body, and the individual wires extend slightly beyond the front of the connector.
- Insert Connector into Crimp Tool: Place the prepared connector into the appropriate crimp cavity (8P for RJ45, 6P for RJ11/RJ12) on the crimp tool. Ensure the connector is fully seated.
- Crimp the Connector: Squeeze the handles of the crimp tool firmly and completely until the ratchet mechanism releases. This action simultaneously presses the pins into the wires and trims the excess wire ends extending from the front of the pass-through connector.
- Inspect the Crimp: After crimping, remove the connector and visually inspect it. Ensure all pins are fully seated, the wires are correctly aligned, and the cable jacket is securely held by the connector's strain relief.
5.3. Using the Cable Tester
The cable tester verifies the continuity and correct wiring of RJ11 and RJ45 cables.
- Install Batteries: Open the battery compartment on the cable tester and insert the required AA batteries (not included), observing correct polarity.
- Connect Cable: Plug one end of the crimped network or telephone cable into the main unit's RJ45 or RJ11 port, and the other end into the remote unit's corresponding port.
- Power On: Slide the power switch to the 'ON' position.
- Observe Indicators: The indicator lights on both the main and remote units will light up sequentially, corresponding to each wire pair. If the cable is correctly wired and has continuity, the lights will illuminate in the same order on both units. Any discrepancy (e.g., a light not illuminating, or illuminating out of sequence) indicates a wiring fault or break in that specific wire.
- Shield Test: If testing shielded cables, observe the 'G' (Ground/Shield) indicator.

6. Maintenance
- Cleaning: Regularly clean the crimp tool and cable tester with a dry, soft cloth. Avoid using abrasive cleaners or solvents.
- Blade Replacement: The crimp tool includes 5 spare blades. If the cutting or stripping blades become dull, they can be replaced. Refer to the diagram on the tool for blade removal and installation. Ensure the tool is clean and free of debris before replacing blades.
- Storage: Store the kit in a dry, cool place, away from direct sunlight and moisture, to prolong its lifespan.
- Battery Care (Cable Tester): Remove batteries from the cable tester if it will not be used for an extended period to prevent leakage.
7. Troubleshooting
- Problem: Wires are not fully crimped or fall out of the connector.
Solution: Ensure the connector is fully seated in the crimp cavity. Squeeze the tool handles completely until the ratchet mechanism releases. Verify that the wires are pushed all the way to the front of the pass-through connector before crimping. - Problem: Cable tester lights do not illuminate or show incorrect sequence.
Solution: Check if batteries are correctly installed and have sufficient charge. Ensure the cable is properly connected to both the main and remote units. Re-crimp the connectors if necessary, ensuring correct wire order and full pin contact. - Problem: Cable jacket is not stripped cleanly.
Solution: Ensure the cable is correctly positioned in the stripper slot. Adjust pressure if possible, or replace the stripping blade if it is dull. - Problem: Excess wires are not trimmed cleanly after crimping.
Solution: Ensure the pass-through connector is fully inserted into the crimp cavity. The trimming blade might be dull and require replacement.
8. Specifications
| Feature | Detail |
|---|---|
| Brand | Proster |
| Model | NSS-468 |
| Item Number | PST-PST286 |
| Tool Functions | Cutting, Stripping (Round & Flat), Crimping (8P, 6P) |
| Compatible Connectors | RJ45 (CAT5, CAT5e, CAT6, CAT6a), RJ11, RJ12 |
| Handle Material | Rubber, Plastic |
| Grip Type | Ergonomic |
| Cable Tester Power | AA Batteries (not included) |
| Included Connectors | 50 Gold-Plated CAT6 Pass-Through |
| Specific Uses | Home, Office, Network Cable Management, DIY, IT |
9. Warranty and Support
For warranty information, technical support, or service inquiries, please refer to the product packaging or contact Proster customer service directly. Contact details can typically be found on the manufacturer's official website or through your point of purchase.

