1. Introduction
The AOOSTAR GEM12 MAX is a high-performance mini PC designed for demanding tasks, including gaming, content creation, and professional applications. Powered by the AMD Ryzen 7 8845HS processor, it offers robust computing power in a compact form factor. This manual provides essential information for setting up, operating, maintaining, and troubleshooting your GEM12 MAX Mini PC.
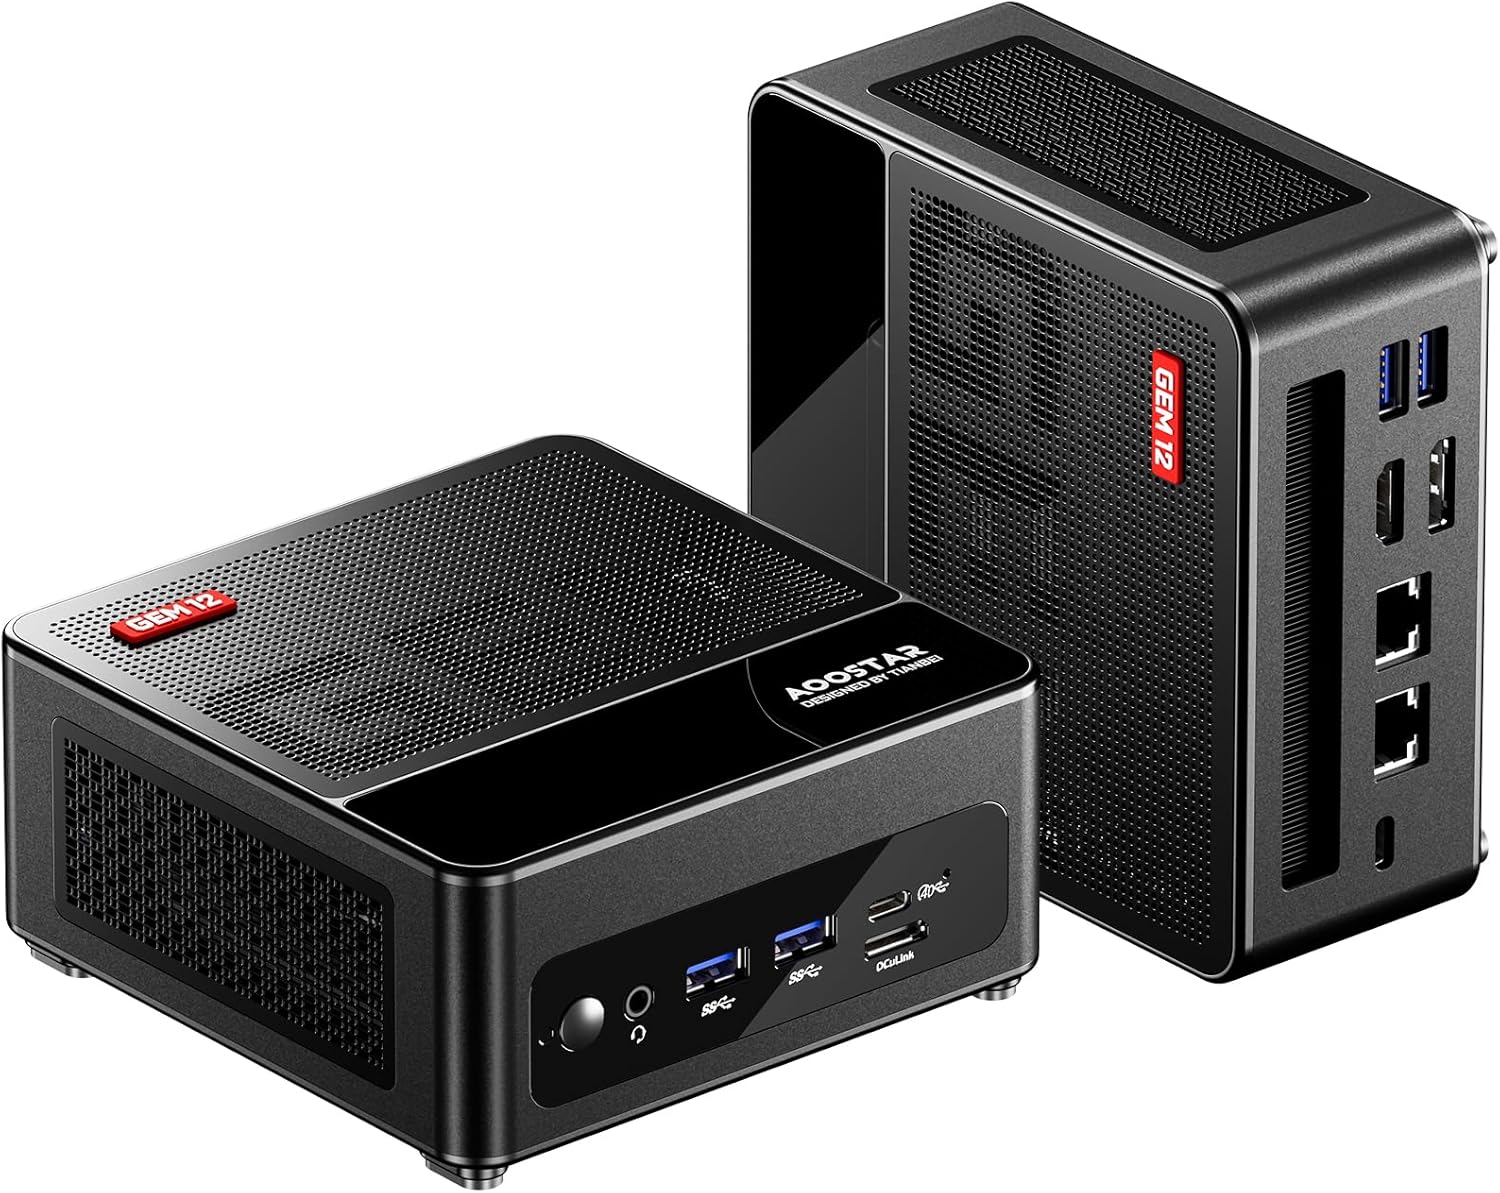
Figure 1.1: AOOSTAR GEM12 MAX Mini PC. This image displays the compact design of the mini PC from both front and side angles, highlighting its sleek black finish and ventilation grilles.
2. Package Contents
Please check the package contents upon unboxing to ensure all items are present:
- 1 x AOOSTAR GEM12 8845HS Mini PC (Note: This model comes without pre-installed RAM or SSD)
- 1 x VESA mount
- 1 x Mounting screw set
- 1 x Power supply (120W 19V 6.32A Type-C)
- 1 x HDMI cable
- 1 x SSD Cooling Pad
3. Key Features
The AOOSTAR GEM12 MAX Mini PC is equipped with advanced components to deliver exceptional performance:
- Processor: AMD Ryzen 7 8845HS (8 Cores / 16 Threads, up to 5.1 GHz) with 16 TOPS NPU AI Engine.
- Memory: Dual-channel DDR5 5600MHz support (expandable up to 64GB).
- Storage: Dual-channel M.2 2280 NVMe PCIe4.0x4 SSD slots (expandable up to 8TB).
- Graphics: Integrated AMD Radeon 780M (RDNA3 architecture).
- OCuLink Port: Dedicated 64 Gbps OCuLink port for external GPU solutions, offering superior bandwidth compared to USB4.
- Connectivity: Dual USB4, Dual USB3.2 Gen2, Dual USB2.0, HDMI 2.1, DisplayPort 1.4, Dual 2.5G LAN, Wi-Fi 6, Bluetooth 5.2.
- Display Support: Supports up to four 4K@60Hz displays simultaneously.
- Cooling: Vapor Chamber + CPU fan dual cooling system with large cooling holes.
- BIOS Modes: Three adjustable BIOS modes (Silent, Balanced, Performance) for power management up to 75W TDP.

Figure 3.1: Key Features Overview. This graphic summarizes the main specifications including the AMD Ryzen 8845HS processor, RDNA3 GPU, OCuLink support, DDR5 RAM, PCIe 4.0 SSD slots, 2.5G LAN, and various display outputs.
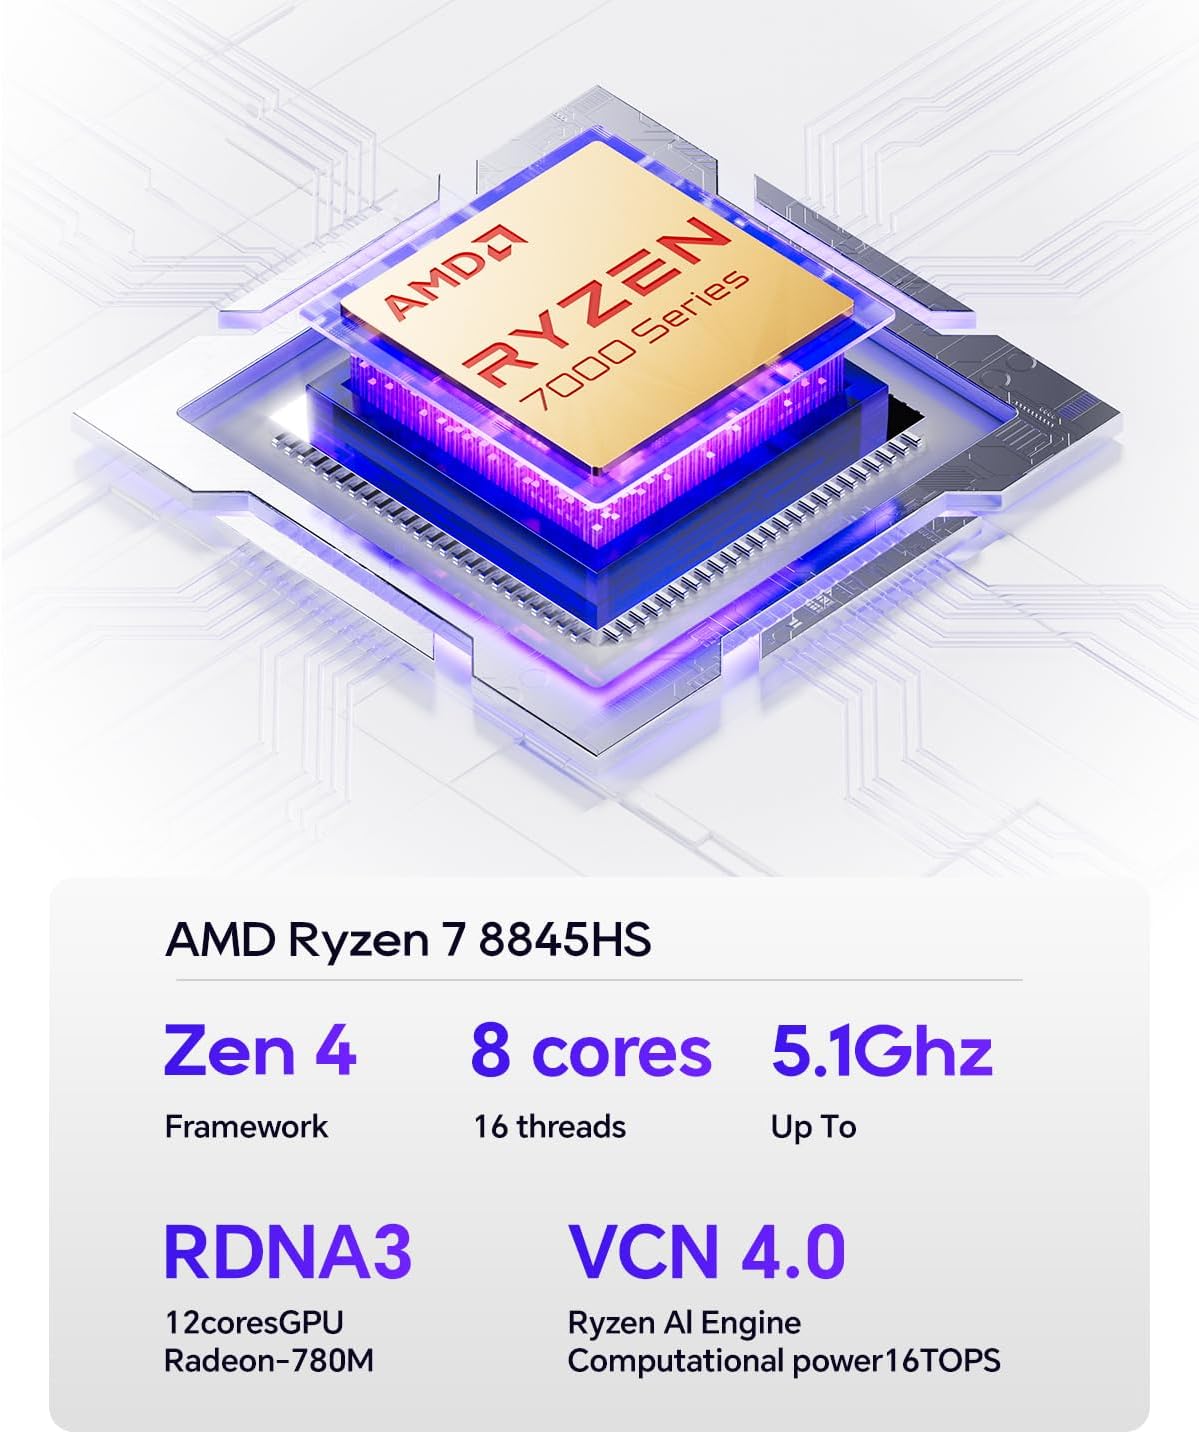
Figure 3.2: AMD Ryzen 7 8845HS Processor. This image highlights the specifications of the AMD Ryzen 7 8845HS CPU, including its Zen 4 framework, 8 cores, 16 threads, up to 5.1GHz clock speed, RDNA3 12-core GPU, and VCN 4.0 Ryzen AI Engine with 16 TOPS computational power.

Figure 3.3: AMD Radeon 780M Graphics. This graphic illustrates the performance improvement of the AMD Radeon 780M GPU, noting its 2800MHz frequency, 12CU computing unit, and RDNA 3 framework, with a 50% performance increase over the previous generation.

Figure 3.4: DDR5 5600MHz Memory. This image emphasizes the high speed of DDR5 5600MHz dual-channel memory, supporting up to 64GB, and shows a 33% speed increase compared to DDR4 3600MHz.

Figure 3.5: Advanced Network Connectivity. This image highlights the dual 2.5G LAN ports, Wi-Fi 6, and Bluetooth 5.2, ensuring fast and stable network connections for the mini PC.
4. Setup Guide
4.1 Installing RAM and SSD
The AOOSTAR GEM12 MAX is shipped without pre-installed RAM or SSD. Follow these steps to install them:
- Carefully open the mini PC chassis. Refer to the product's official support page or included quick start guide for specific instructions on opening the case.
- Locate the DDR5 RAM slots and M.2 2280 NVMe PCIe4.0x4 SSD slots on the motherboard.
- Insert the DDR5 RAM modules into the slots, ensuring they are properly seated and the clips lock into place.
- Insert the M.2 SSDs into their respective slots. Secure them with the provided screws or retention clips. Apply the SSD Cooling Pad if included.
- Close the mini PC chassis securely.
4.2 Connecting Peripherals
Connect your monitor, keyboard, mouse, and other peripherals to the appropriate ports:
- Display: Connect your monitor(s) to the HDMI 2.1 or DisplayPort 1.4 ports. The mini PC supports up to four displays.
- USB Devices: Connect your keyboard, mouse, and other USB devices to the USB4, USB3.2 Gen2, or USB2.0 ports.
- Network: For wired internet, connect an Ethernet cable to one of the 2.5G LAN ports. For wireless, ensure Wi-Fi 6 is enabled.
- Power: Connect the provided 120W Type-C power supply to the DC-in port on the mini PC, then plug it into a power outlet.

Figure 4.1: Front and Rear Port Layout. This diagram labels all available ports on the mini PC, including USB, HDMI, DisplayPort, LAN, DC-in, Audio Jack, and the OCuLink port.
Important Note for OCuLink: Be sure to turn off the computer when plugging in or unplugging devices from the OCuLink interface. Failure to do so may damage the motherboard, and such damage due to incorrect use will not be covered by the warranty.
4.3 Initial Power On
After connecting all necessary components, press the power button on the front of the mini PC to turn it on. Follow the on-screen instructions to complete the operating system setup (if applicable).
5. Operating Instructions
5.1 BIOS Modes
The GEM12 MAX features three adjustable BIOS modes to optimize performance and power consumption:
- Silent Mode (45W-54W): Ideal for light tasks, office work, and quiet environments. Prioritizes low noise and power efficiency.
- Balanced Mode (54W-65W): Suitable for everyday computing, multimedia consumption, and moderate workloads. Offers a balance between performance and noise.
- Performance Mode (65W-70W, up to 75W): Designed for demanding applications, gaming, and heavy workloads. Maximizes CPU performance. To adjust the BIOS to 75W, this setting must be configured within the BIOS menu.
To switch between BIOS modes, access the BIOS setup utility during startup (usually by pressing Del or F2 key repeatedly after power on) and navigate to the power or performance settings.

Figure 5.1: BIOS Modes and Their Applications. This image visually represents the three BIOS modes (Silent, Balanced, Performance) and suggests typical use cases for each, such as content creation for Silent, media consumption for Balanced, and gaming for Performance mode.
5.2 Multi-Display Setup
The mini PC supports connecting up to four displays simultaneously. Use a combination of the HDMI 2.1 and DisplayPort 1.4 outputs. Ensure your monitors are set to the correct input source. You can configure display settings (resolution, orientation, extended/duplicate desktop) within your operating system's display settings.
6. Maintenance
6.1 Cleaning
To ensure optimal performance and longevity, regularly clean your mini PC:
- Use a soft, dry cloth to wipe the exterior.
- Use compressed air to clear dust from ventilation grilles and ports. Do this periodically, especially if the PC is in a dusty environment.
- Ensure the PC is powered off and unplugged before cleaning.
6.2 Software Updates
Keep your operating system, drivers, and BIOS updated to ensure stability, security, and optimal performance. Check the AOOSTAR official website for the latest driver and BIOS updates for your GEM12 MAX model.
6.3 Hardware Upgrades
The GEM12 MAX allows for RAM and SSD upgrades. Refer to section 4.1 for installation guidance. Always ensure compatibility of new components with your mini PC's specifications (e.g., DDR5 RAM, PCIe4.0 NVMe M.2 SSDs).

Figure 6.1: Internal Cooling System. This image provides an exploded view of the mini PC's internal components, highlighting the dual cooling fans and VC Graphene Heat Sink designed to efficiently dissipate heat from the CPU, hard drive, and memory.
7. Troubleshooting
This section addresses common issues you might encounter:
| Problem | Possible Cause | Solution |
|---|---|---|
| No display on monitor | Loose cable, incorrect input, no RAM/SSD installed, faulty monitor. | Check HDMI/DP cable connections. Ensure monitor is on correct input. Verify RAM and SSD are correctly installed (refer to Section 4.1). Test with another monitor. |
| PC does not power on | No power, faulty power supply, loose internal connection. | Ensure power adapter is securely connected to PC and wall outlet. Test outlet with another device. Contact support if issue persists. |
| No internet connection | Loose Ethernet cable, Wi-Fi disabled, driver issue, router problem. | Check Ethernet cable. Ensure Wi-Fi is enabled in OS settings. Update network drivers. Restart router. |
| System performance is slow | Incorrect BIOS mode, high background processes, overheating. | Switch to Performance BIOS mode (Section 5.1). Close unnecessary applications. Ensure proper ventilation and clean dust from vents. |
8. Technical Specifications
| Feature | Specification |
|---|---|
| Brand | AOOSTAR |
| Model Name | GEM12 MAX |
| Item Model Number | GEM12 MAX R7 8845HS NO RAM NO SSD |
| Processor | AMD Ryzen 7 8845HS (8 Cores, 16 Threads, up to 5.1 GHz) |
| Graphics Card | Integrated AMD Radeon 780M (Dedicated) |
| RAM Type | DDR5 5600MHz (Dual-channel, expandable) |
| Hard Drive Type | SSD (Dual M.2 2280 NVMe PCIe4.0x4 slots, expandable) |
| Operating System | Windows (User-installed) |
| Screen Resolution Support | Up to 3840 x 2160 (4K) |
| USB 2.0 Ports | 2 |
| USB 3.0 Ports (USB3.2 Gen2) | 2 |
| USB4 Ports | 2 |
| HDMI Port | 1 (HDMI 2.1) |
| DisplayPort | 1 (DP 1.4) |
| OCuLink Port | 1 |
| LAN Ports | 2 (2.5G) |
| Wireless Connectivity | Wi-Fi 6, Bluetooth 5.2 |
| Item Weight | 1.46 pounds (0.66 Kg) |
| Product Dimensions (LxWxH) | 5.12 x 5.12 x 2.36 inches (13 x 13 x 6 cm) |
| Color | Black |
9. Warranty and Support
AOOSTAR products come with a standard manufacturer's warranty. For specific warranty terms and conditions, please refer to the documentation included with your product or visit the official AOOSTAR website. For technical support, troubleshooting assistance, or warranty claims, please contact AOOSTAR customer service through their official channels. Ensure you have your product model number and purchase details ready when contacting support.


