
1. Introduction
This user manual provides detailed instructions for the LILYGO T-Deck ESP32-S3 Development Board. The T-Deck is a versatile development platform featuring an ESP32-S3 microcontroller, a 2.8-inch LCD, Wi-Fi, and Bluetooth connectivity, designed for various embedded projects. Please read this manual thoroughly before using the device to ensure proper operation and to maximize its potential.

Figure 1: Front and back view of the LILYGO T-Deck ESP32-S3 Development Board. The front features the 2.8-inch LCD and a QWERTY keyboard, while the back shows the main components including the ESP32-S3 module.
2. Setup
2.1 Package Contents
Verify that all items are present in your package:
- 1 x LILYGO T-Deck Development Board
- 1 x 6-pin Header
- 1 x Power Cable (JST 1.25mm connector)
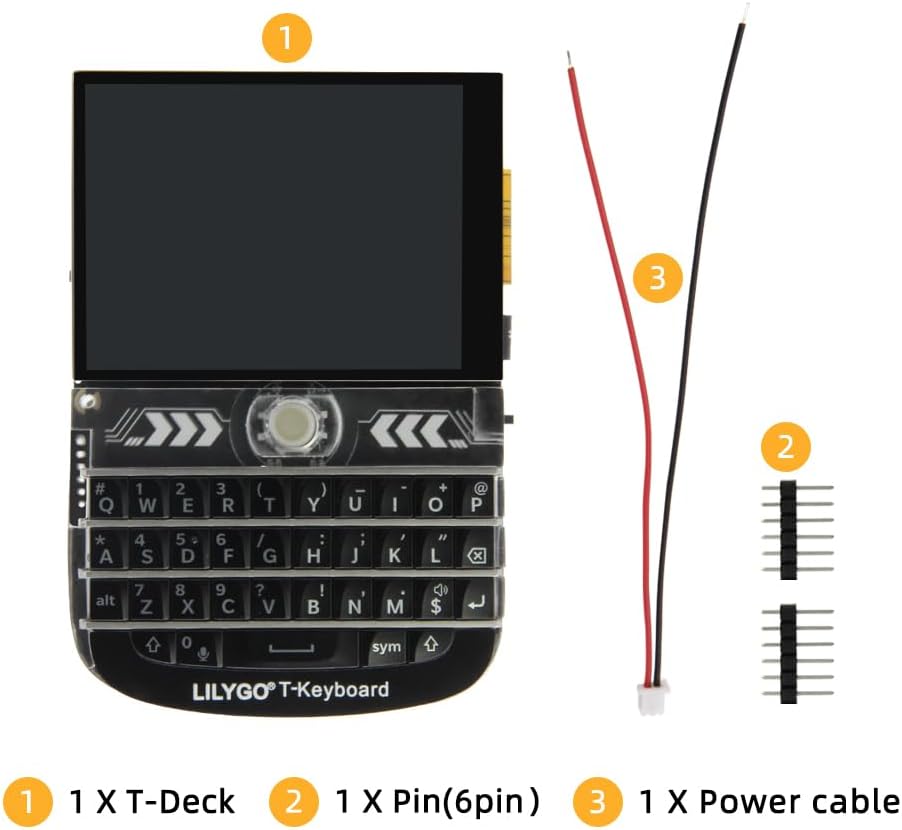
Figure 2: Contents of the LILYGO T-Deck package. This image displays the T-Deck board, a 6-pin header, and a power cable.
2.2 Initial Power-Up
The LILYGO T-Deck can be powered via its USB-C port or through the battery connector. For initial setup, connect the device to a computer using a USB-C cable. The device should power on, and the LCD screen will activate.
- Connect the USB-C cable to the T-Deck's USB port.
- Connect the other end of the USB-C cable to a power source (e.g., computer USB port, USB wall adapter).
- Observe the LCD screen for activity, indicating successful power-up.
For battery operation, connect a compatible LiPo battery to the JST 1.25mm battery connector. Ensure correct polarity.
3. Operation
3.1 Key Features and Components
The T-Deck integrates several key components for development and interaction:
- MCU: ESP32-S3FN16R8 Dual-core LX7 microprocessor
- Display: 2.8 inch ST7789 SPI Interface IPS LCD (320 x 240 resolution, full viewing angle)
- Wireless Connectivity: 2.4 GHz Wi-Fi, Bluetooth 5 (LE)
- Onboard Peripherals: Trackball, Microphone, Speaker
- Memory: 16MB PSRAM, 8MB Flash
- Keyboard: Integrated QWERTY keyboard

Figure 3: Detailed overview of the LILYGO T-Deck's features and onboard components, including the MCU, display, memory, and peripherals.
3.2 Development Environment
The LILYGO T-Deck supports various development environments, making it flexible for different programming needs:
- Arduino IDE
- PlatformIO-IDE
- Micropython
For detailed development resources, including code examples and documentation, please refer to the official LILYGO GitHub repository:
github.com/Xinyuan-LilyGO/T-Deck
3.3 Pinout Diagram
Understanding the pinout is crucial for connecting external components and utilizing the full capabilities of the T-Deck. Refer to the diagram below for the pin assignments.

Figure 4: LILYGO T-Deck ESP32-S3 Pinout Diagram. This diagram illustrates the various GPIO pins, power connections, and peripheral interfaces available on the board.
4. Specifications
| Feature | Detail |
|---|---|
| MCU | ESP32-S3FN16R8 Dual-core LX7 microprocessor |
| Wireless Connectivity | 2.4 GHz Wi-Fi, Bluetooth 5 (LE) |
| Display | 2.8 inch ST7789 SPI Interface IPS LCD, 320 x 240 resolution |
| RAM | LPDDR4X |
| Flash Memory | 16MB |
| PSRAM | 8MB |
| Onboard Functions | Trackball, Microphone, Speaker |
| Development Environments | Arduino, PlatformIO-IDE, Micropython |
| Operating System | Linux (as per product specifications, typically refers to underlying OS for development) |
| Dimensions (Approx.) | Height: 10cm, Width: 6.8cm, Thickness: 1.1cm (keyboard section) |

Figure 5: Approximate dimensions of the LILYGO T-Deck ESP32-S3, showing height, width, and thickness.
5. Maintenance
Proper maintenance ensures the longevity and reliable operation of your LILYGO T-Deck.
- Cleaning: Use a soft, dry cloth to clean the device. Avoid abrasive cleaners or solvents. For the screen, use a microfiber cloth specifically designed for electronics.
- Storage: Store the device in a cool, dry place away from direct sunlight and extreme temperatures. If storing for extended periods, ensure any connected battery is charged to approximately 50% to prevent degradation.
- Handling: Handle the board with care to avoid physical damage to components or connectors. Avoid static discharge by working in a static-safe environment.
6. Troubleshooting
This section addresses common issues you might encounter with your LILYGO T-Deck.
- Device Not Powering On:
- Ensure the USB-C cable is securely connected to both the T-Deck and the power source.
- Try a different USB-C cable and power adapter.
- If using a battery, ensure it is charged and correctly connected to the JST 1.25mm connector with proper polarity.
- Display Not Activating:
- Verify the device is powered on.
- Check for any physical damage to the display or its ribbon cable.
- Ensure the firmware loaded onto the ESP32-S3 includes display initialization routines.
- Connectivity Issues (Wi-Fi/Bluetooth):
- Confirm that the Wi-Fi or Bluetooth antenna (if external) is properly connected.
- Check your code for correct initialization and configuration of the wireless modules.
- Ensure you are within range of the Wi-Fi network or Bluetooth device.
- LoRa Functionality:
- Important Note: This specific model (B0DRVKJFY1) is advertised as "Without LoRa". If you require LoRa capabilities, please ensure you have purchased a model that explicitly includes the LoRa module. The presence of a "LoRa" label on the PCB does not guarantee the chip is installed in this particular variant.
7. Support and Contact Information
For further assistance, technical support, or to provide feedback, please contact LILYGO customer service. We are committed to providing prompt responses to your inquiries.
You can often find support resources and community forums through the official LILYGO website or their GitHub page:
- Official GitHub Repository: github.com/Xinyuan-LilyGO/T-Deck
- General Inquiries: Refer to the contact information provided on the LILYGO official website or the platform where the product was purchased.
Please note that warranty information, if applicable, is typically provided at the point of purchase or on the official product page.