1. Safety Information
Read all instructions before using this appliance. Follow basic safety precautions to reduce the risk of fire, electric shock, or injury.
- Ensure the freezer is properly grounded.
- Do not store explosive substances such as aerosol cans with a flammable propellant in this appliance.
- Keep ventilation openings clear of obstruction.
- Do not use mechanical devices or other means to accelerate the defrosting process, other than those recommended by the manufacturer.
- Do not damage the refrigerant circuit.
- Do not use electrical appliances inside the food storage compartments of the appliance, unless they are of the type recommended by the manufacturer.
- Unplug the freezer before cleaning or performing any maintenance.
- If the supply cord is damaged, it must be replaced by the manufacturer, its service agent, or similarly qualified persons to avoid a hazard.
2. Product Overview
The BANGSON 3.0 Cu.ft Compact Upright Freezer (Model US-BSR-0198) is designed for efficient and convenient frozen food storage in various settings such as dorms, offices, or apartments. It features an adjustable thermostat, removable shelves, and a reversible door for flexible placement.
Key Features:
- Compact Design: Measures 20.28 inches W x 18.9 inches D x 31.57 inches H, ideal for small spaces.
- Adjustable Temperature: 5 levels of temperature control, ranging from -11.2°F to 10.4°F (-12°C to -24°C).
- Removable Shelves: Allows for flexible storage configurations.
- Reversible Door: Door can be configured to open from either the left or right side.
- Adjustable Leveling Feet: Ensures stability on uneven surfaces.
- Low Noise Operation: Designed for a quiet environment.
- Energy Efficient: Utilizes R600a refrigerant for environmentally responsible cooling.

Figure 2.1: Front view of the BANGSON 3.0 Cu.ft Compact Upright Freezer.

Figure 2.2: Detailed view of key features including the reversible door hinge, built-in handle, removable interior shelf, and adjustable leveling feet.

Figure 2.3: Interior capacity of the 3.0 Cu.ft freezer, illustrating storage space with two removable shelves.
3. Setup Instructions
3.1 Unpacking
- Carefully remove all packaging materials, including foam and adhesive tape. Inspect the freezer for any shipping damage.
- Remove any internal packing materials and accessories.
- Clean the interior of the freezer with a damp cloth before first use.
3.2 Placement
- Place the freezer on a flat, stable surface away from direct sunlight and heat sources (e.g., stove, heater).
- Ensure adequate air circulation around the freezer. Allow at least 4 inches (10 cm) of space on the back and sides, and 8 inches (20 cm) on top.
- Use the adjustable leveling feet to ensure the freezer is level. This helps with proper door sealing and efficient operation.

Figure 3.1: Freezer dimensions and key benefits for placement.
3.3 Initial Power-On
After placing the freezer in its desired location, allow it to stand upright for at least 24 hours before plugging it into a power outlet. This allows the refrigerant to settle, preventing potential damage to the cooling system.
- After the waiting period, plug the freezer into a dedicated 110V electrical outlet.
- Set the temperature control to the desired setting (refer to Section 4.1).
- Allow the freezer to operate for 2-3 hours empty before loading food items.
3.4 Reversible Door Installation
The freezer door can be reversed to open from either the left or right side, depending on your space requirements. This process requires basic tools (screwdriver, wrench) and careful handling. Refer to the detailed diagram below for hinge locations.
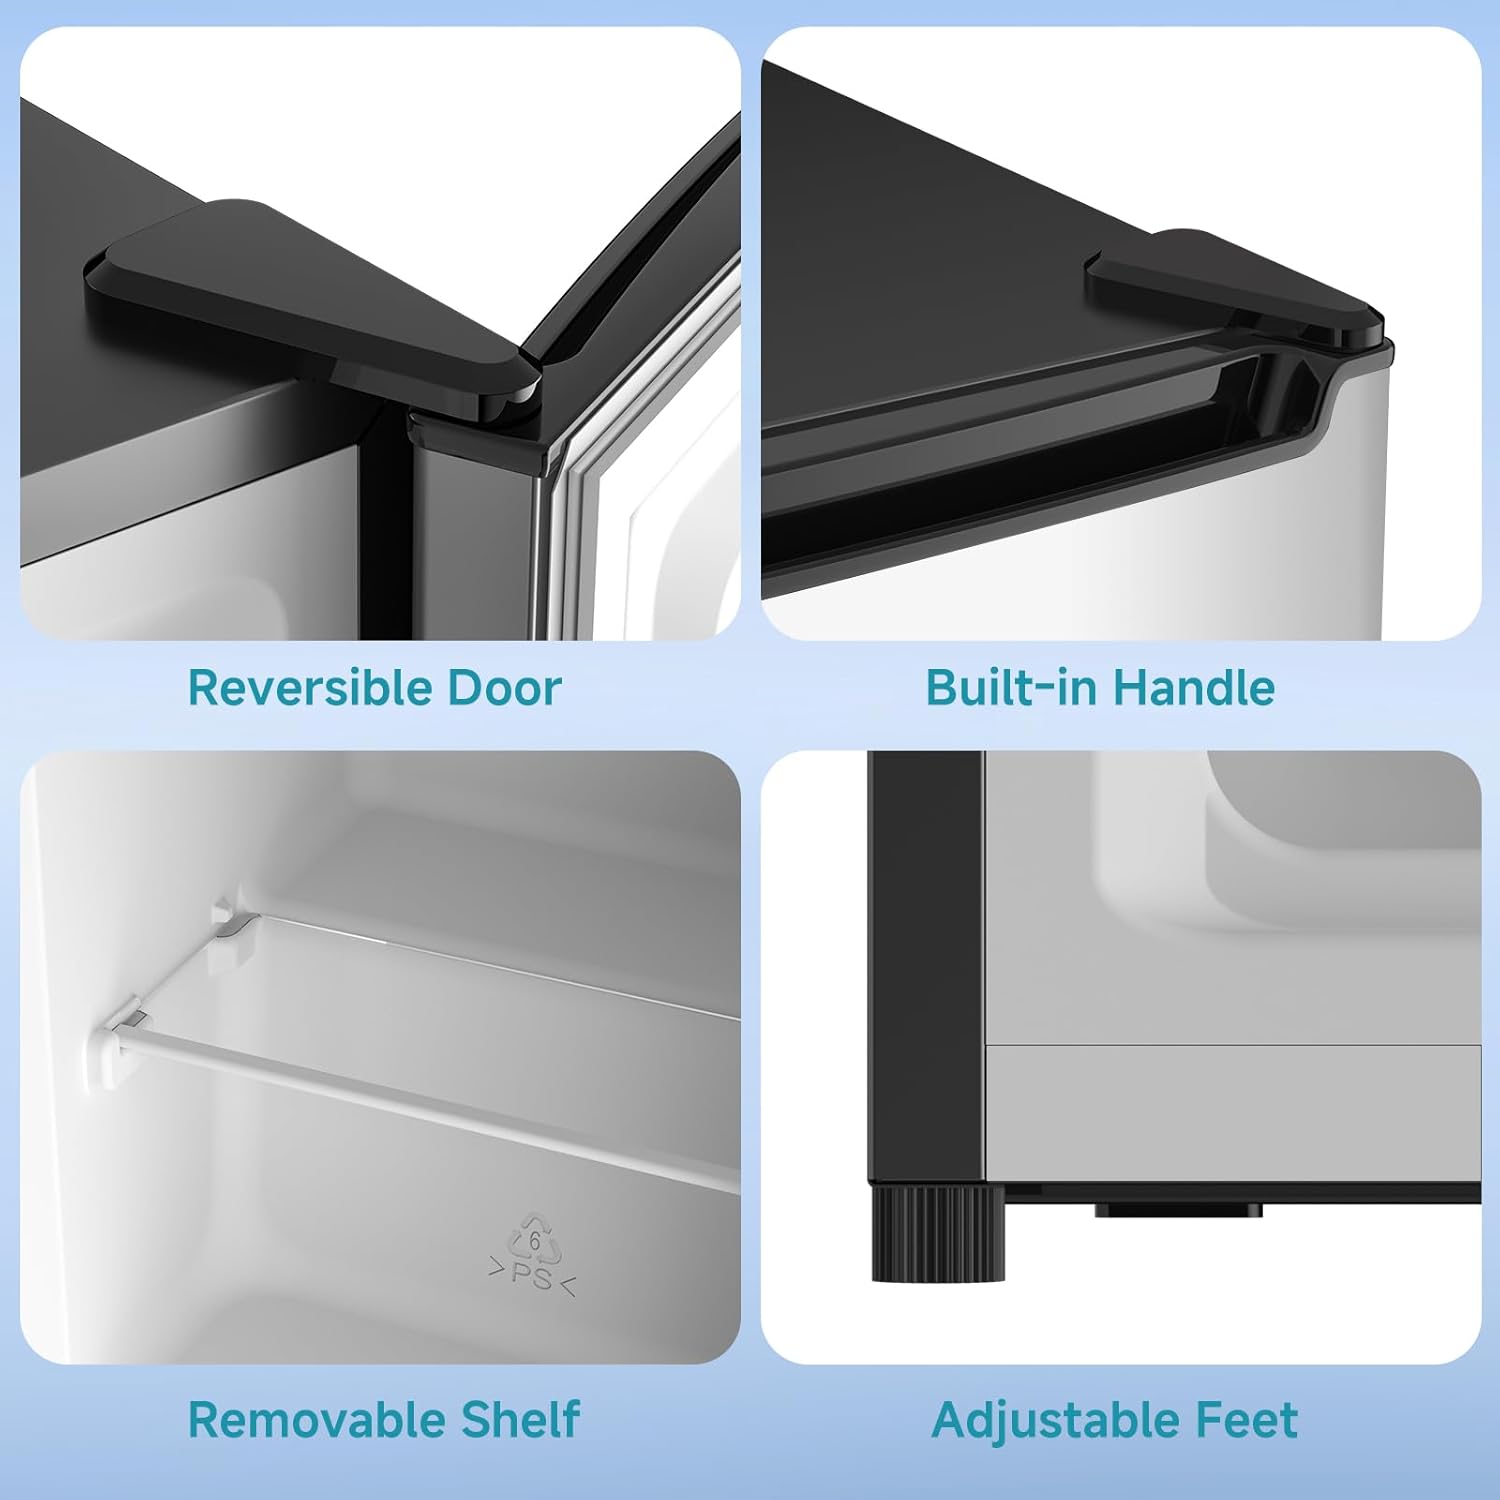
Figure 3.2: Illustration of the reversible door mechanism.
- Unplug the freezer from the power outlet.
- Remove the top hinge cover and unscrew the top hinge. Carefully lift the door off the bottom hinge.
- Remove the bottom hinge and the leveling foot from the opposite side.
- Install the bottom hinge and leveling foot on the desired side.
- Reattach the door, ensuring it aligns correctly with the new bottom hinge.
- Install the top hinge on the new side and secure it. Replace the hinge cover.
- Ensure the door seals properly when closed.
4. Operating Instructions
4.1 Temperature Control
The freezer features a 5-grade adjustable thermostat located at the rear of the unit. The temperature can be adjusted from -11.2°F to 10.4°F (-12°C to -24°C). Turn the dial to select the desired cooling level.
- Setting 1: The warmest setting, suitable for light freezing.
- Settings 2-4: Provide partial freezing, suitable for most frozen goods.
- Setting 5: The coldest setting, for deep freezing or when rapid freezing is required.

Figure 4.1: Adjustable temperature control dial and settings.
4.2 Loading the Freezer
- Do not overload the freezer. Allow space for air circulation around items for efficient freezing.
- The internal shelves are removable, allowing you to adjust the storage space based on the size of your items.
- Avoid placing hot food directly into the freezer, as this can increase internal temperature and energy consumption.
Video 4.1: Product demonstration video showcasing features and usage.
5. Maintenance
5.1 Defrosting
This freezer is not equipped with an auto-defrost feature. Manual defrosting is required periodically to maintain efficiency and prevent excessive ice buildup. Defrost when ice accumulation reaches approximately 0.25 inches (0.6 cm) thickness.
- Unplug the freezer from the power outlet.
- Remove all food items and store them in another freezer or cooler.
- Leave the freezer door open to allow ice to melt naturally. Place towels at the bottom to absorb water.
- Do not use sharp objects or heating devices to remove ice, as this can damage the freezer.
- Once all ice has melted, clean and dry the interior thoroughly.
- Plug the freezer back in and allow it to cool for 2-3 hours before returning food items.
5.2 Cleaning
- Exterior: Wipe the exterior surfaces with a soft cloth and mild detergent. Dry thoroughly.
- Interior: Clean the interior with a solution of mild soap and warm water. Rinse with clean water and dry thoroughly to prevent odors and mold.
- Door Gasket: Clean the door gasket regularly to ensure a tight seal. Use a soft cloth and mild soap.
- Do not use abrasive cleaners, scouring pads, or solvents, as these can damage surfaces.
6. Troubleshooting
Before contacting customer support, review the following common issues and solutions.
| Problem | Possible Cause | Solution |
|---|---|---|
| Freezer does not operate. | No power supply. Power cord not plugged in. Circuit breaker tripped. | Check if the freezer is plugged into a live outlet. Check the circuit breaker or fuse box. |
| Freezer is not cold enough. | Temperature control set too warm. Door not closed properly. Excessive ice buildup. Freezer overloaded. Ambient temperature too high. | Adjust temperature control to a colder setting. Ensure door is fully closed and gasket is sealing. Defrost the freezer (see Section 5.1). Reduce the amount of food. Move freezer to a cooler location. |
| Excessive noise. | Freezer not level. Objects vibrating against the freezer. Normal compressor operation. | Adjust leveling feet to ensure stability. Move objects away from the freezer. Some operational noise is normal. |
| Door does not close completely. | Freezer not level. Door gasket dirty or damaged. Obstruction. | Adjust leveling feet. Clean or replace door gasket. Remove any items blocking the door. |

Figure 6.1: Noise level comparison for the freezer.
7. Specifications
| Feature | Specification |
|---|---|
| Brand | BANGSON |
| Model Number | US-BSR-0198 |
| Capacity | 3.0 Cubic Feet |
| Product Dimensions (W x D x H) | 20.28 x 18.9 x 31.57 inches |
| Item Weight | 46.3 pounds |
| Color | Silver |
| Voltage | 110 Volts |
| Wattage | 43 watts |
| Door Hinges | Reversible |
| Door Material Type | Stainless Steel |
| Installation Type | Freestanding |
| Refrigerant | R600a |

Figure 7.1: Energy consumption details.
8. Warranty & Support
BANGSON provides courteous service for one year from the date of purchase. For warranty claims or technical assistance, please contact BANGSON customer support.
Please have your model number (US-BSR-0198) and purchase date available when contacting support.
Video 8.1: Short video demonstrating product features or setup.
Video 8.2: Additional video resource for product information.


