1. Introduction
The INGQI RG50XX is a portable retro handheld game console designed to provide an immersive gaming experience with a wide range of classic titles. Featuring a 5.0-inch IPS screen, dual 3D joysticks, and support for multiple emulators, this console allows you to enjoy your favorite games on the go or connected to a larger display.
2. Package Contents
Please verify that all items listed below are included in your package:
- 1 x RG50XX Handheld Game Console
- 1 x USB Data Cable
- 1 x 64GB TF Card (pre-installed or included separately)

Image 2.1: Contents of the RG50XX package, including the console, its packaging box, and the USB charging/data cable.
3. Product Features
- 5.0-inch IPS Screen: High-resolution 800*480 display for clear visuals and eye protection.
- Powerful Chipset: Equipped with a Rockchip RK3128 chip (1.2GHz) capable of running 2D and some 3D games smoothly.
- Extensive Emulator Support: Supports 19+ emulators, allowing for a wide variety of game compatibility.
- Expandable Storage: Comes with a 64GB TF card, expandable up to 128GB for additional games and files.
- Long-lasting Battery: Features a 3000 mAh rechargeable battery, providing 3-5 hours of playtime on a full charge.
- Dual 3D Joysticks: Designed with dual 3D joysticks and responsive buttons for precise and flexible control.
- HDMI Output: Supports connection to external displays for a larger screen gaming experience.
- Multimedia Functionality: Includes MP4 function for listening to music and watching videos.

Image 3.1: Visual representation of the console's main features, including its high-definition screen, powerful game chip, long-lasting battery, and dual joystick design.
4. Console Layout and Controls
Familiarize yourself with the console's buttons, joysticks, and ports for optimal use.
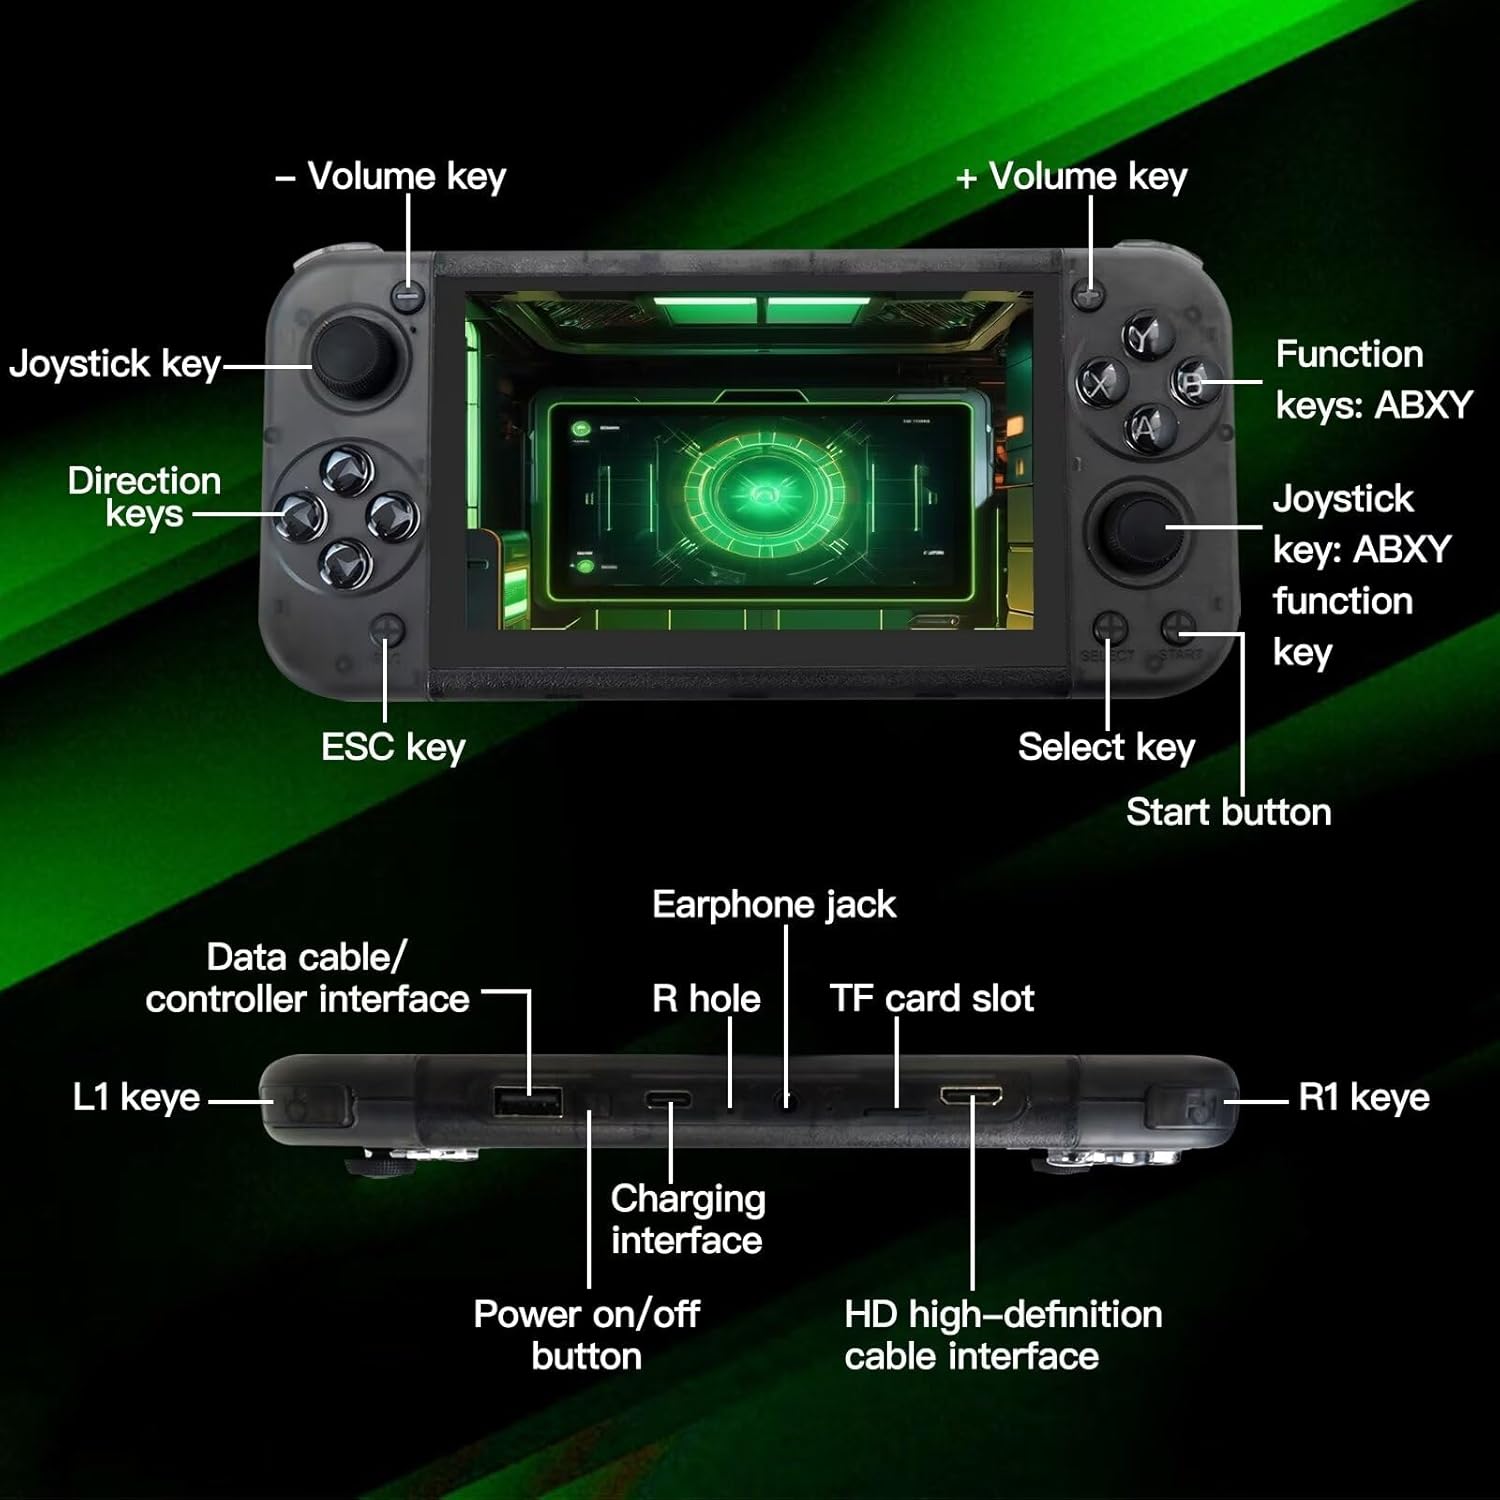
Image 4.1: Detailed diagram of the RG50XX console, highlighting the location and function of its various keys, joysticks, and ports such as the volume keys, function keys (ABXY), direction keys, ESC key, Select key, Start button, Data cable/controller interface, Earphone jack, TF card slot, Charging interface, HD high-definition cable interface, L1 key, and R1 key.
Key Controls:
- Volume Keys (-/+): Adjust the audio output level.
- Joystick Keys: Left and right analog sticks for precise movement in games.
- Direction Keys (D-pad): For directional input, typically used in retro games.
- Function Keys (ABXY): Standard action buttons for gameplay.
- ESC Key: Typically used to exit menus or return to a previous screen.
- Select Key: Often used for in-game menus or secondary functions.
- Start Button: Used to begin games, pause, or confirm selections.
- L1/R1 Keys: Shoulder buttons for additional in-game actions.
Ports:
- Data Cable/Controller Interface: For charging and connecting external controllers.
- Earphone Jack: 3.5mm port for audio output to headphones.
- TF Card Slot: For inserting the game storage card.
- Charging Interface: USB port for power input.
- HD High-Definition Cable Interface: For connecting to an HDMI-compatible display.
5. Setup Guide
5.1 Initial Charging
Before first use, fully charge the console. Connect the provided USB data cable to the console's charging interface and plug the other end into a compatible USB power adapter (under 5A-2V) or a computer's USB port. The charging indicator will typically show status and turn off when fully charged.
5.2 Inserting the TF Card
Locate the TF card slot on the console. Gently insert the pre-loaded 64GB TF card into the slot until it clicks into place. Ensure the card is inserted correctly to avoid damage.
5.3 Powering On and Basic Navigation
Press and hold the Power On/Off button to turn on the console. Use the joysticks or direction keys to navigate through the main menu. The A button typically confirms selections, and the B button or ESC key returns to the previous screen.
5.4 Scanning Games
To ensure all games on your TF card are recognized, you may need to perform a game scan. Navigate to the 'System Setup' menu, then select 'Scan game'. Confirm the operation to allow the console to scan and add all ROMs from the TF card.
Video 5.1: This video demonstrates the process of navigating the system setup menu on the RG50XX console, specifically showing how to access the 'Scan game' option to ensure all game ROMs are properly detected and added from the TF card. It also shows the language setting.
5.5 HDMI Output Connection
To play on a larger screen, connect an HDMI cable (not included) from the console's HD high-definition cable interface to your TV or monitor's HDMI input. Switch your TV's input source to the corresponding HDMI port. The console should automatically switch to TV mode.
5.6 External Controller Connection
The console supports external joysticks for two-player matches. Connect your wired controller to the Data cable/controller interface. The console should recognize the controller automatically.
6. Operating Instructions
6.1 Playing Games
- From the main menu, navigate to the 'Games' section or select a specific emulator.
- Browse the list of available games.
- Select a game using the A button to start playing.
6.2 Saving and Loading Game Progress
Most emulators support in-game saving and loading. Additionally, the console may offer quick save/load states. Refer to the specific emulator's controls or the console's system menu for these functions. Typically, a combination of buttons (e.g., Function + Select) might bring up an in-game menu for save states.
6.3 Using MP4 Function
The RG50XX console can also play MP4 video files and music. Transfer your media files to the TF card in a designated folder (e.g., 'Video' or 'Music'). Navigate to the multimedia section on the console to access and play your files.
6.4 Power Management
To conserve battery life, the console has power management settings. You can adjust backlight brightness and auto-sleep timers in the 'System Setup' menu. To turn off the console, press and hold the Power On/Off button until the power-off prompt appears, then confirm.
7. Maintenance and Care
- Cleaning: Use a soft, dry cloth to clean the console's screen and body. Avoid using liquid cleaners or abrasive materials.
- Storage: Store the console in a cool, dry place away from direct sunlight and extreme temperatures.
- Battery Care: Do not expose the battery to high temperatures or puncture it. If the console will not be used for an extended period, charge it periodically to maintain battery health.
- TF Card: Handle the TF card carefully. Avoid frequent insertion and removal to prevent wear and tear. Always ensure the console is powered off before removing the TF card.
8. Troubleshooting
| Problem | Possible Cause | Solution |
|---|---|---|
| Console does not turn on. | Low battery; Power button not held long enough. | Charge the console for at least 30 minutes. Press and hold the Power On/Off button for 3-5 seconds. |
| Games are not appearing or loading. | TF card not inserted correctly; Games not scanned; Corrupt game files. | Ensure TF card is fully inserted. Perform a 'Scan game' from System Setup. Try re-downloading or replacing game files if possible. |
| No image on TV via HDMI. | Incorrect TV input; Loose HDMI cable. | Select the correct HDMI input on your TV. Ensure the HDMI cable is securely connected to both the console and the TV. |
| Console freezes or crashes. | Software glitch; Overheating; Corrupt game. | Restart the console by holding the power button. Ensure adequate ventilation. Avoid playing for excessively long periods without breaks. |
| No sound. | Volume too low; Muted; Headphone issue. | Increase volume using the volume keys. Check if headphones are properly plugged in or if the console is muted. |
9. Specifications
- Model: RG50XX
- Screen: 5.0-inch IPS, 800*480 resolution
- Processor: Rockchip RK3128, 1.2GHz
- Storage: 64GB TF Card (expandable up to 128GB)
- Battery: 3000 mAh rechargeable battery
- Battery Life: 3-5 hours (approx.)
- Emulators: Supports 19+ emulators
- Connectivity: HDMI output, USB (for charging/controller)
- Dimensions: 7.48 x 0.91 x 3.62 inches
- Country of Origin: China
- Manufacturer: INGQI
10. Warranty and Support
This product is an economical aftermarket replacement part. While not manufactured by the original brand, it is designed to be 100% functional. For any issues, questions, or support needs, please contact the seller directly through the platform where the purchase was made. They are committed to resolving any problems as quickly as possible to ensure customer satisfaction.