1. Introduction
This manual provides detailed instructions for the installation, operation, and maintenance of your Motorsi 7-inch Android Car Stereo. Please read this manual thoroughly before using the product to ensure proper functionality and safety. This unit is designed to enhance your driving experience with advanced features such as wireless CarPlay, Android Auto, GPS navigation, Bluetooth connectivity, and a high-definition touch screen.

Image 1.1: The Motorsi 7-inch Android Car Stereo unit, including a backup camera, microphone, and icons for Android Auto and CarPlay.
2. Setup and Installation
2.1 Compatible Vehicle Models
This car stereo system is designed for specific Ford models. Verify your vehicle's compatibility before installation.
- Ford Focus II (2008-2011)
- Ford S-Max (2008-2011)
- Ford Mondeo 9 (2008-2011)
- Ford C-Max (2008-2011)
- Ford Galaxy II (2006-2011)
- Ford Kuga (2006-2011)
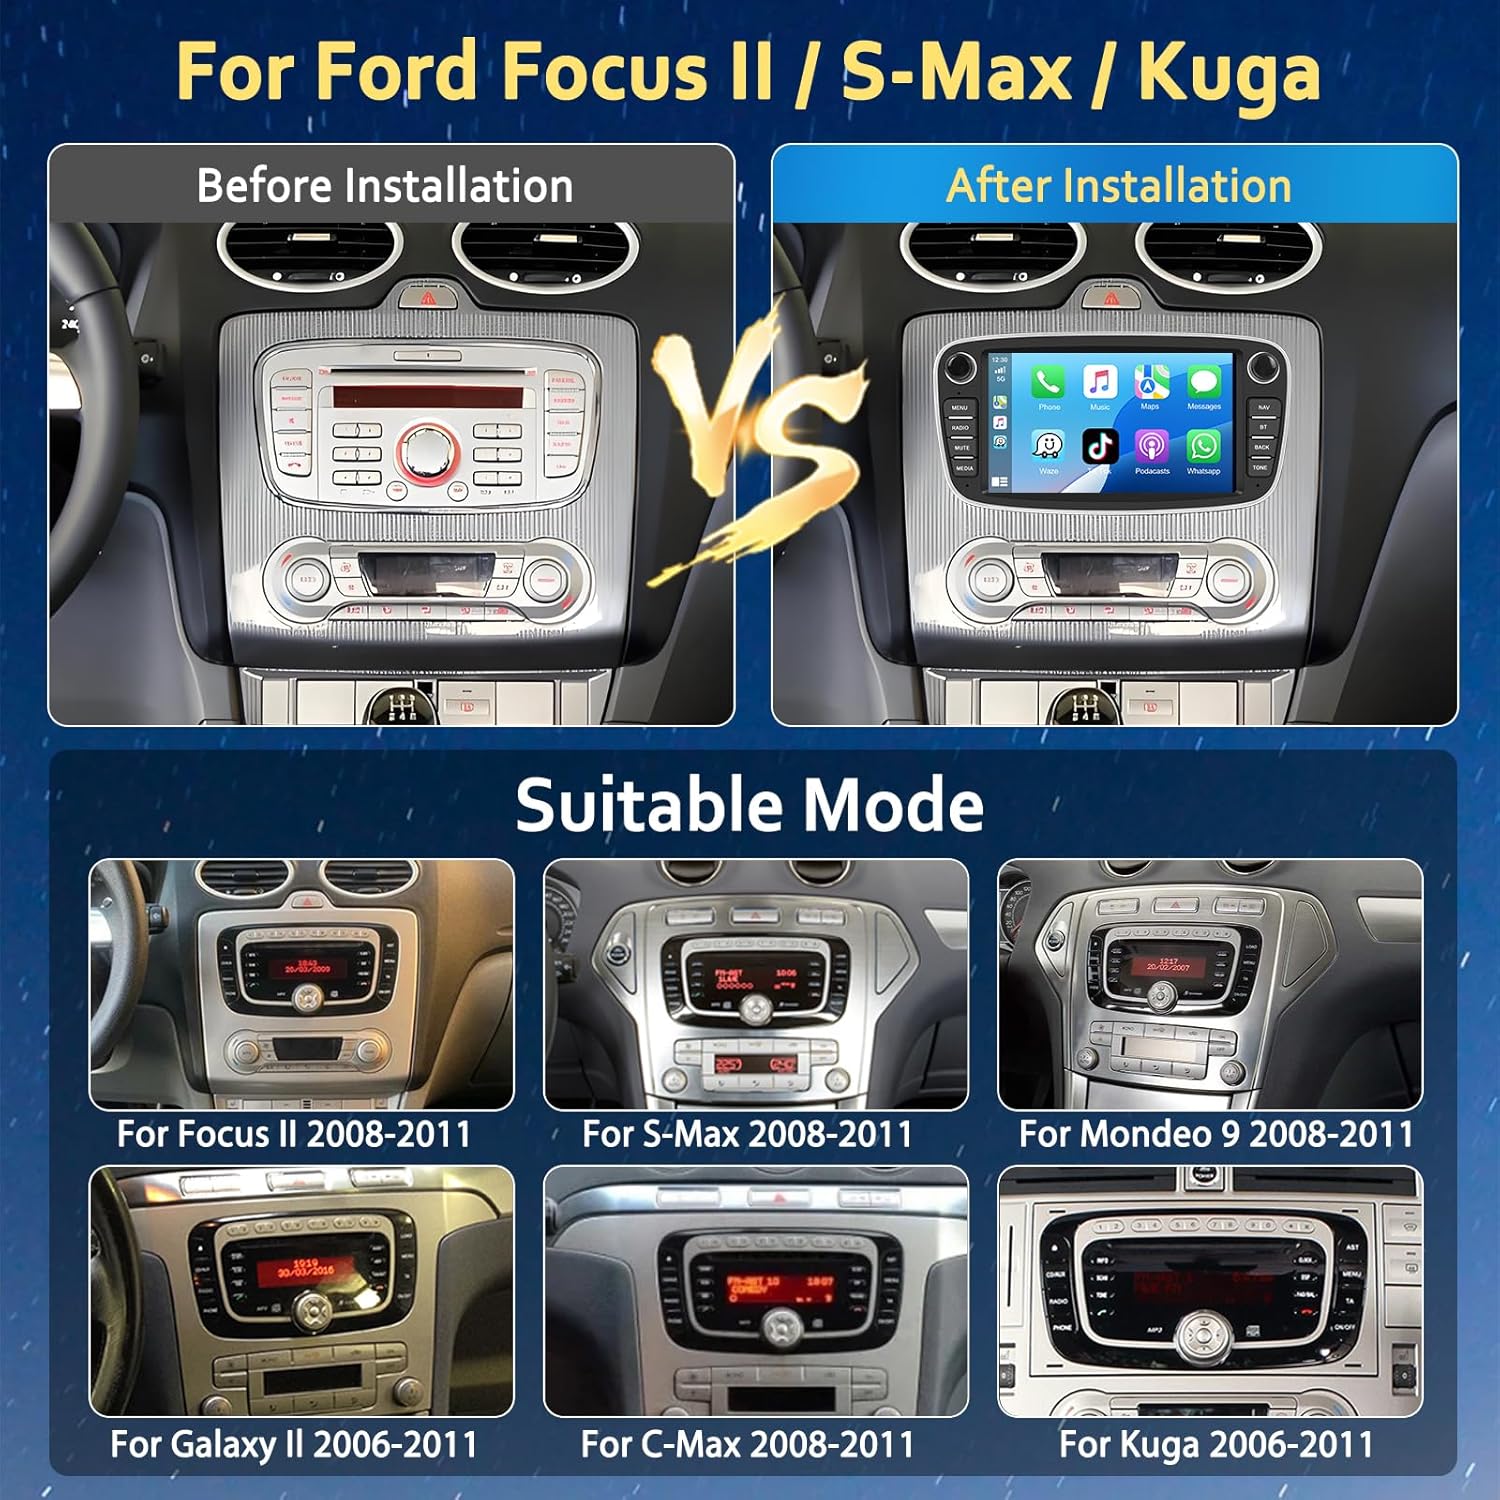
Image 2.1: Visual comparison of a car dashboard before and after the installation of the Motorsi car stereo, alongside examples of compatible dashboard layouts for various Ford models.
2.2 Package Contents
Ensure all components are present before beginning installation:
- Motorsi Car Stereo Unit
- Rear Camera
- Microphone
- Power Cable
- User Manual
- Canbus Decoder
- GPS Antenna
- Antenna Adapter
- USB Cable
- Rear Camera Input Cable
- RCA Cable
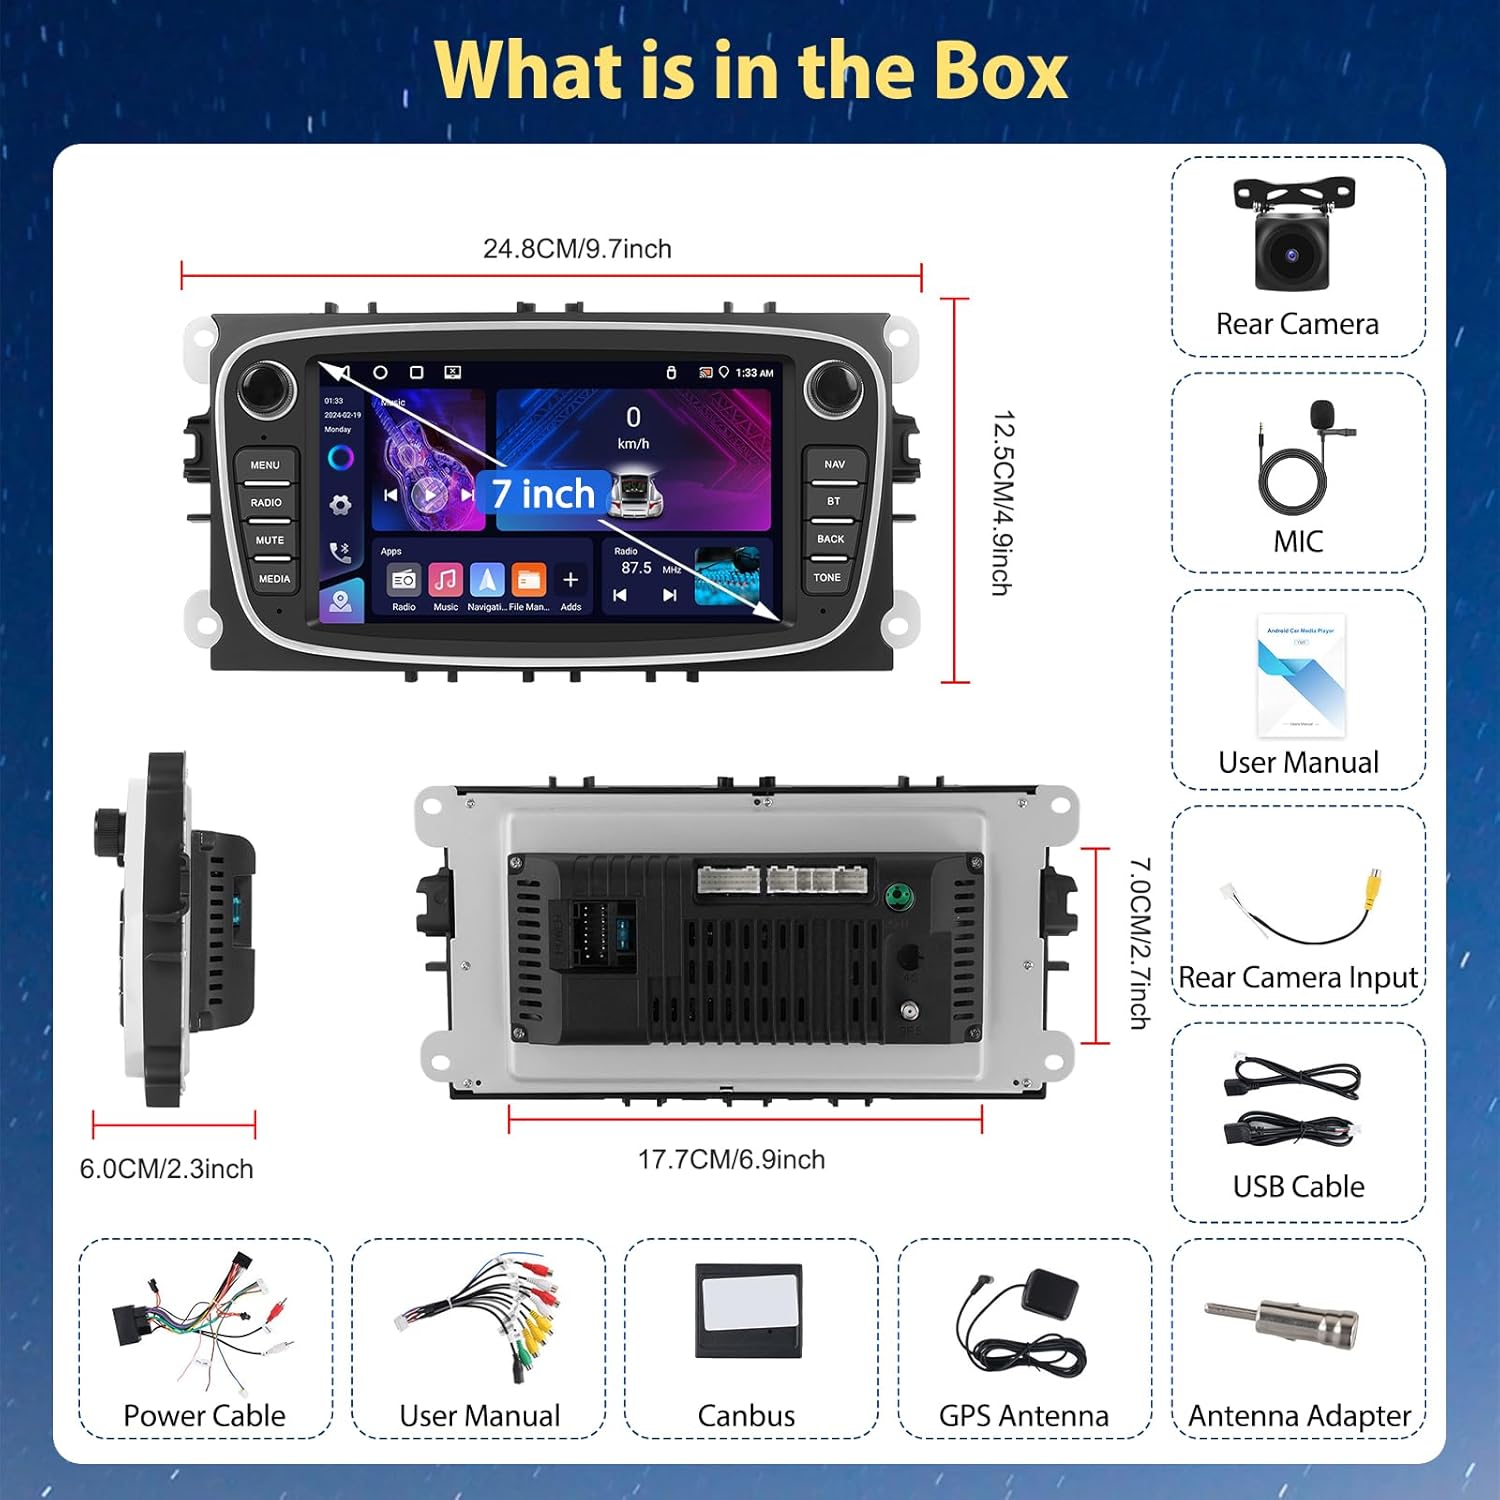
Image 2.2: An exploded view diagram illustrating all items included in the product package, such as the main unit, cables, and accessories.
2.3 Wiring Diagrams
Proper wiring is crucial for optimal performance. Refer to the following diagrams for connecting the rear camera and steering wheel controls.
2.3.1 Reversing Camera Wiring
Connect the rear camera as follows:
- Red Cable (1): Connects to the positive terminal of the car's reverse light cable.
- Black Cable (2): Connects to the negative terminal of the car's reverse light cable.
- The two red extension cables (3 and 4) are typically not needed for standard installations.
- The reverse input cable must be plugged in even if the reverse camera is not used. This prevents interference with Bluetooth and WiFi signal reception.

Image 2.3: A detailed wiring diagram for the reversing camera, showing connections to the car's reverse light and the main stereo unit's input.
2.3.2 Steering Wheel Control Wiring
For steering wheel control functionality:
- Connect the 20Pin Canbus Plug and 8Pin Canbus Plug (Connect to host).
- Connect the 16Pin Power Cable and 16Pin Canbus Plug.
- Identify KEY1 and KEY2 for the car steering wheel control function.
- If your car has only one SWC wire, connect SW1 and SW2 together and then connect them to your car's SWC wires.
- If your car has two SWC lines, connect them to KEY1 and KEY2 respectively.
- Note: You will need to manually learn the steering wheel control buttons on the unit after connecting the wires.
- Ensure the 8-pin cable is plugged into the radio connector. If not, steering wheel controls will not work.

Image 2.4: A wiring diagram detailing the connections for steering wheel controls, including the Canbus plugs and key input wires.
3. Operating Instructions
The Motorsi car stereo operates on an Android 13 system, providing a responsive and feature-rich user experience on its 7-inch HD touch screen (1024*600 resolution).

Image 3.1: The car stereo displaying its Android 13 interface, highlighting its 4-core processor, 4GB RAM, and 64GB storage capacity.
3.1 Wireless CarPlay
Wireless CarPlay allows seamless integration of your iPhone for navigation, communication, and entertainment.
3.1.1 Wireless Connection Steps
- Open your phone's Settings.
- Turn on Bluetooth.
- Find the monitor's Bluetooth name (e.g., 'T86-90C4F') and connect.
- Allow contacts to make calls and select pairing.
- Connection succeeded.
- You will enter CarPlay mode.
3.1.2 Wired Connection Tips
- Connect your mobile phone to the USB port of your car stereo using a USB cable.
- Click on the 'Zlink' app on the car stereo.
- The CarPlay (mobile phone) interface will be displayed after a successful connection.

Image 3.2: The car stereo demonstrating Wireless CarPlay and Android Auto functionality, including voice command integration.

Image 3.3: A visual guide detailing the steps to connect your iPhone to the car stereo using Wireless CarPlay.
3.2 Wireless Android Auto
Wireless Android Auto integrates your Android phone for navigation, calls, messages, and music without a wired connection.
3.2.1 Wireless Connection Steps
- Open your phone's Settings.
- Turn on Bluetooth.
- Find the monitor's Bluetooth name (e.g., 'T86-90C4F') and connect.
- Allow contacts to make calls and select pairing.
- Connection succeeded.
- You will enter Android Auto mode.
3.2.2 Wired Connection Tips
- Download Android Auto software from the Google Play Store.
- Open the car radio's 'Zlink' software and insert the data cable to connect successfully.
- The Zlink version needs to support Android Auto. Check 'About' in the version information to confirm support.

Image 3.4: A visual guide detailing the steps to connect your Android phone to the car stereo using Wireless Android Auto.
3.3 GPS Navigation & WiFi
The unit features built-in GPS (supporting GPS, Galileo, Glonass) and WiFi connectivity for navigation and online services.
- Online Maps: Connect to WiFi via a hotspot or tethering to access online maps and real-time traffic information.
- Offline Maps: Download offline navigation apps from the Play Store for reliable navigation without an internet connection.
- The system supports voice guidance for navigation.
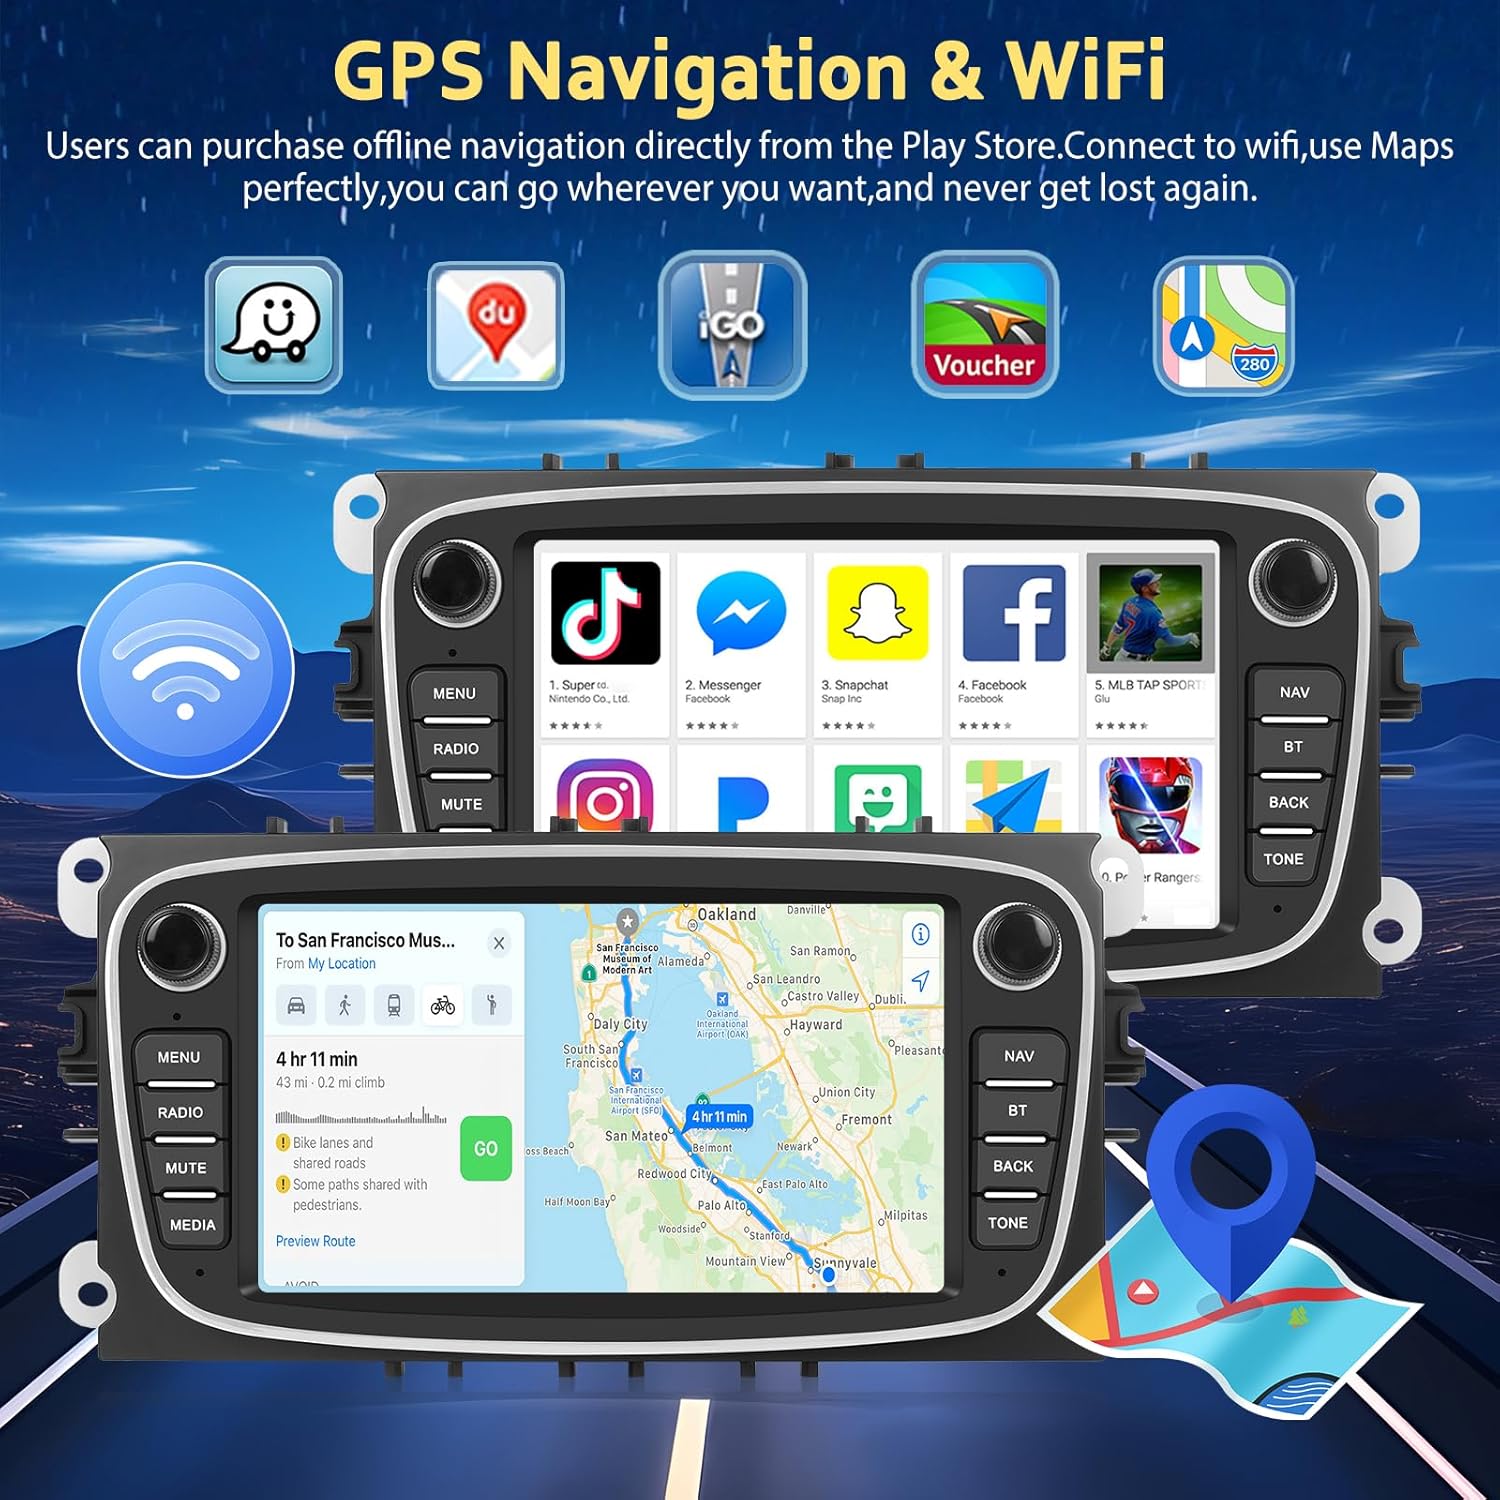
Image 3.5: The car stereo displaying GPS navigation and various applications accessible via WiFi connection.

Image 3.6: The GPS navigation screen showing a map with a planned route and estimated travel time.

Image 3.7: The WiFi connection feature, illustrating how the stereo can access online content and applications.
3.4 Bluetooth & FM/RDS Radio
The unit includes Bluetooth 4.2 for hands-free calling and audio streaming, and an FM/RDS radio tuner.
- Bluetooth: Pair your smartphone or other devices to stream audio and make/receive calls directly from the stereo.
- FM/RDS Radio: Tune into your favorite radio stations with clear sound quality. RDS (Radio Data System) provides additional information like station name and traffic updates.

Image 3.8: The car stereo displaying Bluetooth connection status and the FM/RDS radio interface with frequency options.

Image 3.9: The Bluetooth interface demonstrating hands-free calling functionality, with a phone connected to the stereo.

Image 3.10: The FM/RDS radio interface, displaying available frequencies and radio station details.
3.5 Steering Wheel Control (SWC)
Control various functions of the stereo directly from your vehicle's steering wheel for convenience and safety.
- After connecting the SWC wires (refer to Section 2.3.2), you must perform a control learning process.
- Navigate to Settings > Factory Settings > Fang Control Learning to program your steering wheel buttons.

Image 3.11: The steering wheel control learning interface, demonstrating how to assign functions to your car's steering wheel buttons.

Image 3.12: The steering wheel control learning screen, indicating the path to access the learning function within the settings.
3.6 AHD Backup Camera
The system supports AHD high-definition 720P image input for a clear view of your surroundings when reversing.
- The display automatically switches to the reversing image when the vehicle is in reverse gear.
- The camera offers HD image quality, night vision, a 170° wide-angle view, and is waterproof.
- You can switch between CVBS and AHD video input types in the settings if required (requires optional camera).
Image 3.13: The AHD backup camera display on the car stereo, showing a clear view with parking assist lines.

Image 3.14: An illustration highlighting the key features of the AHD backup camera, such as HD image quality and wide-angle view.
3.7 Audio Settings (DSP & EQ)
The car stereo features a Digital Sound Processor (DSP) with a 32-band Equalizer (EQ) for comprehensive audio customization.
- Adjust frequency bands to tailor the sound output to your preference.
- Utilize preset EQ modes (Pop, Rock, Classic, Jazz, etc.) or create custom settings.
- Adjust balance and fader settings to optimize sound distribution within the vehicle.

Image 3.15: The DSP and 32-band EQ interface, allowing for precise audio adjustments and sound field control.
3.8 UI Design and Themes
The system offers various user interface designs and themes to personalize your experience.
- Access the UI Design settings to browse and select different visual themes for the home screen and application icons.
- Apply themes to change the overall aesthetic of the stereo's interface.
Video 3.1: This video demonstrates the various UI designs and themes available on the Motorsi Android car stereo, showing how to navigate and apply different visual styles to the interface.
3.9 Split Screen Function
The split-screen function allows you to run two applications simultaneously on the display.
- To activate, open an application, then press and hold the recent apps button (or swipe up from the bottom and hold, depending on UI).
- Drag the first app to one side of the screen, then select a second app to fill the other side.
- This is useful for using navigation and music playback concurrently.
Video 3.2: This video demonstrates the split-screen functionality of the Motorsi Android car stereo, showing how to display and interact with two applications simultaneously on the screen.
4. Maintenance
To ensure the longevity and optimal performance of your Motorsi car stereo, follow these maintenance guidelines:
- Screen Cleaning: Use a soft, lint-free cloth to gently wipe the touch screen. For stubborn smudges, slightly dampen the cloth with water or a screen-safe cleaner. Avoid harsh chemicals or abrasive materials.
- Software Updates: Periodically check for available software updates through the system settings. Updates can improve performance, add new features, and fix bugs.
- Avoid Extreme Temperatures: Do not expose the unit to extreme heat or cold for extended periods, as this can affect electronic components and the screen.
- Cable Connections: Ensure all cables are securely connected. Loose connections can lead to intermittent functionality or poor signal quality.
- Ventilation: Ensure the unit's ventilation areas are not blocked to prevent overheating.
5. Troubleshooting
If you encounter issues with your Motorsi car stereo, refer to the following common problems and solutions:
- No Power:
- Check the power cable connections to ensure they are secure.
- Verify the vehicle's fuse related to the stereo is not blown.
- Ensure the car's ignition is on.
- No Sound:
- Check speaker wire connections.
- Ensure the volume is not muted or set too low.
- Verify audio settings (EQ, balance, fader) are correctly configured.
- Bluetooth Connection Issues:
- Ensure Bluetooth is enabled on both the stereo and your mobile device.
- Delete previous pairings on both devices and attempt to re-pair.
- Move your device closer to the stereo.
- GPS Signal Loss:
- Ensure the GPS antenna is properly installed and has a clear view of the sky.
- Check for any obstructions that might block the signal.
- Verify that location services are enabled in the stereo's settings.
- Steering Wheel Controls Not Working:
- Confirm all SWC wires are correctly connected (refer to Section 2.3.2).
- Perform the steering wheel control learning process in the settings.
- Ensure the 8-pin cable is securely plugged into the radio connector.
- Backup Camera Not Displaying:
- Check the rear camera wiring, especially the connection to the reverse light.
- Ensure the reverse input cable is plugged into the stereo, even if no camera is used, to prevent signal issues.
- Verify the camera is receiving power.
If these steps do not resolve the issue, please contact Motorsi customer support.
6. Specifications
| Feature | Specification |
|---|---|
| Model Number | B0DRNWM8ZK |
| Operating System | Android 13 |
| Processor | 4-Core |
| Running Memory (RAM) | 4GB |
| Storage Memory (ROM) | 64GB |
| Display Size | 7 Inches |
| Screen Resolution | 1024*600 HD |
| Connectivity Technology | Bluetooth 4.2, WiFi |
| Navigation Systems | GPS, Galileo, Glonass |
| Special Features | Wireless CarPlay, Wireless Android Auto, FM/RDS Radio, AHD Backup Camera Support, Steering Wheel Control (SWC) |
| Audio Output Mode | Stereo, DSP Audio & 32EQ |
| Item Weight | 2.71 pounds |
| Package Dimensions | 10.83 x 8.27 x 4.13 inches |

Image 6.1: A visual comparison demonstrating the clarity of the 1024x600 resolution on the 7-inch IPS touch screen compared to a lower resolution.
7. Warranty Information
This Motorsi product comes with a 2-year warranty from the date of purchase. This warranty covers manufacturing defects and malfunctions under normal use. Please retain your proof of purchase for warranty claims.
8. Customer Support
For any questions, technical assistance, or support, please contact Motorsi customer service. Our professional technical team is committed to providing friendly and professional support and will reply within 24 hours.
Refer to your purchase documentation or the Motorsi official website for specific contact details.