1. Important Safety Instructions
Please read and understand all safety warnings and instructions before operating this product. Failure to follow these instructions may result in electric shock, fire, and/or serious injury.
- Always wear eye protection and appropriate protective clothing when operating the strimmer.
- Keep children and bystanders at a safe distance (at least 15 meters) from the operating area.
- Do not operate the strimmer in wet conditions or rain.
- Inspect the work area for objects that could be thrown or entangled in the cutting line/blade. Remove any debris.
- Ensure the battery is fully charged before use and removed when not in use or during maintenance.
- Never modify the strimmer or use non-approved attachments.
- Store the strimmer and batteries in a dry, secure location away from children.

For detailed safety information, refer to the complete safety manual provided with your product.
2. Package Contents
Carefully unpack all items and ensure you have received all components listed below. If any parts are missing or damaged, contact customer support.
- Cordless Strimmer Unit
- 2 x 21V 4000mAh Lithium-Ion Batteries
- Battery Charger
- Auxiliary Handle
- Protective Guard
- Auxiliary Wheels
- Nylon Saw Blades (x10)
- Steel Wire Ropes (x2)
- Metal Saw Blades (x2)
- Metal Circular Saw Blade (x1)
- Safety Goggles
- Gloves
- Wrench

3. Assembly
Follow these steps to assemble your Conentool Cordless Strimmer:
- Attach the Protective Guard: Align the protective guard with the mounting points on the strimmer head and secure it using the provided fasteners. Ensure it is firmly attached to prevent debris from being thrown towards the user.
- Install the Auxiliary Handle: Slide the auxiliary handle onto the main shaft. Adjust its position for comfortable operation and tighten the handle adjustment button to secure it.
- Attach the Auxiliary Wheels: If desired, attach the auxiliary wheels to the strimmer head. These wheels provide support and ease of movement during operation, especially for edging or larger areas.
- Insert the Battery: Ensure the battery is charged. Slide the battery into the battery compartment on the strimmer handle until it clicks into place.

4. Operation
4.1 Charging the Battery
Connect the charger to a power outlet and then to the battery. The indicator light on the charger will show the charging status. A full charge typically takes approximately 2-3 hours. Each 4000mAh battery can provide over 90 minutes of continuous operation.

4.2 Adjusting Strimmer Length and Head Angle
The strimmer features an adjustable telescoping rod and a rotating head for versatile use.
- Length Adjustment: Press the telescoping rod adjustment button and extend or retract the shaft to your desired length (from 90cm/35.4in to 125cm/49.2in). Release the button to lock the length.
- Head Angle Adjustment: Press the head adjustment button near the strimmer head to rotate the head up to 90 degrees. This allows for easy edging and trimming in various orientations.

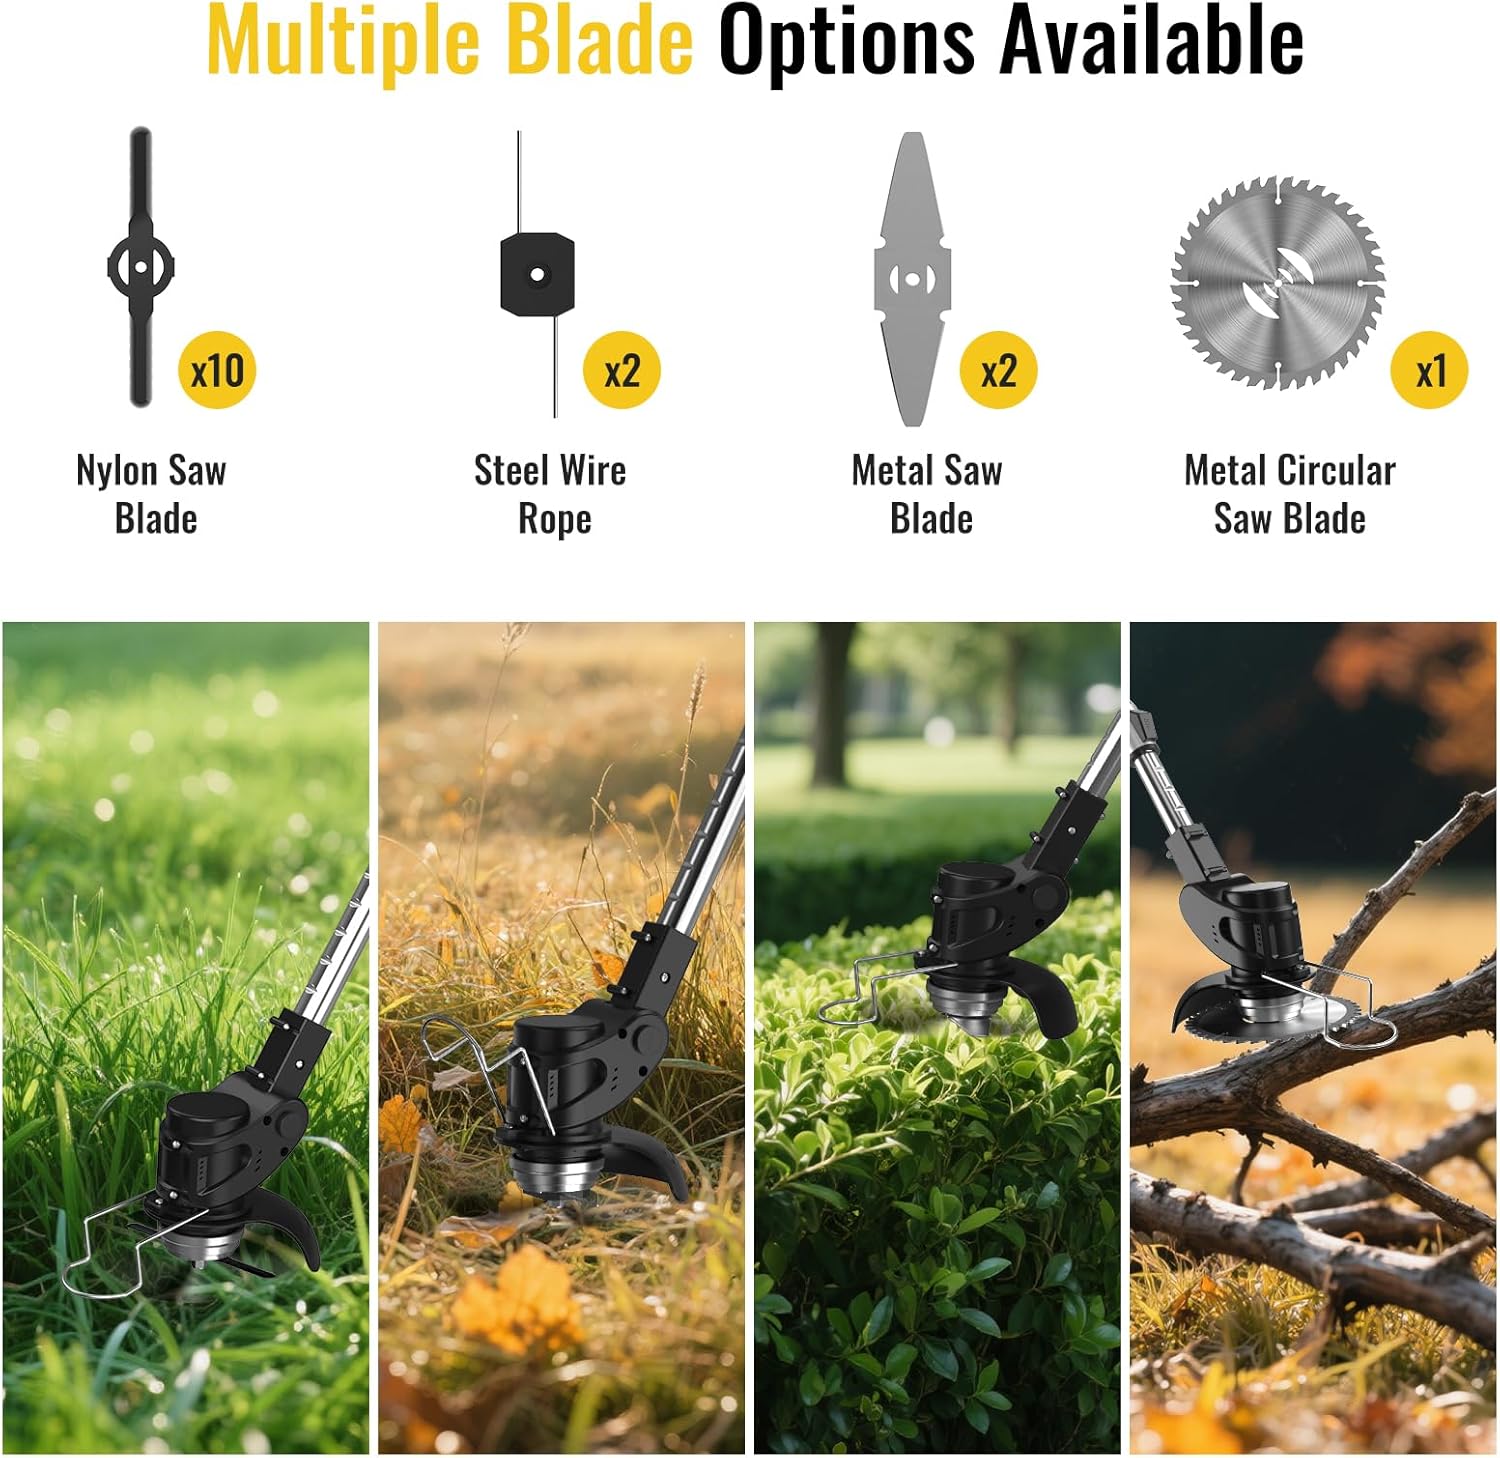
4.3 Blade Selection and Replacement
The strimmer supports multiple blade types for different cutting tasks:
- Nylon Saw Blades: Ideal for light grass and soft weeds.
- Steel Wire Ropes: Suitable for thicker grass and tougher weeds.
- Metal Saw Blades: For dense brush and small woody stems.
- Metal Circular Saw Blade: Best for heavy-duty cutting of thick brush and small saplings.
To replace a blade, ensure the battery is removed. Use the provided wrench to loosen the retaining nut, remove the old blade, install the new blade, and tighten the nut securely.

4.4 Starting and Stopping
To start the strimmer, press the circuit breaker button and then the start switch. To stop, release the start switch.
5. Maintenance
Regular maintenance ensures optimal performance and extends the life of your strimmer.
- Cleaning: After each use, remove the battery and clean the strimmer head, guard, and housing with a damp cloth. Remove any grass, dirt, or debris. Do not use harsh chemicals or abrasive cleaners.
- Blade Inspection: Regularly inspect blades for wear, damage, or dullness. Replace worn or damaged blades immediately to maintain cutting efficiency and safety.
- Battery Care: Store batteries in a cool, dry place. Do not expose them to extreme temperatures. Charge batteries fully before long-term storage and recharge every 3-6 months to maintain battery health.
- Storage: Store the strimmer in a dry, secure location, out of reach of children. Remove the battery before storage.
6. Troubleshooting
| Problem | Possible Cause | Solution |
|---|---|---|
| Strimmer does not start | Battery not inserted correctly Battery discharged Safety switch not engaged | Ensure battery is fully seated Charge battery Press circuit breaker before start switch |
| Reduced cutting performance | Dull or damaged blade Incorrect blade for material | Replace blade Select appropriate blade type |
| Excessive vibration | Damaged or unbalanced blade Loose components | Replace blade Check all fasteners and tighten |
7. Specifications
- Brand: Conentool
- Model Number: D1003
- Power Source: Battery Powered
- Battery Type: 21V Lithium Ion (2 x 4000mAh included)
- Motor Power: 650W MAX
- No-Load Speed: 8500 RPM
- Product Dimensions: 34.65"L x 6.3"W (adjustable length up to 49.2")
- Item Weight: 8.01 pounds
- Color: Black
8. Warranty and Support
For warranty information or technical support, please refer to the documentation included with your purchase or contact Conentool customer service directly. Keep your purchase receipt as proof of purchase.


