1. Introduction
This manual provides essential information for the safe and efficient use of your AFNOP Cordless Vacuum Cleaner Battery Blue. Please read these instructions carefully before installation and operation to ensure optimal performance and longevity of your product. This battery is designed to power compatible AFNOP cordless vacuum cleaners, offering extended runtime and reliable performance.
2. Safety Information
- Always use the battery with compatible AFNOP cordless vacuum cleaners and chargers.
- Do not expose the battery to extreme temperatures (hot or cold), direct sunlight, or fire.
- Avoid short-circuiting the battery terminals.
- Do not disassemble, puncture, or modify the battery pack.
- If the battery shows signs of damage, leakage, or overheating, discontinue use immediately and dispose of it properly.
- Keep the battery out of reach of children and pets.
- Dispose of used batteries according to local regulations.
3. Setup
3.1 Battery Installation
To install the AFNOP Cordless Vacuum Cleaner Battery Blue into your compatible vacuum cleaner:
- Ensure the vacuum cleaner is powered off and disconnected from any charging source.
- Locate the battery compartment on your vacuum cleaner. This is typically on the main body of the handheld unit.
- Align the battery pack with the compartment. The battery is designed to slide in smoothly.
- Push the battery firmly into place until you hear a click, indicating it is securely locked.
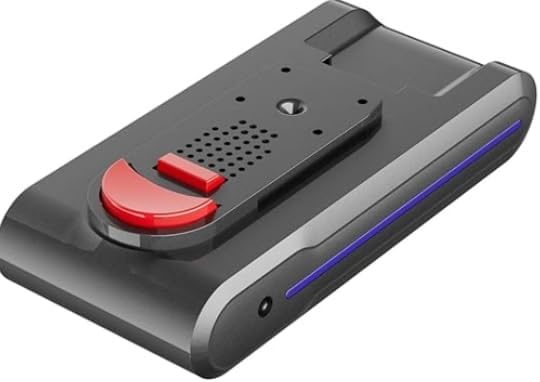
Figure 1: AFNOP Cordless Vacuum Cleaner Battery Blue. A blue and black cordless vacuum cleaner battery pack, featuring a red release button and blue indicator lights.
3.2 Charging the Battery
Before first use, fully charge the battery. To charge the AFNOP Cordless Vacuum Cleaner Battery Blue:
- Connect the charging cable to the charging port on the battery or the wall-mount charging dock.
- Plug the charger into a standard electrical outlet.
- The battery indicator lights on the vacuum or battery will illuminate to show charging status. A full charge is indicated when all lights are solid or the display shows 100%.
- Charging typically takes several hours. Do not overcharge the battery.
4. Operating Instructions (Vacuum Cleaner)
Once the battery is installed and charged, your cordless vacuum cleaner is ready for use. The vacuum typically features:
- Power Settings: Multiple suction modes (e.g., Low, Medium, High) to suit different cleaning needs. These can usually be cycled through using a button on the main unit.
- Auto Mode: Some models include an auto mode that intelligently adjusts suction power based on the floor type (e.g., hardwood, carpet) for efficient cleaning.
- LED Display: A digital display on the main unit may show battery level, current power mode, and other operational information.
- LED Headlights: The cleaning head often includes LED lights to illuminate dark areas, making dust and debris more visible.
- Versatile Attachments: The vacuum can be converted into a handheld unit by detaching the extension wand and attaching specialized tools like a crevice tool or upholstery brush for targeted cleaning.
5. Maintenance
5.1 Battery Care
- Keep battery contacts clean and dry.
- Store the battery in a cool, dry place when not in use.
- If storing for an extended period, charge the battery to approximately 50% capacity.
5.2 Vacuum Dustbin and Filter Cleaning
Regular cleaning of the dustbin and filters is crucial for maintaining suction power and preventing blockages.
- Emptying the Dustbin: Press the dustbin release button (often red) to open the bottom flap and empty contents directly into a trash receptacle. For thorough cleaning, the entire dustbin assembly can often be detached from the main unit by pressing another release button.
- Cleaning Filters: The vacuum typically includes a HEPA filter and other washable filters. Remove these filters from the dustbin assembly. Tap them gently to remove loose dust. For deeper cleaning, rinse them under cool running water until the water runs clear.
- Drying Filters: Allow all filters to air dry completely for at least 24 hours before reassembling. Do not use a dryer or direct heat.
- Reassembly: Once dry, reinsert the filters and reattach the dustbin assembly to the vacuum cleaner.
6. Troubleshooting
- Vacuum not turning on: Ensure the battery is fully charged and correctly installed. Check if the power button is pressed firmly.
- Low suction power: Empty the dustbin. Clean all filters thoroughly and ensure they are completely dry before reinstallation. Check for blockages in the nozzle, wand, or hose.
- Battery not charging: Verify the charger is properly connected to both the battery/dock and the power outlet. Check for any damage to the charging cable or adapter.
- Short battery life: Ensure the battery is fully charged before use. Operating in high-power modes will consume battery faster. Consider if the battery needs replacement after extended use.
7. Specifications
| Feature | Detail |
|---|---|
| Brand | AFNOP |
| Special Feature | Long runtime |
| Filter Type | HEPA Filter (for compatible vacuum) |
| Is Cordless? | Yes |
| Battery Life | 65 minutes |
| Batteries | 1 C batteries required. (included) |
| Color | Blue (as per product title, though specifications mention Purple for the vacuum) |
8. Warranty and Support
For warranty information and customer support, please refer to the documentation included with your original AFNOP cordless vacuum cleaner or visit the official AFNOP website. Keep your purchase receipt as proof of purchase for any warranty claims.