1. Introduction
Thank you for choosing the Barrina T5 Full Spectrum LED Grow Light Strip. This manual provides essential information for the safe and efficient use of your new grow lights. Please read these instructions carefully before installation and operation, and retain them for future reference.
2. Safety Information
To ensure safe operation, please observe the following precautions:
- Always disconnect power before installation, cleaning, or maintenance.
- Do not operate the light strip if it is damaged.
- This product is designed for indoor use only. Do not expose to water or high humidity.
- Ensure the installation surface is stable and can support the weight of the light fixture.
- Do not stare directly into the LED lights when they are on, as this may cause eye strain.
- Keep out of reach of children.
3. Package Contents
Verify that all components are present in your package:
- Barrina T5 LED Grow Light Strips
- Power Cords
- Connecting Cables
- Installation Clips
- Screws
- Cable Ties
- Magnetic Bars with Double-Sided Tapes

Image: Overview of Barrina T5 Grow Light Strip package contents, including light fixtures, power cords, connecting cables, clips, screws, cable ties, and magnetic bars.
4. Setup and Installation
The Barrina T5 Grow Light Strips offer multiple installation and connection methods for flexibility.
4.1 Installation Methods
Choose the most suitable method for your setup:
- Magnetic Bar Installation: The light fixture can be directly attached to any magnetic surface. For non-magnetic surfaces, use the included magnetic bar with double-sided tape.
- Clip and Screw Installation: Secure the provided clips to your desired surface using screws, then snap the light fixture into the clips.
- Cable Tie Installation: Use the included cable ties to attach the light fixture to poles, racks, or other suitable structures.

Image: Depicts three installation options: using magnetic bar and double tape, clips and screws, and cable ties.

Image: Illustrates the magnetic bar installation method, showing direct attachment to a magnetic surface and attachment to a non-magnetic surface using the magnetic bar with double-sided tape.
4.2 Connection Methods
You can connect multiple light strips together:
- Direct Connection: Connect light strips end-to-end for a continuous lighting setup.
- Connecting Cable: Use the provided connecting cables to link light strips with a gap between them.
When not connecting to another fixture, ensure to cover the open end with the provided dust cap.

Image: Shows two connection methods: direct end-to-end connection and connection using a 19.6-inch cable. Also shows covering an unused end with a dust cap.
5. Operating Instructions
The Barrina T5 Grow Light Strips are designed for optimal plant growth.
5.1 Powering On/Off
Each grow light fixture features an individual ON/OFF switch on its housing. This allows you to control each light strip separately or together, depending on your plants' specific lighting requirements (PPFD).
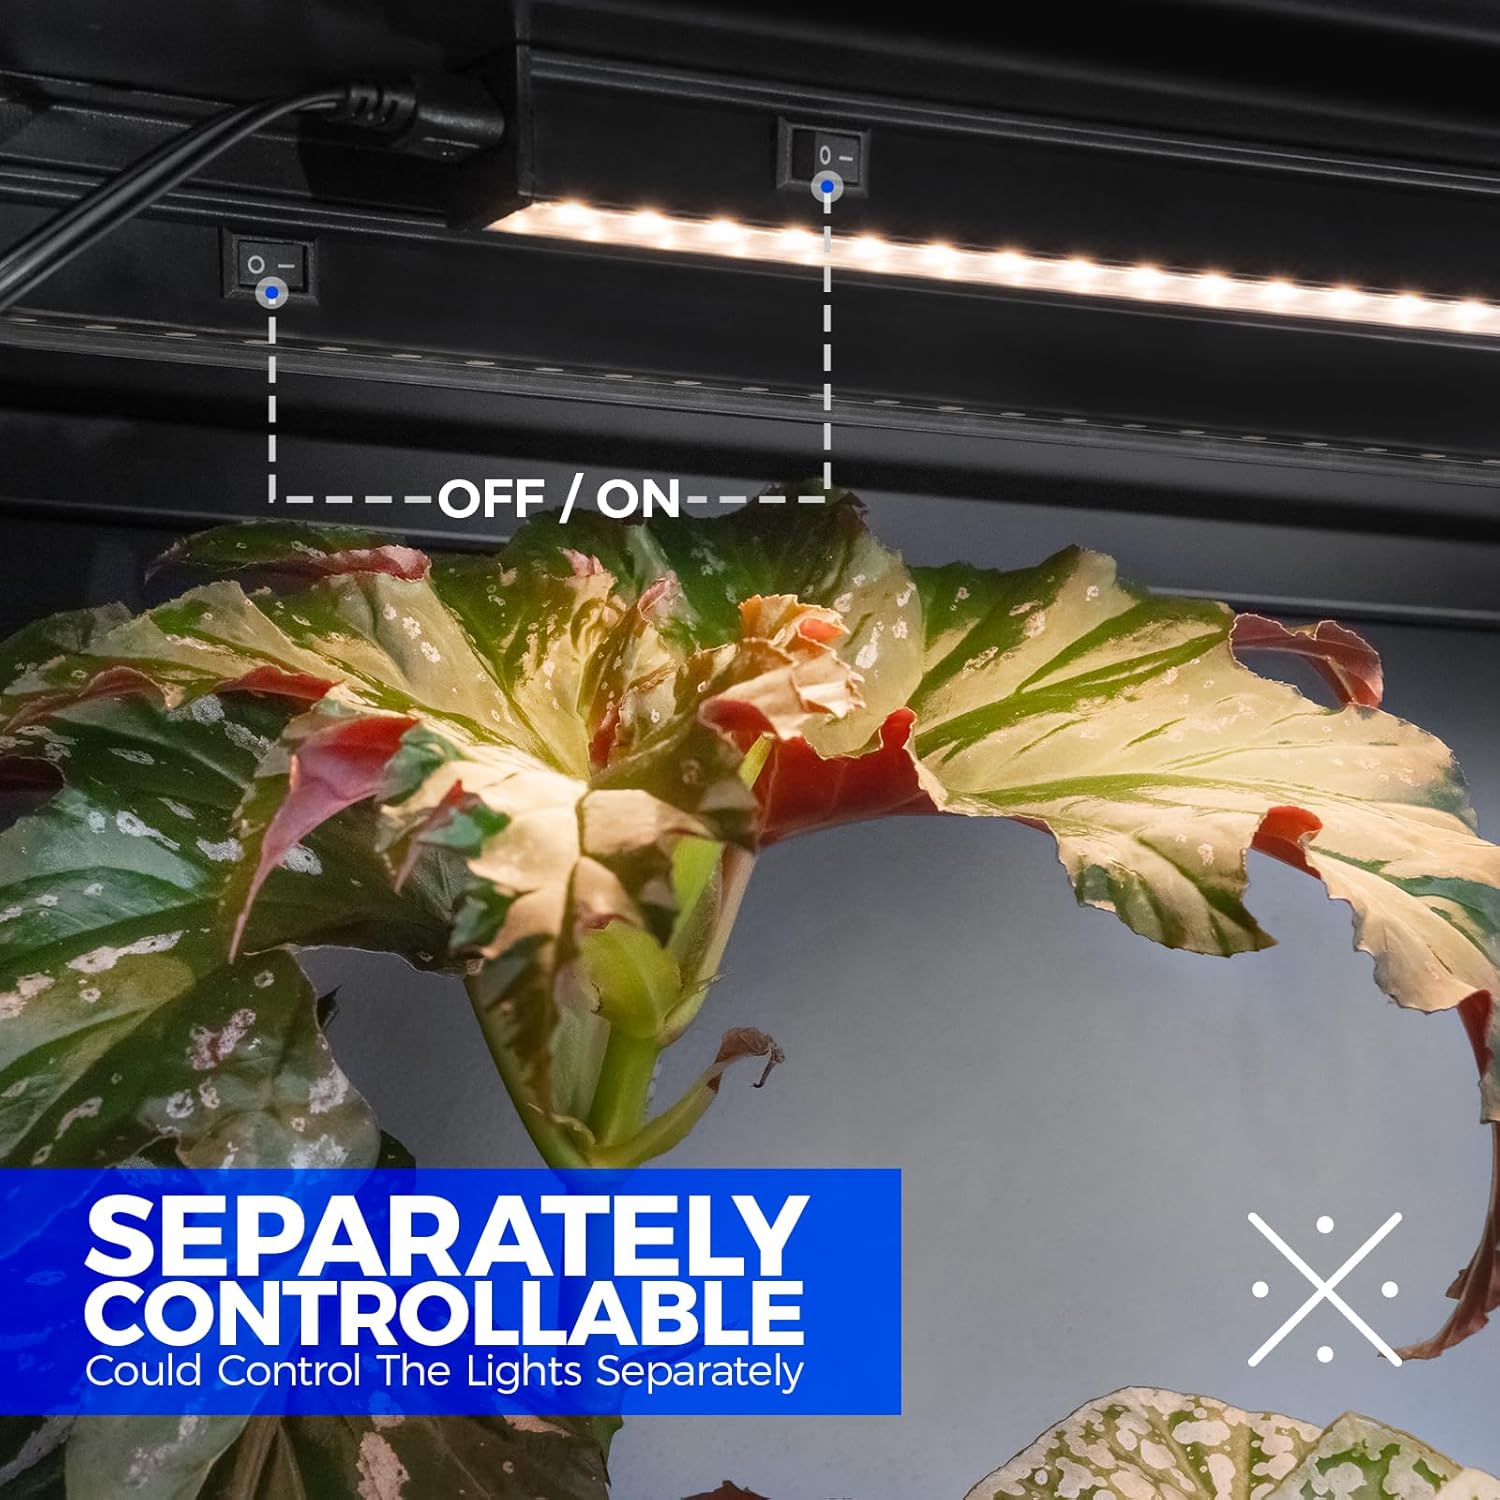
Image: Illustrates the individual ON/OFF switch located on the housing of each Barrina T5 Grow Light Strip, allowing separate control.
5.2 Full Spectrum Lighting
These grow lights provide a full spectrum of light, closely mimicking natural sunlight. This spectrum supports photosynthesis throughout all stages of plant growth, from germination to flowering and fruiting, ensuring healthy development for your indoor plants.
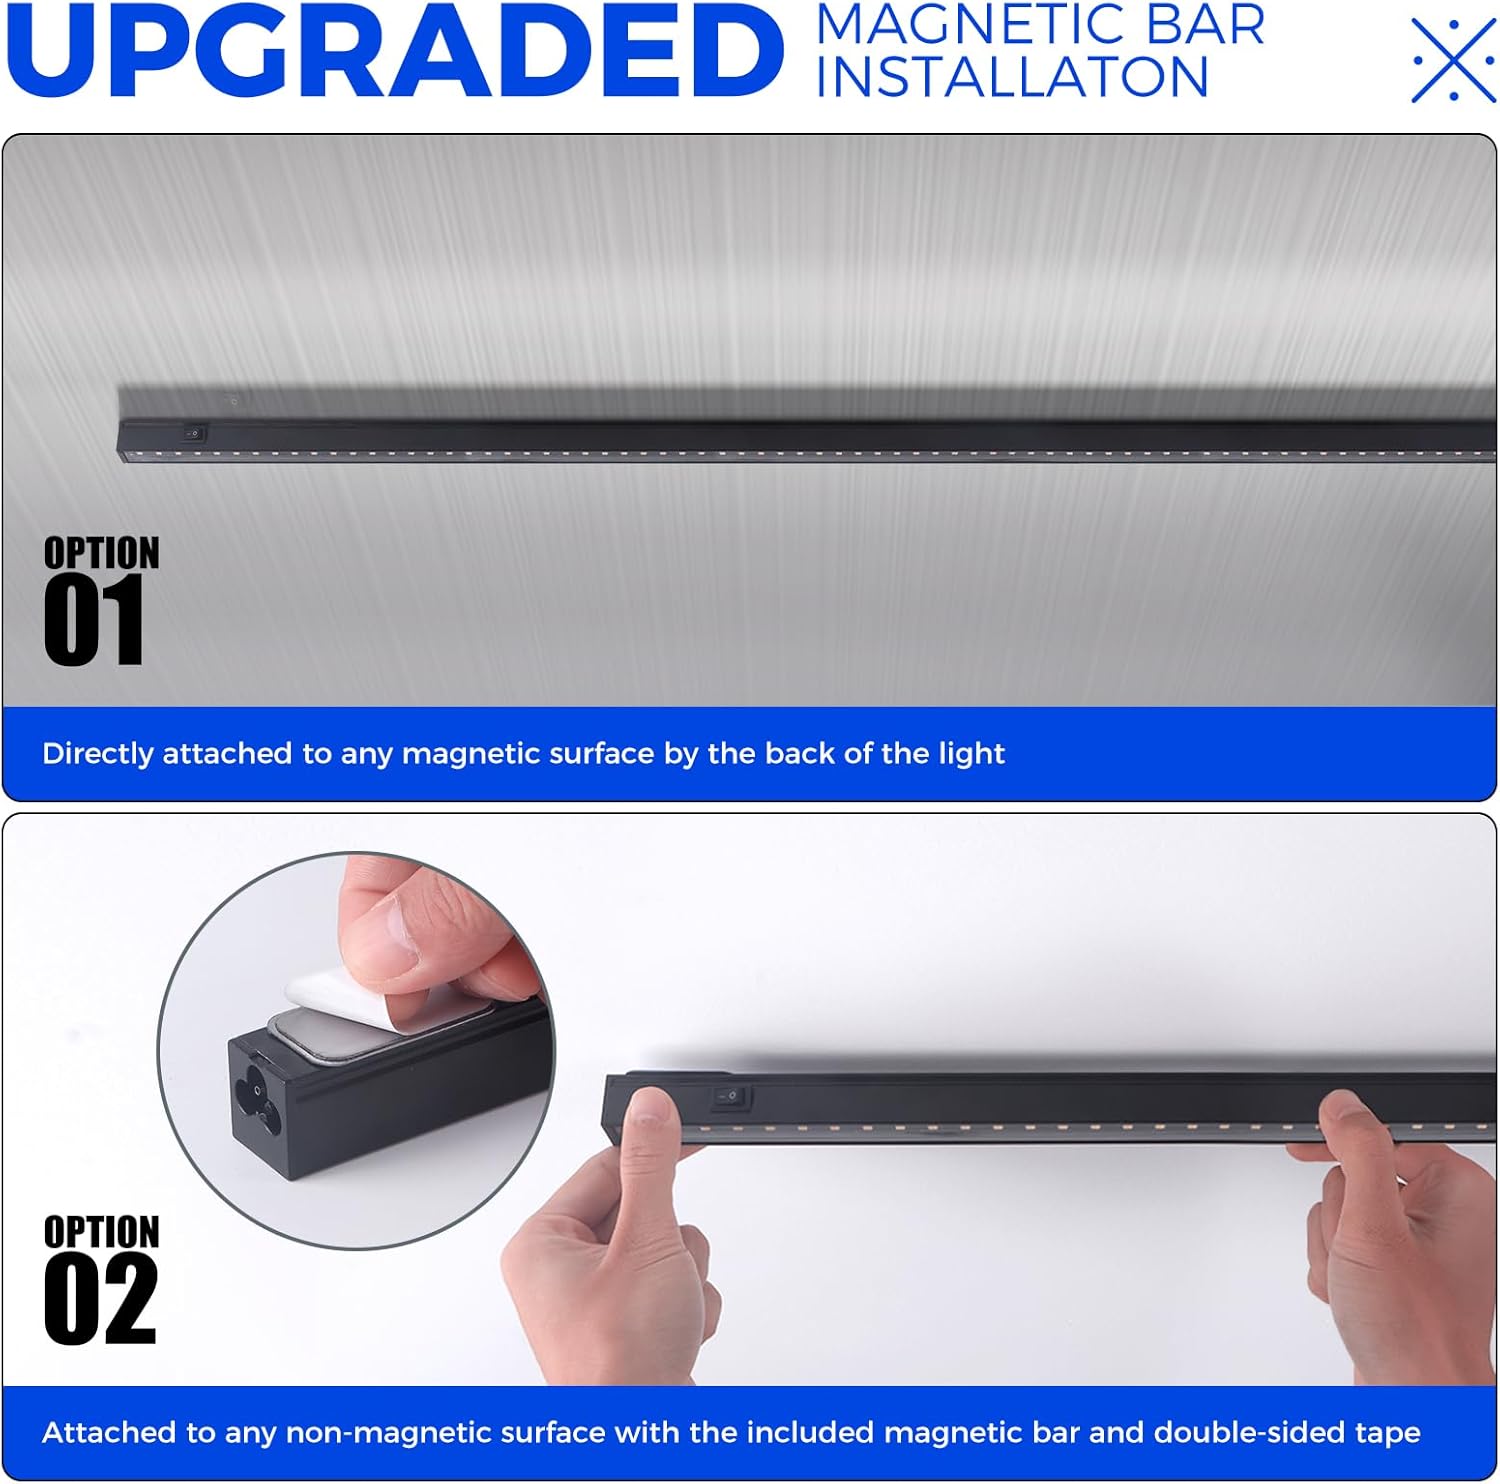
Image: Displays a spectral power distribution graph, indicating the full spectrum output of the Barrina T5 Grow Light, suitable for all growing stages with enhanced blue and red wavelengths.
5.3 High PPFD for Optimal Growth
The Barrina T5 Grow Lights deliver high Photosynthetic Photon Flux Density (PPFD), maximizing photosynthesis efficiency. This promotes rapid and healthy plant growth by providing the necessary light intensity. Adjust the distance between the lights and your plants to achieve desired PPFD levels.
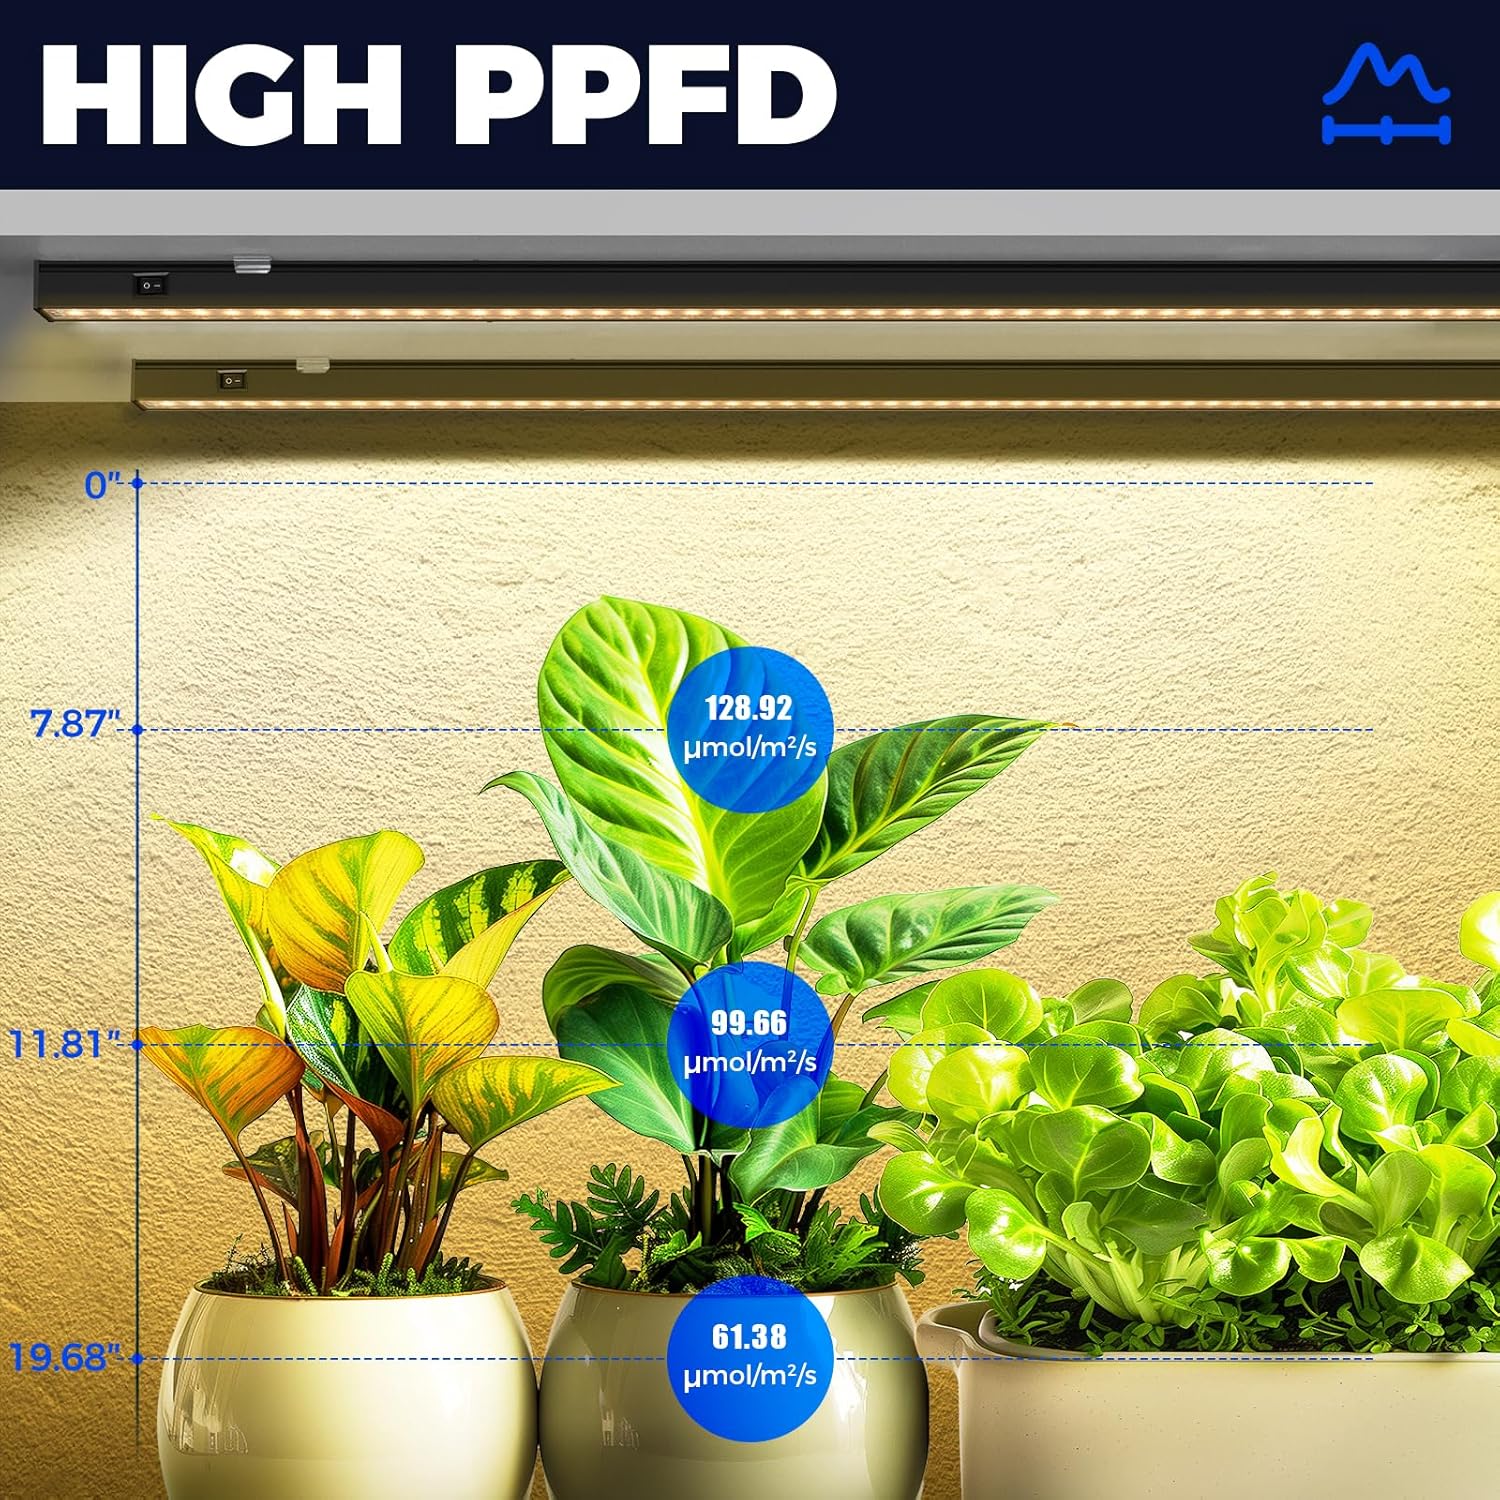
Image: Shows PPFD measurements at various distances from the Barrina T5 Grow Light, illustrating how light intensity changes with height above plants.

Image: A view of various plants thriving under Barrina T5 Grow Lights in an indoor growing setup, highlighting the effectiveness of the full spectrum lighting.
6. Maintenance
Regular maintenance ensures the longevity and optimal performance of your grow lights.
- Cleaning: Ensure the light is off and cool before cleaning. Gently wipe the light strips with a soft, dry cloth to remove dust and debris. Do not use abrasive cleaners or solvents.
- Inspection: Periodically check power cords and connecting cables for any signs of damage. Ensure all connections are secure.
- Storage: If storing the lights, ensure they are clean, dry, and stored in a cool, dry place away from direct sunlight.
7. Troubleshooting
If you encounter issues with your Barrina T5 Grow Light Strip, refer to the following common problems and solutions:
| Problem | Possible Cause | Solution |
|---|---|---|
| Light does not turn on | No power supply; loose connection; individual switch off | Check power outlet; ensure all cables are securely connected; verify the individual ON/OFF switch is in the 'ON' position. |
| Lights flicker | Loose connection; faulty power cord | Check all connections; try a different power cord if available. |
| Uneven light distribution | Improper placement; insufficient number of lights | Adjust light strip positions; consider adding more light strips for larger areas. |
If the problem persists after trying these solutions, please contact Barrina customer support.
8. Specifications
| Feature | Specification |
|---|---|
| Brand | Barrina |
| Model | T5 Grow Light Strip |
| ASIN | B0DRJJCBGF |
| Light Type | LED Full Spectrum |
| Power Consumption | 20W (per strip) |
| Color Rendering Index (CRI) | 98 |
| Control | Individual ON/OFF Switch |
| Installation | Magnetic, Clips, Cable Ties |
| Connectivity | Direct linkable, connecting cables |
9. Warranty and Support
For warranty information and customer support, please refer to the official Barrina website or contact their customer service directly. Keep your purchase receipt as proof of purchase.


