1. Introduction
Thank you for choosing the Huepar D011CGTP 360° Green Line Laser Level. This device is designed for precise indoor alignment tasks, offering a 360° horizontal line and a 130° vertical line. It features self-leveling capabilities, a pulse mode for extended range with a detector, and adjustable brightness levels. This manual provides essential information for safe and effective operation.

This image displays the Huepar D011CGTP laser level, its 1.5-meter tripod, green laser enhancement glasses, magnetic L-bracket, USB-C charging cable, and a carrying pouch.
2. Safety Instructions
Please read and understand all safety instructions before operating this product. Failure to follow these instructions may result in laser radiation exposure, electric shock, or injury.
- Laser Radiation: This product emits laser radiation. Do not stare directly into the laser beam. Avoid direct eye exposure.
- Do not aim the laser beam at people or animals.
- Use caution when operating near reflective surfaces, as reflected beams can also cause eye injury.
- Keep the device out of reach of children.
- Use only as intended and described in this manual.
- Wear the included laser enhancement glasses when necessary to improve visibility, but note they do not protect against direct laser exposure.
- This device is designed for indoor use only. It is not suitable for outdoor applications.
3. Package Contents
Verify that all items listed below are included in your package:
- 1x Huepar Green Cross Laser Level (D011CGTP)
- 1x 360° Magnetic Pivoting Base
- 1x Canvas Carry Bag
- 1x Laser Enhancement Glasses
- 1x Laser Level Tripod (1.5m)
- 2x Instruction Manual
- 1x Type-C Power Cord

This image displays all items included in the Huepar D011CGTP package: 1x Green cross laser level, 1x 360° Magnetic pivoting base, 1x Canvas carry bag, 1x Laser enhancement glasses, 1x Laser level tripod, 2x Instruction manual, and 1x Type-C power cord.
4. Product Overview
Familiarize yourself with the components of your Huepar D011CGTP laser level:

This detailed diagram provides an overview of the Huepar D011CGTP laser level's components. It points out the Laser Window, 1/4"-20 Threaded Mount, 3-Level Brightness Control Button & Strobe Mode Button & Pulse Mode Button, Pulse Mode Indicator, Power Indicator, Pendulum/Transit Lock, and Type-C Charging Port.
- Laser Window: Emits the green laser lines.
- 1/4"-20 Threaded Mount: For attaching the device to the tripod or magnetic base.
- Control Button: Used to adjust brightness, activate strobe mode, and pulse mode.
- Pulse Mode Indicator: Lights up when pulse mode is active.
- Power Indicator: Shows battery status.
- Pendulum/Transit Lock: Secures the pendulum for transport and activates manual mode.
- Type-C Charging Port: For recharging the internal Li-ion battery.
5. Setup
5.1 Tripod Assembly and Leveling
- Unfold the tripod legs and extend them to the desired height using the adjustment buckles.
- Place the tripod on a stable, level surface. Use the integrated bubble view level on the tripod head to ensure it is as level as possible.
- Attach the Huepar laser level to the tripod's 1/4"-20 screw mount.
- For fine adjustments, use the rotary rocker on the tripod head to precisely position the laser level.

This image highlights the key features of the 1.5m tripod, including the 1/4"-20 screw mount for the laser level, an integrated bubble view level for precise setup, a rotary rocker for fine adjustments, durable aluminum alloy material, adjustment buckles for leg extension, and non-skid rubber feet for stability. The tripod extends to 152cm (59.84 inches) and folds to 44cm (17.3 inches).
5.2 Magnetic Base Attachment
The included magnetic L-bracket allows for attachment to metallic surfaces.
- Screw the laser level onto the 1/4"-20 threaded mount of the magnetic L-bracket.
- Attach the magnetic base firmly to iron or steel surfaces such as metal studs, beams, or frames.
- Note: The magnets will not adhere to drywall, wood studs, or non-metallic surfaces.
6. Operating Modes
6.1 Self-Leveling Mode
- Slide the Pendulum/Transit Lock switch to the "ON" side. The power indicator will show a green light.
- The laser level will automatically self-level within ±3°. If the device is outside this range, the laser lines will flash rapidly to indicate it is not level.
- Once leveled, the laser lines will become steady.
6.2 Manual Mode
- Slide the Pendulum/Transit Lock switch to the "OFF" side. The power indicator will show a red light.
- In this mode, the self-leveling function is deactivated, allowing you to project laser lines at any desired angle. The laser lines will remain steady.

This image demonstrates the three main operational states of the laser level. The first panel shows the self-leveling mode (switch to "on" side, indicated by a green light), where the device automatically levels within ±3°. The second panel illustrates the manual mode (switch to "off" side, indicated by a red light), allowing the user to project lines at any angle. The third panel shows the device in the "Turn Off" state.
6.3 Adjustable Brightness
- Press the control button to cycle through three brightness levels: 100%, 70%, and 50%.
- Adjust the brightness according to indoor lighting conditions for optimal visibility.

This image illustrates the three adjustable brightness levels (100%, 70%, 50%) of the green laser lines, demonstrating how they appear on a surface. It also shows the included green glasses, which enhance the visibility of the green laser beams.
6.4 Pulse Mode
- Long-press the control button (screen button) to activate pulse mode. A blue light will illuminate, indicating pulse mode is active.
- In pulse mode, the laser range can be extended up to 50 meters (164 feet) when used with a compatible Huepar line laser detector (not included).
- A third short press of the control button will cause the laser line to flash continuously, which is another indication of pulse mode.
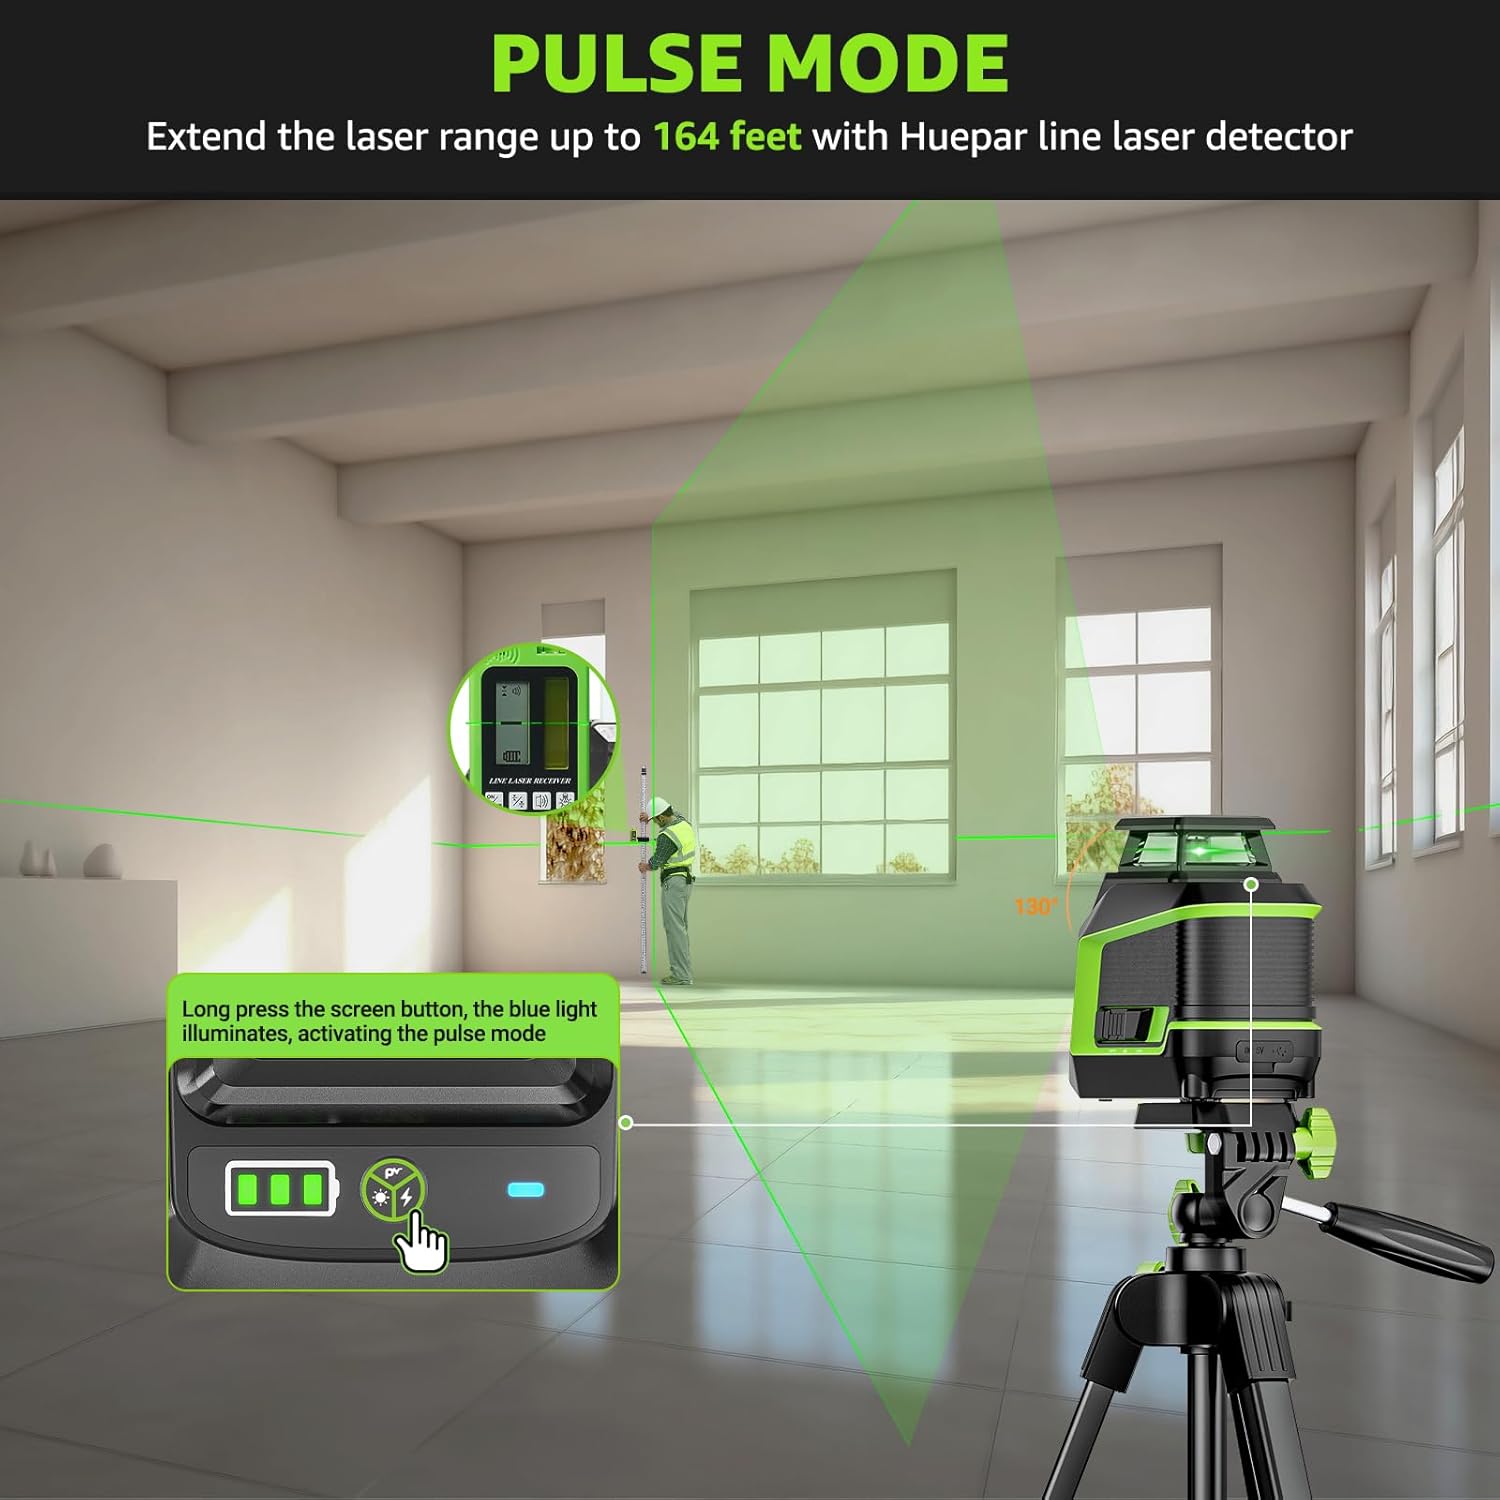
This image depicts the Huepar laser level in pulse mode, extending its range for use with an external Huepar line laser detector (not included). It shows a user operating the device in a room, with the green laser line visible. The image also indicates how to activate pulse mode by long-pressing the screen button, which illuminates a blue light.
7. Charging
The Huepar D011CGTP laser level is equipped with a built-in 2200 mAh rechargeable lithium-ion battery.
- Connect the provided Type-C power cord to the charging port on the device.
- Connect the other end of the cable to a compatible USB power source (e.g., phone charger, laptop, power bank, car charger).
- A full charge typically takes approximately 3 hours and provides up to 11 hours of continuous indoor use.

This image illustrates the charging process of the Huepar laser level via its Type-C port. It highlights that 3 hours of charging provides up to 11 hours of continuous power supply. The image also shows examples of the laser level being used for hanging pictures and other indoor tasks.
8. Maintenance
Proper maintenance ensures the longevity and accuracy of your laser level.
- Cleaning: Use a soft, damp cloth to clean the device. Do not use harsh chemicals or abrasive cleaners.
- Storage: Store the laser level in its canvas carry bag in a dry, cool place when not in use. Ensure the pendulum lock is engaged (switch in "OFF" position) during transport and storage to protect the internal components.
- IP54 Rating: The device is IP54 rated, meaning it is protected against dust ingress and splashing water from any direction. While it offers protection, avoid submerging the device in water or exposing it to heavy rain.

This image shows the Huepar laser level in two scenarios: one where it is exposed to water droplets, illustrating its IP54 waterproof rating, and another where it is in a dusty environment, demonstrating its dust-proof capabilities. These features ensure durability in various working conditions.
9. Troubleshooting
If you encounter issues with your Huepar D011CGTP laser level, refer to the following common solutions:
- Laser lines flashing rapidly: The device is out of its self-leveling range (±3°). Adjust the position of the laser level or tripod until the lines become steady.
- No laser lines: Ensure the device is powered on and the pendulum lock is in the "ON" or "OFF" position (not in the locked transport state). Check the battery level and recharge if necessary.
- Dim laser lines: Adjust the brightness setting using the control button. Ensure you are in an indoor environment, as the laser is not designed for outdoor visibility.
- Inaccurate leveling: Ensure the device is on a stable surface and within its self-leveling range. If issues persist, contact customer support.
- Battery not charging: Verify the Type-C cable is securely connected to both the device and the power source. Try a different charging cable or power adapter.
10. Specifications
| Brand | Huepar |
| Model Number | D011CGTP |
| Laser Color | Green |
| Laser Configuration | 360° Horizontal, 130° Vertical |
| Self-Leveling Range | ±3° |
| Accuracy | ± 1/9 inch at 10 meters |
| Working Range (Normal) | Up to 25 meters |
| Working Range (Pulse Mode) | Up to 50 meters (with Huepar receiver, not included) |
| Power Source | Rechargeable Lithium-ion Battery (2200 mAh) |
| Charging Port | Type-C |
| Battery Life | Up to 11 hours (continuous indoor use) |
| IP Rating | IP54 (Waterproof and Dust-proof) |
| Operating Mode | Automatic (Self-leveling) |
| Product Dimensions | 45 x 20.8 x 0.1 cm |
| Item Weight | 1.28 Kilograms |
11. Warranty and Support
Huepar products are designed for reliability and durability. For warranty information or technical support, please refer to the warranty card included in your package or visit the official Huepar website. Keep your purchase receipt as proof of purchase for warranty claims.


