
1. Product Overview
This Tedeligo wireless passive dry contact controller set operates at AC220V~250V and supports a load power of up to 2200W. It is designed for various DIY applications, offering both monostable and bistable control modes. Common uses include garden switches, access control systems, garage doors, wireless security alarms, and signal transmission.
The package includes one wireless receiver and two wireless remote control transmitters, along with this manual.

Image 1.1: The Tedeligo Wireless Remote Control Relay Module in an outdoor lighting application.
2. Setup and Installation
The receiver module is designed for easy integration into existing systems. Ensure all power is disconnected before attempting any wiring.
2.1 Wiring Diagram
The module features terminals for Line (L), Neutral (N), Normally Open (NO), and Common (COM). Refer to the diagrams below for typical AC and DC device wiring, as well as integration with a switch.

Image 2.1: Detailed wiring diagrams for connecting the receiver module to AC and DC devices, and integrating with a wall switch.
2.2 Garage Door System Integration
For garage door systems, the module acts as a passive relay. Connect the NO and COM terminals to the wall button/console input of your garage door motor unit. This allows the remote to trigger the garage door opener.

Image 2.2: Wiring for a garage door system, showing the relay module connected to the motor unit's wall button input.
3. Operating Modes and Programming
The module supports four distinct operating modes: Momentary (Monostable), Toggle (Bistable), Latched, and Delay. Each remote control can be programmed independently to any of these modes. The product is pre-configured in Latched mode.
3.1 Programming the Remote Control
To change the operating mode, follow these steps:
- Momentary (Monostable) Mode: Press the learning button on the receiver once. Then, press the 'ON' button on the remote control once. The relay will activate only while the 'ON' button is held.
- Toggle (Bistable) Mode: Press the learning button on the receiver twice. Then, press the 'ON' button on the remote control once. The relay will toggle its state (ON/OFF) with each press of the 'ON' button.
- Latched Mode: Press the learning button on the receiver three times. Then, press the 'ON' button on the remote control once, followed by the 'OFF' button once. The 'ON' button will activate the relay, and the 'OFF' button will deactivate it.
- Delay Mode: Press the learning button on the receiver 4, 5, 6, or 7 times for 5, 10, 15, or 20-second delays respectively. Then, press the 'ON' button on the remote control once. The relay will activate and then deactivate automatically after the set delay.

Image 3.1: Visual representation of the four available control modes and their operation.
Video 3.1: Demonstration of programming and operating the four control modes (Momentary, Toggle, Latched, Delay) with the remote control.
4. Applications
This versatile remote control relay module is suitable for a wide range of DIY applications, enhancing convenience and control in various settings. Some common applications include:
- Garden switches for outdoor lighting or irrigation systems.
- Access control systems for gates or doors.
- Garage door openers.
- Controlling fans or ventilation equipment.
- Wireless security alarms.
- General signal transmission for custom projects.

Image 4.1: Examples of diverse applications for the wireless remote control system.
5. Specifications
| Feature | Specification |
|---|---|
| Operating Voltage | AC220V ~ 250V |
| Max Load Power | 2200W |
| Max Current | 10A |
| Connectivity Technology | Radiofrequency (433Mhz) |
| Control Modes | Momentary, Toggle, Latched, Delay |
| Maximum Range | 30 Meters |
| Number of Buttons (Remote) | 7 |
| Controller Type | Push button control |
| Product Dimensions (L x W x H) | 47 x 27 x 22 mm |
| Weight | 120 g |
| Batteries (Remote) | 1 x 12V (CR2016), included |
| Maximum Supported Devices (Transmitters per Receiver) | 20 |
| Special Feature | Pre-programmed |
| Manufacturer | Tedeligo |
| Country of Origin | China |
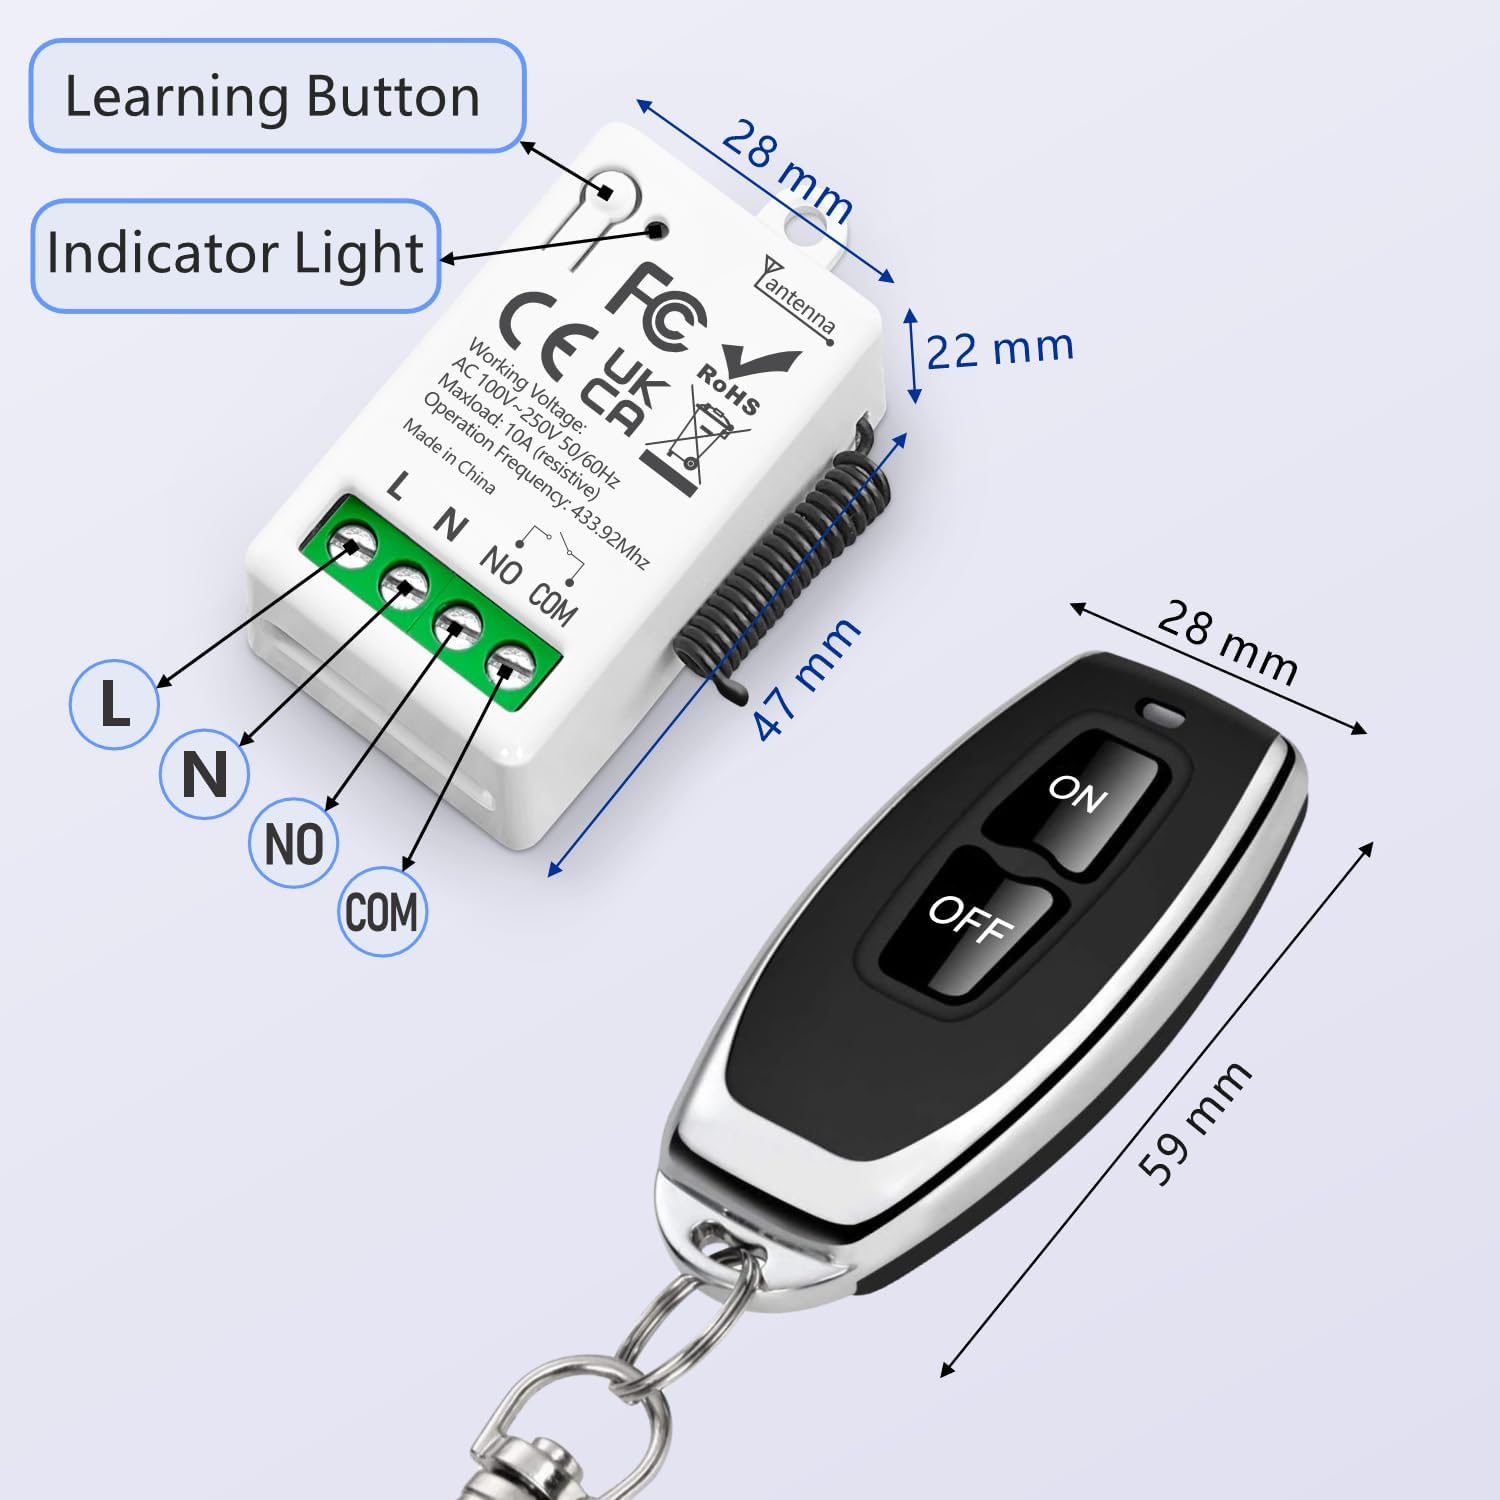
Image 5.1: Physical dimensions of the receiver module and the remote control.
6. Troubleshooting
If you encounter any issues during the use of this product, consider the following common troubleshooting steps:
- No response from receiver: Ensure the receiver is properly powered (AC220V~250V). Check all wiring connections for secure contact. Verify the remote control battery (CR2016) is functional and correctly inserted.
- Remote control range issues: Obstacles like thick walls or metal structures can reduce range. Ensure the receiver's antenna is unobstructed. Replace the remote control battery if it's weak.
- Incorrect operating mode: Re-program the remote control to the desired mode by following the steps in Section 3.1.
- Interference: While designed for independent operation, strong local radio frequency interference might occur. Try operating the device in a different location if possible.
For persistent issues or further assistance, please contact Tedeligo customer support.
7. Warranty and Support
The Tedeligo 433Mhz AC 220V 1-Channel Wireless Remote Control Relay Module comes with a two-year manufacturer's warranty. Spare parts availability in the EU is guaranteed for 1 year.
If you have any questions, require technical support, or encounter problems with the product, please contact Tedeligo customer service. We are committed to providing support for the products we sell.


