
Introduction
Thank you for purchasing the GODOX V1 Pro F TTL Li-ion Round Head Camera Flash. This professional speedlite is designed for Fujifilm cameras, offering advanced features such as 2.4G wireless transmission, High-Speed Sync (HSS) up to 1/8000s, and a powerful 2980mAh Li-ion battery. This manual provides detailed instructions for safe and effective operation of your flash unit.
Product Overview and Included Components
The GODOX V1 Pro F flash unit comes with several essential accessories to enhance your photography experience. Please ensure all components listed below are present in your package.

Image: GODOX V1 Pro F Flash unit, detachable sub-flash, lithium battery, charger, USB-C cable, flash stand, storage bag, and cleaning cloth.
Included Components:
- 1x V1ProF Flash (USA Version)
- 1x Storage Bag
- 1x Detachable Sub Flash SU-1
- 1x Lithium Battery (7.2V/2980mAh)
- 1x USB-C Charging Cable
- 1x Charger (VC26 USB charger)
- 1x Flash Stand
- 1x LETWING Cleaning Cloth
Setup
1. Battery Installation
- Ensure the flash unit is powered off.
- Locate the battery compartment on the side of the flash unit.
- Insert the provided 7.2V/2980mAh lithium battery, ensuring correct polarity.
- Close the battery compartment securely.
2. Mounting on Camera
- Slide the flash's hot shoe onto your Fujifilm camera's hot shoe mount.
- Secure the flash by rotating the locking mechanism until it is firmly attached.
3. Attaching the Detachable Sub Flash SU-1
The V1 Pro F features a detachable fill light component, the SU-1, which can serve as both a bounce flash and fill light.

Image: Illustration of the detachable Sub Flash SU-1 being attached to the V1 Pro flash body.
- Align the SU-1 with the designated slot on the V1 Pro flash body.
- Gently slide the SU-1 into place until it clicks securely.
- To detach, press the release button (if present) and slide the SU-1 off.
4. Removable Plastic Ring
The red plastic ring on the flash head is designed to be removable. This allows for customization with standard universal iron or magnetic rings (sold separately).
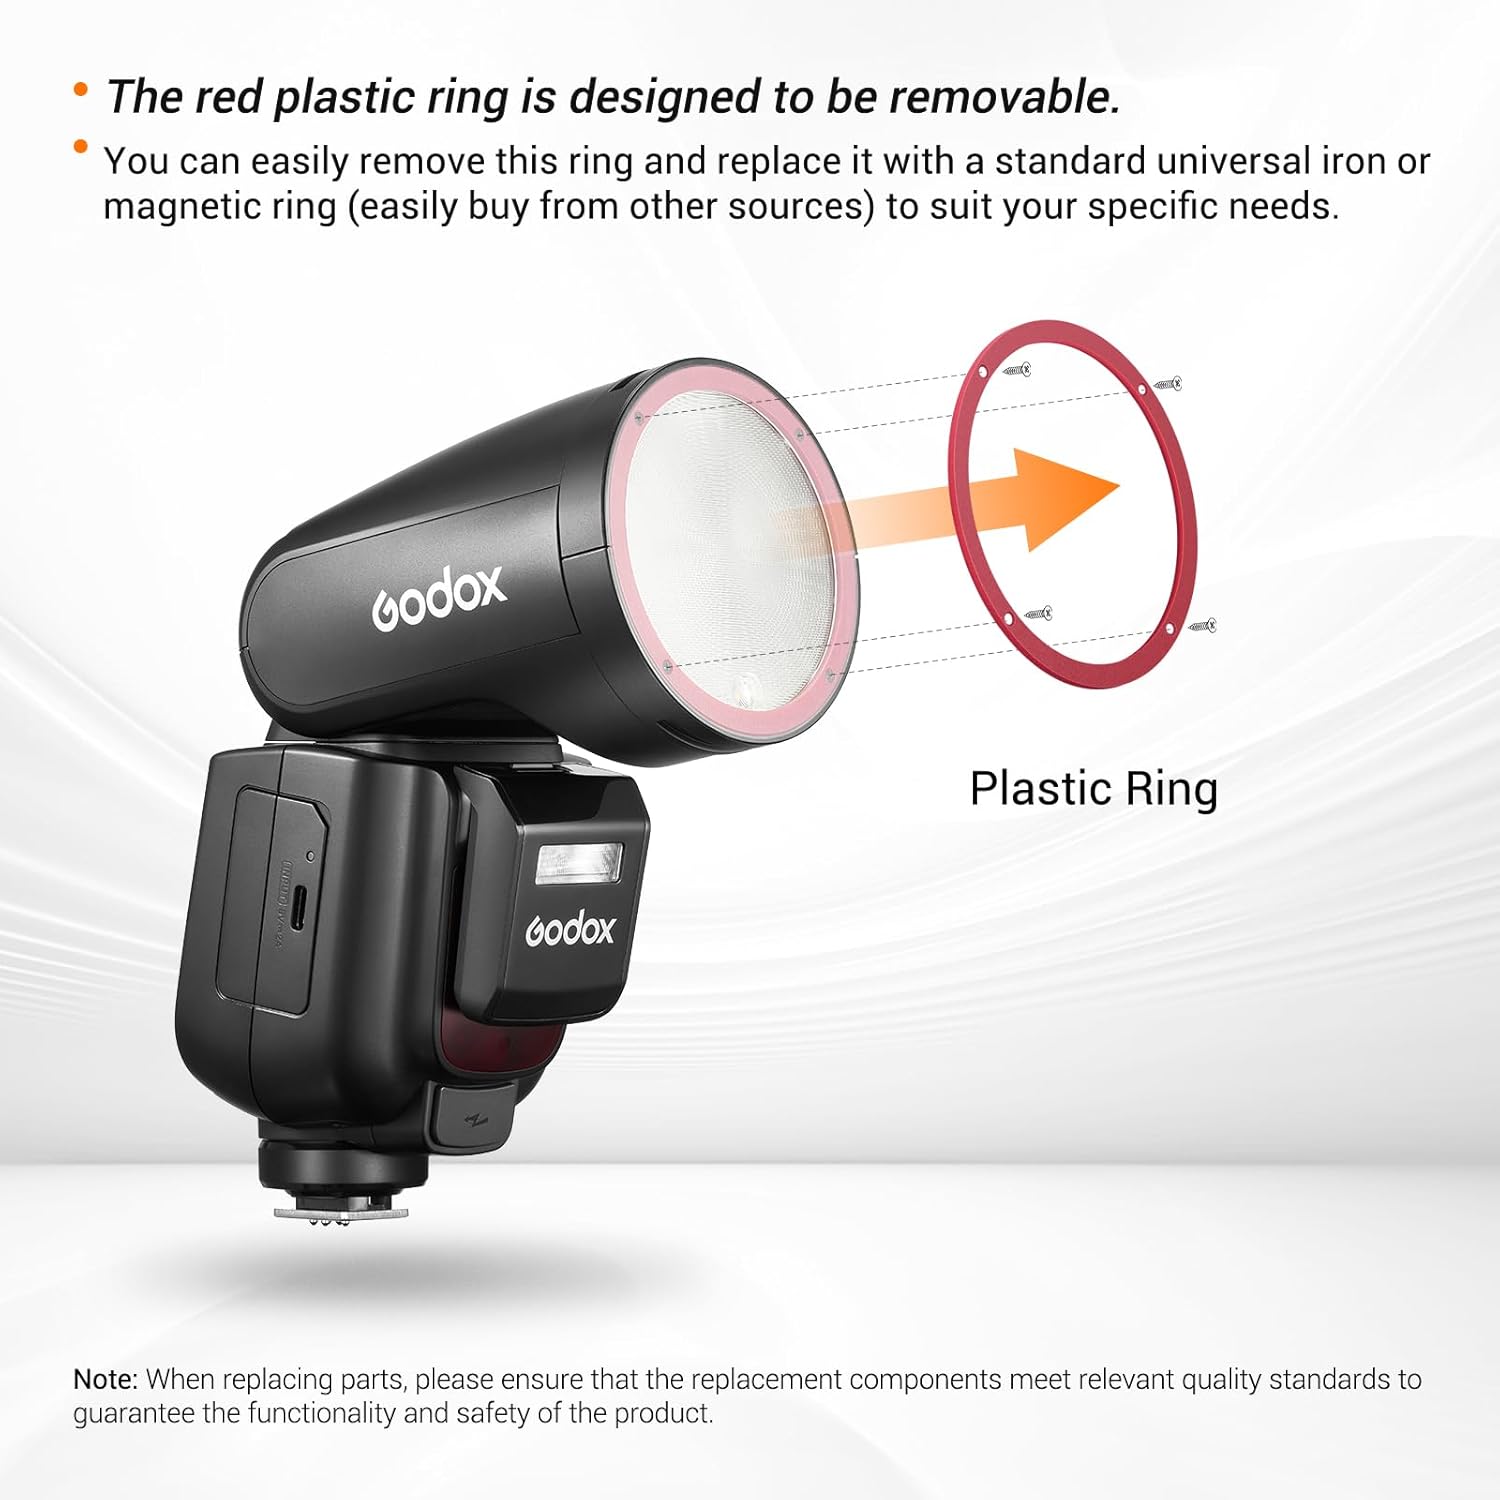
Image: Diagram illustrating the removal of the red plastic ring from the flash head.
Note:
- When replacing parts, ensure that replacement components meet relevant quality standards to guarantee product functionality and safety.
Operating Instructions
1. Power On/Off
Press and hold the power button to turn the flash unit on or off.
2. TTL/M Switch
Effortlessly switch between TTL automatic exposure mode and Manual (M) mode with a single click of the dedicated TTL/M button.

Image: Close-up of the TTL/M switch on the GODOX V1 Pro F flash.
3. Adjusting Swivel Angle
The flash head offers versatile positioning for direct flash, bounce flash, and other techniques:
- Horizontal Rotation: 0° to 330°
- Vertical Tilt: -7° to 120°
Image: Diagrams showing the range of horizontal (0-330°) and vertical (-7-120°) movement for the flash head.
4. Modeling Light Adjustment
The built-in 2W LED modeling light can be adjusted in 10 levels for pre-visualization of lighting effects.

Image: A visual representation of the 1-10 step dimming for the built-in LED modeling light.
5. 2.4G Wireless System (Master/Slave)
The V1 Pro F supports 2.4G wireless transmission and reception, allowing seamless integration with other Godox flashes/triggers. It can function as both a master unit and a slave unit for multi-light setups.
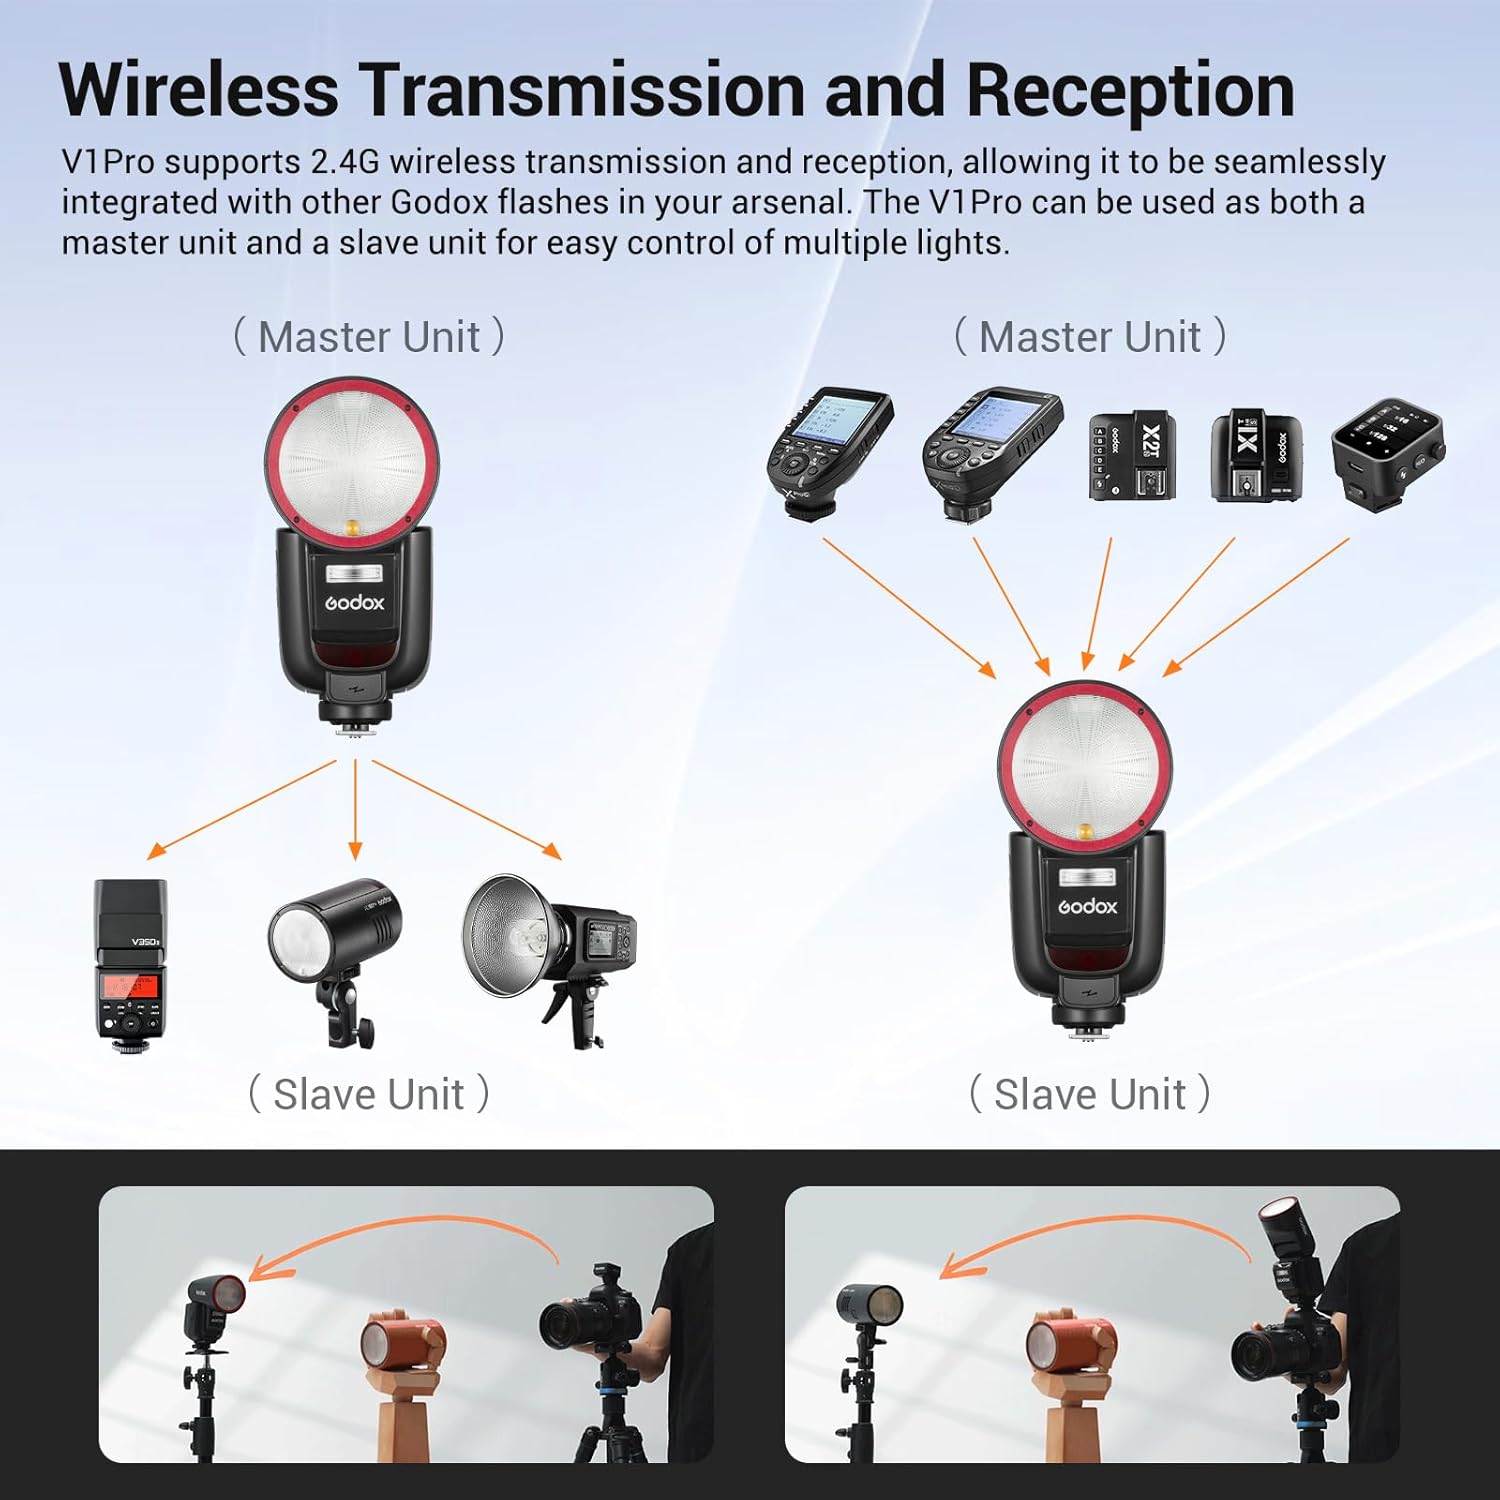
Image: Diagram showing the V1 Pro acting as a master unit controlling other Godox flashes (slave units), and being controlled by a separate master trigger.
6. Advanced Flash Modes
The flash supports various advanced modes for creative control:
- High-Speed Sync (HSS): Achieve shutter speeds up to 1/8000s to freeze fast motion or use wide apertures in bright conditions.
- Multi Flash: Fire a series of rapid flashes to capture multiple stages of movement in a single exposure.
- Front/Rear Curtain Sync: Synchronize the flash with either the beginning or end of the shutter exposure for different motion blur effects.
- Flash Exposure Compensation (FEC): Adjust the flash output relative to the camera's metered exposure for fine-tuning brightness.

Image: Examples of HSS (water splash), Multi Flash (fencers), Front/Rear Curtain Sync (car motion blur), and Flash Exposure Compensation (child's portrait at -1, 0, +1 exposure).
Charging and Power
The GODOX V1 Pro F is equipped with a powerful 7.2V/2980mAh lithium battery, providing approximately 500 full power flashes and a rapid 1.5-second recycle time. Multiple charging options are available:
- Type-C Charging: Directly charge the battery using a standard Type-C cable connected to the flash unit.
- VC26 USB Charger: Use the original VC26 USB charger (included) with a Type-C cable for charging.
- External Power Pack: The V1 Pro F is designed with an extra power port to seamlessly connect to Godox power packs like the PB960 (sold separately) for extended shooting sessions.

Image: Visuals demonstrating Type-C direct charging, charging with the VC26 USB charger, and connection to an optional PB960 external power pack.
The charging dock and battery are also compatible with the original Godox V1 flash unit.
Maintenance
- Keep the flash unit dry. Do not expose it to rain or moisture.
- Clean the flash head and body with a soft, dry cloth. Use the provided LETWING cleaning cloth for lenses and screens.
- Avoid strong impacts or dropping the unit.
- Store the flash in its protective bag when not in use to prevent dust and scratches.
- When not using the battery for extended periods, remove it from the flash unit and store it in a cool, dry place.
Troubleshooting
| Problem | Possible Cause | Solution |
|---|---|---|
| Flash does not fire. | Low battery; incorrect camera/flash settings; flash not securely mounted. | Charge or replace battery; check camera and flash settings (e.g., TTL/M mode, wireless settings); ensure flash is firmly attached to hot shoe. |
| Flash output is too weak/strong. | Incorrect FEC setting; flash mode mismatch with ambient light; distance to subject. | Adjust Flash Exposure Compensation (FEC); switch to Manual mode for precise control; ensure subject is within flash range. |
| Flash overheats. | Excessive continuous firing at full power. | Allow the flash to cool down. Reduce continuous firing frequency. The unit has thermal protection. |
| Wireless communication issues. | Interference; incorrect channel/group settings; distance. | Change wireless channel/group; ensure clear line of sight; reduce distance between units. |
If problems persist, please contact GODOX customer support.
Specifications
| Feature | Detail |
|---|---|
| Brand | GODOX |
| Model Number | V1Pro FU Flash for Fujifilm |
| Compatible Mountings | Fuji cameras and TTL auto flash |
| Camera Flash Type | Hot Shoe Mount |
| Flash Sync Speed | 1/8000s (High-Speed Sync) |
| Battery Type | 7.2V/2980mAh Li-ion Battery (included) |
| Full Power Flashes | Approx. 500 |
| Recycle Time | 1.5s |
| Continuous Shots | Up to 100 times at full power |
| Wireless System | 2.4G Wireless Transmission and Reception |
| Modeling Light | Built-in 2W LED, 1-10 level adjustable brightness |
| Swivel Angle (Horizontal) | 0° to 330° |
| Swivel Angle (Vertical) | -7° to 120° |
| Detachable Sub Flash | SU-1 (included) |
| Item Weight | 2.4 pounds |
| Package Dimensions | 9 x 8 x 4 inches |
Warranty and Support
For information regarding warranty coverage, please refer to the warranty card included with your product or visit the official GODOX website. For technical support or service inquiries, please contact GODOX customer service directly.
Official GODOX Store: GODOX Amazon Store