tfscar KEYDIY KDMAX
tfscar KEYDIY KDMAX Car Key Programmer User Manual
Model: KEYDIY KDMAX
1. Introduction
The KEYDIY KDMAX is a multifunctional smart device designed for automotive key and remote management. It integrates various functions including remote generation, chip recognition, frequency testing, and battery voltage detection. This manual provides detailed instructions for the proper setup, operation, and maintenance of your KDMAX device.
1.1 What's in the Box
- KEYDIY KDMAX Device
- USB Charging Cable
- Data Cables (various types for connection)
- Test Probes
- User Manual (this document)

Image 1.1: Contents of the KEYDIY KDMAX package, including the device, cables, and probes.
2. Product Overview
Familiarize yourself with the physical components and interfaces of your KDMAX device.
2.1 Front and Side View
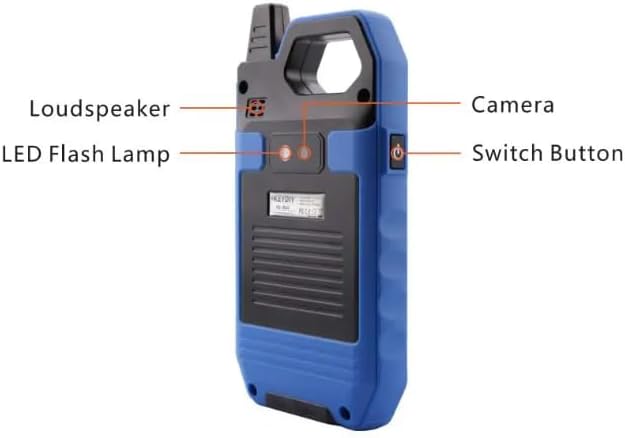
Image 2.1: Front and side view of the KDMAX device with labeled components.
- High Frequency Induction Region: Used for detecting and interacting with high-frequency signals.
- Transponder Holder: Area to place transponders for reading, editing, or cloning.
- Low Frequency Induction Acquisition Head: For acquiring low-frequency signals.
- Status Indicator: LED light indicating device status (e.g., charging, operation).
- HOME Button: Returns to the main menu.
- Functional Shortcut Button: Customizable button for quick access to frequently used functions.
- Voltage Detection Interface: Port for connecting test probes to measure voltage.
2.2 Back View

Image 2.2: Back view of the KDMAX device with labeled components.
- Loudspeaker: Provides audio feedback and alerts.
- LED Flash Lamp: Provides illumination for working in low-light conditions.
- Camera: For scanning or capturing images as required by certain functions.
- Switch Button: Power on/off button.
3. Setup
Follow these steps to prepare your KDMAX device for first use.
3.1 Initial Charging
- Connect the provided USB charging cable to the KDMAX device's charging port.
- Connect the other end of the USB cable to a compatible USB power adapter (not included) or a computer's USB port.
- The status indicator will illuminate to show charging is in progress. Allow the device to charge fully before first use. A full charge typically takes several hours.
3.2 Powering On/Off
- To Power On: Press and hold the Switch Button (refer to Image 2.2) until the screen illuminates.
- To Power Off: Press and hold the Switch Button until a power-off prompt appears on the screen. Select 'Power Off' to shut down the device.
4. Operating Instructions
The KDMAX device offers a range of functions accessible via its touchscreen interface. Navigate through the menus to select the desired operation.
4.1 Remote Generation
This function allows for the generation of new car remotes.
- From the main menu, select 'Remote Generation'.
- Choose the vehicle make and model from the list.
- Follow the on-screen prompts to generate the remote. Ensure the blank remote is correctly positioned if required.
4.2 Garage Remote Generating/Cloning
Create or duplicate remotes for garage doors.
- Access the 'Garage Remote' function.
- Select 'Generate' for new remotes or 'Clone' to copy an existing one.
- Follow the specific instructions for your garage remote type.
4.3 Remote Cloning
Duplicate existing car remotes.
- Select 'Remote Clone' from the main menu.
- Place the original remote in the designated area (e.g., High Frequency Induction Region).
- Follow the on-screen instructions to read the original remote's data and write it to a new blank remote.
4.4 Chip Recognition, Editing, Decoding, and Cloning
Manage transponder chips for vehicle immobilization systems.
- Place the chip into the Transponder Holder.
- Select the desired function: 'Recognition' to identify chip type, 'Editing' to modify data, 'Decoding' to extract information, or 'Cloning' to duplicate the chip.
- Follow the prompts for each specific operation.
4.5 Dedicated Chip Generating
Create specific transponder chips for various vehicle applications.
- Navigate to 'Dedicated Chip Generating'.
- Select the required chip type or vehicle application.
- Insert a blank chip into the Transponder Holder and proceed with generation.
4.6 Remote Battery Leakage Detection
Identify if a remote control is drawing excessive power, indicating a potential battery issue.
- Select 'Battery Leakage Detection'.
- Place the remote control in the specified area.
- The device will display the leakage status.
4.7 Car Key Unlock
This function may refer to unlocking certain types of car keys or remotes for reprogramming.
- Access the 'Car Key Unlock' feature.
- Follow the on-screen instructions, which may involve connecting the key or remote to the device.
4.8 IC/ID Card Recognition/Cloning
Read and duplicate IC (Integrated Circuit) and ID (Identification) cards.
- Select 'IC/ID Card' function.
- Place the card on the device's designated reading area.
- Choose 'Recognition' to read card data or 'Cloning' to duplicate it onto a blank card.
4.9 Frequency Checking
Verify the operating frequency of remote controls and keys.
- Select 'Frequency Checking'.
- Press a button on the remote or key while holding it near the device's frequency detection area.
- The device will display the detected frequency.
4.10 Battery Voltage Detection
Measure the voltage of various batteries using the provided test probes.
- Connect the test probes to the Voltage Detection Interface.
- Select 'Battery Voltage Detection'.
- Carefully touch the probes to the positive and negative terminals of the battery to be tested.
- The voltage reading will be displayed on the screen.
5. Maintenance
Proper maintenance ensures the longevity and optimal performance of your KDMAX device.
- Cleaning: Use a soft, dry cloth to clean the device's screen and body. Avoid abrasive cleaners or solvents.
- Storage: Store the device in a cool, dry place away from direct sunlight and extreme temperatures.
- Battery Care: If the device will not be used for an extended period, charge it periodically to maintain battery health.
- Software Updates: Regularly check for and install software updates to ensure compatibility and access to new features.
6. Troubleshooting
This section addresses common issues you might encounter with your KDMAX device.
- Device does not power on: Ensure the battery is charged. Connect the device to a power source and try again.
- Screen is unresponsive: Try restarting the device. If the issue persists, ensure the screen is clean and free of debris.
- Function not working as expected: Verify that you are following the correct steps for the specific function. Ensure all connections (cables, chips, remotes) are secure. Check for available software updates.
- Inaccurate readings: Ensure proper placement of chips/remotes and correct connection of test probes. Calibrate the device if a calibration option is available in the settings.
7. Specifications
Technical specifications for the KEYDIY KDMAX device.
| Feature | Specification |
|---|---|
| Brand | tfscar |
| Model | KEYDIY KDMAX |
| Power Source | Battery |
| Product Weight | 500 g |
| Package Dimensions | 10 x 10 x 10 cm |
| UPC | 735415246780 |
8. Warranty and Support
For warranty information and technical support, please refer to the documentation provided at the time of purchase or contact your seller directly. Keep your proof of purchase for any warranty claims.
Related Documents - KEYDIY KDMAX
 |
KEYDIY KD-MAX Professional Automotive Key Programming Device User Manual User manual for the KEYDIY KD-MAX, a professional multi-functional smart device for car remote generation, cloning, chip programming, and key unlocking. Features include Android OS, Wi-Fi, Bluetooth, and a 5-inch LCD screen. |
 |
KEYDIY KD-X4 User Manual: Professional Automotive Key Programmer Guide Comprehensive user manual for the KEYDIY KD-X4, a professional automotive key programmer. Learn about its features, functions, operation, and specifications for locksmiths. |
 |
KEYDIY KD X4 Remote Generator & Programming Tool User Manual Comprehensive instruction manual for the KEYDIY KD X4 Remote Generator and Multi-functional Programming Tool, covering safety, usage, functions, and FAQs for locksmiths and automotive technicians. |
 |
KEYDIY KD-X4 User Manual and Product Overview Detailed user manual and product overview for the KEYDIY KD-X4, a professional 5-in-1 key programmer for locksmiths. Learn about its features, functions, specifications, product list, and warranty information. |
 |
CK-IV Handheld Device User Manual: Features, Operation, and Safety Comprehensive user manual for the CK-IV handheld device, detailing its functions for frequency detection, remote control generation, chip identification, and more. Includes safety instructions, product introduction, device connection guide, and after-sales service information. |
 |
Xhorse KEYTOOL LITE User Manual - Car Key Programmer Guide Detailed user manual for the Xhorse KEYTOOL LITE, covering vehicle remote generation, transponder cloning, IC/ID cloning, frequency detection, and after-sale support. Learn how to use this advanced automotive key programming tool. |
Ask a question about this manual
Ask about setup, troubleshooting, compatibility, parts, safety, or missing instructions. Manuals+ will review the question and use this page’s manual context to help answer it.