1. Introduction
This manual provides detailed instructions for the setup, operation, and maintenance of your Flyrivergo Powered Wireless Laser Timer System. Designed for precision timing in various athletic activities, this system offers accurate measurement for speed training, lap times, and race events. Please read this manual thoroughly before using the product to ensure optimal performance and safety.

Image 1.1: Overview of the Flyrivergo Wireless Laser Timer System components.
2. What's in the Box
Carefully unpack all components and verify that you have received the following items:
- Laser Timer Host Machine (x1)
- Laser Timer Auxiliary Machine (x1)
- Adjustable Tripods (x4)
- Clamping Adapters (x4)
- Spare Clamping Adapters (x4)
- Reflective Boards (x2)
- Charging Cables (x2)
- Product Manual (x1)

Image 2.1: All components included in the product package.
3. Setup Instructions
Follow these steps to set up your laser timer system:
- Assemble Tripods: Extend the legs of each adjustable tripod and secure them firmly. The tripods can extend up to 5.25 feet (61 inches) to suit various training needs.
- Attach Clamping Adapters: Mount the clamping adapters onto the top of each tripod. These adapters provide a secure attachment point for the timer units and reflective boards.
- Mount Timer Units: Attach the main Laser Timer Host Machine to one tripod and the Laser Timer Auxiliary Machine to another. Ensure they are securely fastened.
- Position Reflective Boards: Place the reflective boards on the remaining tripods. These boards are essential for the laser beam to register breaks and accurately record times.
- Align Components: Position the main timer, auxiliary unit, and reflective boards in a straight line, ensuring the laser beam from the main unit can reach the reflective board and return to the auxiliary unit without obstruction.

Image 3.1: Adjustable tripod heights for flexible setup.

Image 3.2: Tripod base variations.
Setup Demonstration Video
Video 3.1: A demonstration of how to set up the laser timer system, including tripod assembly and unit placement.
4. Operating Instructions
The Flyrivergo Laser Timer System is designed for intuitive operation using its integrated body buttons. No remote control is needed.
Basic Operation:
- Power On/Off: Locate the power button on the main timer unit. Press and hold to power on or off.
- Start: Once powered on and set up, press the 'Start' button to begin timing.
- Stop: The timer automatically stops when the laser beam is broken at the finish line.
- Reset: Press the 'Reset' button to clear the current time and prepare for a new measurement.

Image 4.1: Details of the timer's body button controls and antenna.
5. Modes of Operation
The timer system offers multiple modes to adapt to various training scenarios:
- Mode 01: Normal Mode - Standard timing for single sprints or continuous runs.
- Mode 02: Single Person Multi-Cycle - Ideal for tracking multiple laps or repetitions for an individual.
- Mode 03: Multiple People Single Cycle - Suitable for timing several individuals in a single race or drill.
- Other Modes and Settings: Includes options for shielding a time range and prompt tone settings. Refer to the on-screen menu for detailed adjustments.

Image 5.1: Multi-mode adaptability for different events.


6. Key Features
- Adjustable Tripods: Includes four sturdy, height-adjustable tripods that extend up to 5.25 feet (61 inches), allowing for precise height customization to match various training requirements.
- Premium Chipset & HD Display: Equipped with a high-performance chipset for millisecond-level accuracy and an HD display for clear, easy-to-read timing, even in bright sunlight. The durable, wear-resistant aluminum alloy frame ensures longevity.
- Long-Lasting Battery & Portable Carrying Case: Features a built-in lithium battery providing up to 8 hours of continuous use, with support for plug-in mode. A rugged carrying case is included for easy transport and protection.
- Easy-to-Use Body Buttons: Intuitive body buttons simplify operation for quick start, stop, and reset functions, eliminating the need for a remote control.
- Versatile Training Modes: Offers multiple modes suitable for a wide range of activities, including sprints, cycling, soccer drills, and roller skating, making it a versatile tool for athletes of all levels.

Image 6.1: The timer's long endurance and outdoor suitability.

Image 6.2: Versatile applications of the timer system.
7. Specifications
| Color | Black |
| Brand | Flyrivergo |
| Material | Aluminum |
| Item Weight | 4.83 Kilograms (10.63 pounds) |
| Number of Settings | 5 |
| Manufacturer | Flyrivergo |
| Package Dimensions | 26.75 x 13.75 x 7 inches |
| ASIN | B0DRFDWGM4 |
| Batteries | 1 Lithium Polymer battery required (included) |
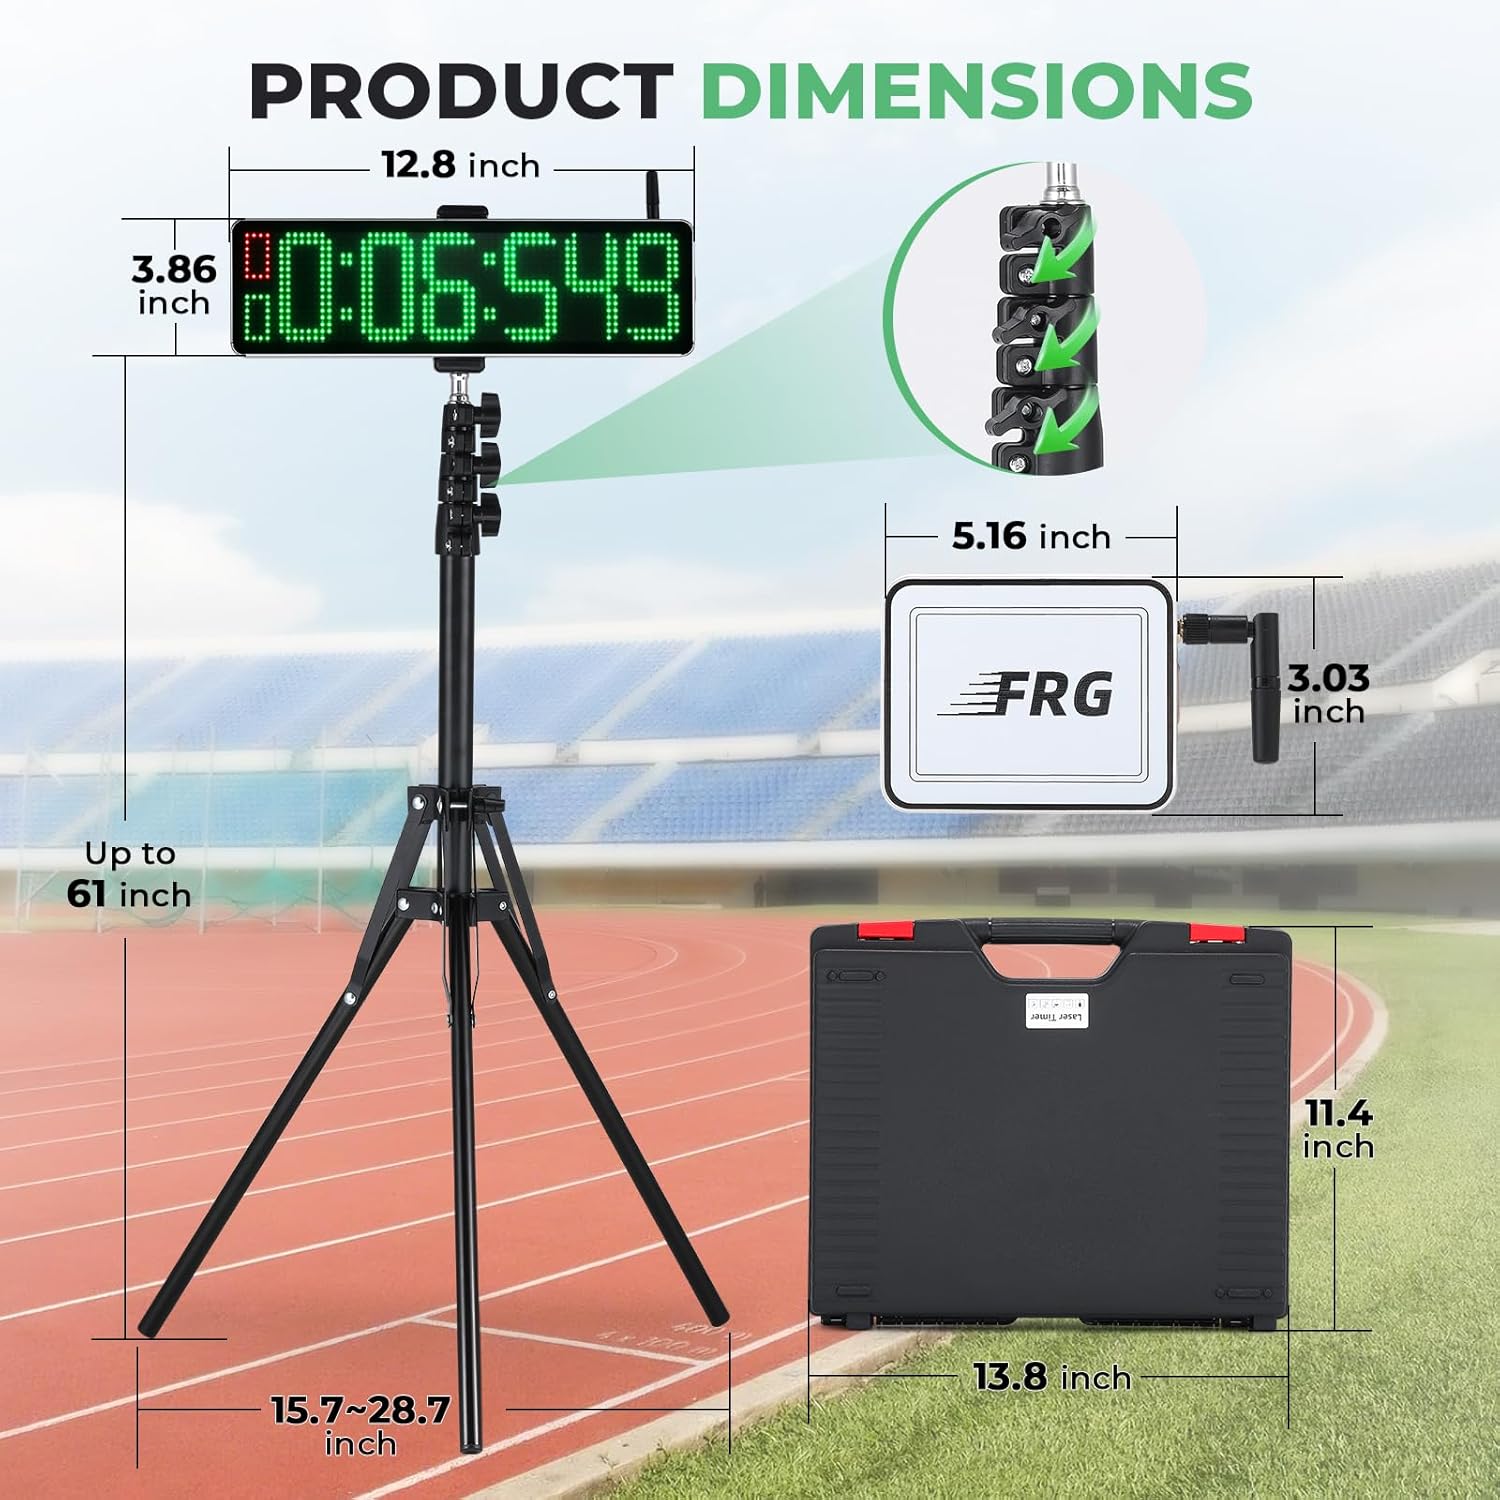
Image 7.1: Product dimensions overview.
8. Maintenance
To ensure the longevity and optimal performance of your Flyrivergo Laser Timer System, follow these maintenance guidelines:
- Cleaning: Use a soft, dry cloth to clean the display and exterior surfaces. Avoid abrasive cleaners or solvents.
- Storage: When not in use, store the system in its provided carrying case in a cool, dry place, away from direct sunlight and extreme temperatures.
- Battery Care: Charge the battery regularly, even if the device is not in frequent use, to maintain battery health. Avoid fully discharging the battery for extended periods.
- Laser Lens: Keep the laser lens on the main unit and the reflective surfaces on the auxiliary unit and reflective boards clean and free of dust or smudges to ensure accurate timing.
9. Troubleshooting
If you encounter issues with your laser timer system, refer to the following common troubleshooting steps:
- Timer Not Starting/Stopping:
- Ensure all units are powered on and fully charged.
- Verify that the laser beam is properly aligned between the main unit, auxiliary unit, and reflective boards. Obstructions can prevent accurate detection.
- Check for any physical obstructions in the laser path.
- Inaccurate Readings:
- Confirm that the reflective boards are clean and positioned correctly.
- Ensure the units are stable and not moving during operation.
- Check for strong external light sources that might interfere with the laser sensor.
- Display Issues:
- If the display is dim, ensure the battery is charged.
- Restart the main timer unit.
If problems persist after attempting these steps, please contact customer support.
10. Warranty and Support
Your Flyrivergo Powered Wireless Laser Timer System is covered by a manufacturer's warranty. Please refer to the warranty card included in your package for specific terms and conditions.
For technical support, troubleshooting assistance, or warranty claims, please contact Flyrivergo customer service through the retailer where you purchased the product or visit the official Flyrivergo website for contact information.
Customer Service Contact: Please refer to your purchase documentation or the Flyrivergo brand store on Amazon for the most current support information.

