1. Introduction
This manual provides essential instructions for the setup, operation, and maintenance of your VILCORN R46S Retro Handheld Game Console. Please read this manual thoroughly before using the device to ensure proper functionality and to maximize your gaming experience.

Figure 1.1: Front view of the VILCORN R46S console. The screen displays key features such as HD output, battery capacity, dual joysticks, and HD color screen.
2. Safety Information
- Keep the device away from water and fire to prevent damage and ensure user safety.
- Do not attempt to disassemble or modify the device. This may void the warranty and cause damage.
- Use only the provided charging cable and adapter to charge the device.
- Avoid prolonged exposure to direct sunlight or extreme temperatures.
- This product is recommended for ages 3 years and up.
3. Product Features
- Display: 4.0-inch IPS OCA display with 720x720 resolution and 1:1 aspect ratio.
- Processor: High-performance RK3566 quad-core CPU.
- Battery: Built-in 3500mAh 3.8V LiPo battery, providing approximately 3-5 hours of gameplay.
- Storage: Dual TF card slots for independent system and game storage.
- Connectivity: Supports 2.4GHz WiFi and Bluetooth.
- Operating System: Open Source Linux System, allowing for system upgrades and compatibility with mainstream 64-bit 3D simulators.
- Peripherals: Supports Bluetooth handles, speakers, and headsets.
- Streaming: Supports WiFi Moonlight streaming function.

Figure 3.1: The 4-inch IPS OCA fully laminated 2.5D HD MIPL screen with 720*720 high resolution provides clear picture quality and soft colors, designed to reduce eye strain during extended play.

Figure 3.2: The console features high-definition large-screen synchronous output via an HDMI interface, enhancing the visual experience with greater depth and vivid colors.
4. Device Layout and Controls
Familiarize yourself with the buttons and ports on your R46S console:
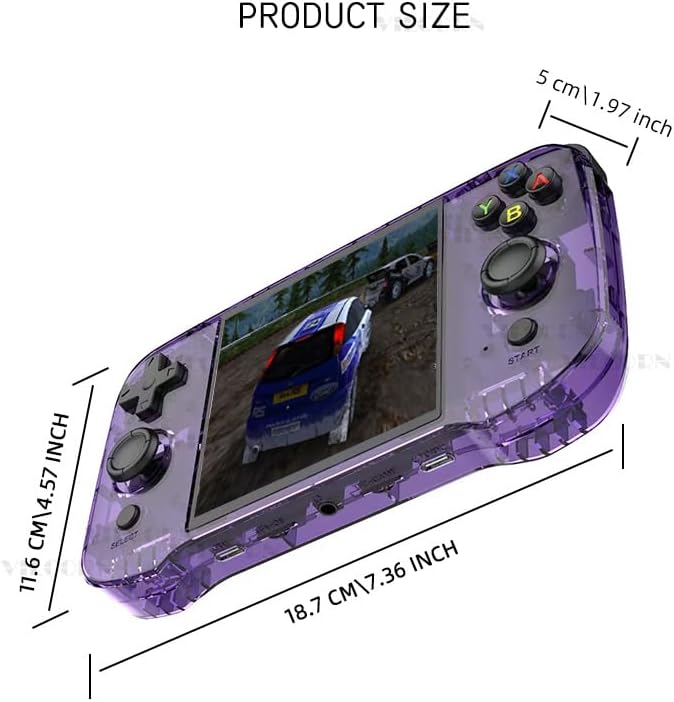
Figure 4.1: Key Analysis of the VILCORN R46S console.
| No. | Feature |
|---|---|
| 1 | Top L1/L2 buttons |
| 2 | Top R1/R2 buttons |
| 3 | Power key |
| 4 | RESET button |
| 5 | HDMI Output port |
| 6 | Volume button |
| 7 | D-Pad (Directional Pad) |
| 8 | Joystick (L) |
| 9 | SELECT button |
| 10 | Game function keys (A, B, X, Y) |
| 11 | Joystick (R) |
| 12 | START button |
| 13 | Charging level light indicator |
| 14 | OTG port |
| 15 | TF1-OS (MicroSD card slot for Operating System) |
| 16 | 3.5mm Audio hole (Headphone Jack) |
| 17 | TF2-GAME (MicroSD card slot for Games) |
| 18 | OTG/DC (Charging port) |

Figure 4.2: The console features dual joysticks with an ergonomic design, allowing for precise game operation and adaptability to various game types.
5. Setup Instructions
- Initial Charge: Before first use, fully charge the console using the provided USB-C cable and a compatible power adapter. The charging level light (13) will indicate charging status.
- Insert MicroSD Cards:
- Insert the MicroSD card containing the operating system into the TF1-OS slot (15).
- Insert the MicroSD card containing your games into the TF2-GAME slot (17).
- Power On: Press and hold the Power key (3) until the screen illuminates.
- Language Selection (if applicable): Follow on-screen prompts to select your preferred language.
- Network Connection (Optional): To enable WiFi Moonlight streaming or system updates, navigate to the system settings and connect to a 2.4GHz WiFi network.
- Bluetooth Pairing (Optional): To connect Bluetooth peripherals (controller, speaker, headset), go to system settings and initiate pairing.
6. Operating Instructions
- Navigating the Menu: Use the D-Pad (7) or Joysticks (8, 11) to navigate through the game system menus. The Game function keys (10) (A, B, X, Y) and SELECT (9) / START (12) buttons are used for selection and confirmation.
- Selecting a Game System: From the main menu, scroll to select your desired game system (e.g., Super Nintendo, Game Boy Advance, PSP). Press the 'A' button (part of 10) to enter.
- Launching a Game: Within a game system, use the D-Pad or Joysticks to browse the list of available games. Select a game and press the 'A' button to launch it.
- In-Game Controls: Controls will vary by game. The console features L1/L2 (1), R1/R2 (2) shoulder buttons, a D-Pad (7), dual joysticks (8, 11), and A, B, X, Y function keys (10).
- Adjusting Volume: Use the Volume button (6) to increase or decrease the audio output.
- Exiting a Game / System: Specific button combinations (often SELECT + START or a dedicated menu button) are typically used to exit a game or return to the main system menu. Refer to the system's on-screen instructions if available.
- Power Off: Press and hold the Power key (3) until the power-off options appear, then select to shut down the device. A quick press may put the device into sleep mode.
7. Maintenance
- Cleaning: Use a soft, dry cloth to clean the console's exterior. Do not use liquid cleaners or aerosols.
- Storage: Store the device in a cool, dry place away from direct sunlight and extreme temperatures.
- Battery Care: To prolong battery life, avoid fully discharging the battery frequently. Charge the device regularly, even if not in use for extended periods.
- Software Updates: Periodically check for system updates through the device's settings menu to ensure optimal performance and access to new features.
8. Troubleshooting
- Device will not power on:
- Ensure the battery is charged. Connect the charger and wait a few minutes before attempting to power on again.
- If the device is unresponsive, press the RESET button (4) with a thin object (e.g., a paperclip) and then try to power on.
- Games are not loading or performing poorly:
- Verify that the game MicroSD card is correctly inserted into the TF2-GAME slot (17).
- Ensure the game file format is compatible with the installed system emulator.
- For performance issues, try restarting the device.
- No sound:
- Check the volume level using the Volume button (6).
- If headphones are connected, ensure they are fully plugged into the 3.5mm Audio hole (16).
- Cannot connect to WiFi/Bluetooth:
- Ensure you are within range of a 2.4GHz WiFi network. The device does not support 5GHz networks.
- Verify correct password entry for WiFi.
- For Bluetooth, ensure the peripheral is in pairing mode and within close proximity to the console.
9. Specifications
| Feature | Detail |
|---|---|
| Model Name | R46S |
| Brand | VILCORN |
| Display | 4.0-inch IPS OCA, 720x720 resolution, 1:1 aspect ratio |
| Processor | RK3566 Quad-core CPU |
| Battery | 3500mAh 3.8V LiPo (approx. 3-5 hours playtime) |
| Storage | Dual MicroSD card slots (TF1-OS, TF2-GAME) |
| Connectivity | 2.4GHz WiFi, Bluetooth |
| Operating System | Open Source Linux System |
| Dimensions | 7.8 x 5.11 x 1.6 inches |
| Recommended Age | 3 years and up |
| Manufacturer | Shenzhen Jiajue Technology Co., Ltd |

Figure 9.1: Product dimensions of the VILCORN R46S console: 18.7 cm (7.36 inches) length, 11.6 cm (4.57 inches) width, and 5 cm (1.97 inches) thickness.
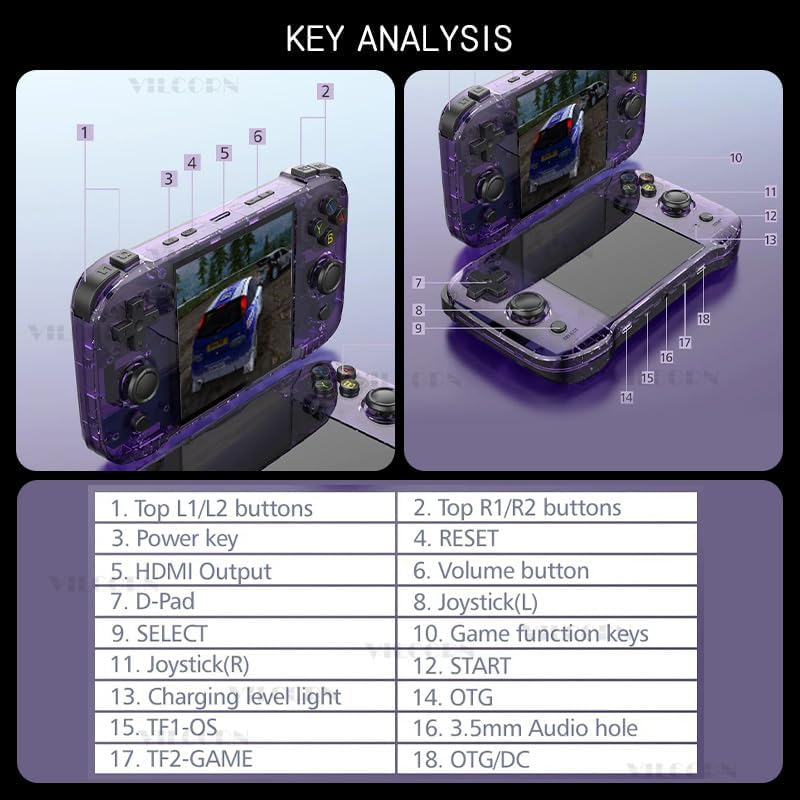
Figure 9.2: The console is equipped with a built-in 3500mAh polymer battery (note: image shows 4000mAh, but product text specifies 3500mAh), featuring two-way protection for charge and discharge, allowing for several hours of play on a single full charge.
10. What's in the Box
- 1 x VILCORN R46S Handheld Game Console
- 1 x USB-C Charging Cable
- 1 x User Manual (this document)
11. Warranty and Support
For warranty information and technical support, please refer to the contact details provided by your retailer or visit the official VILCORN website. Keep your purchase receipt as proof of purchase for warranty claims.
