1. Introduction
Welcome to your new FOWORE Digital Security Safe Box. This manual provides essential information for the safe and efficient operation of your product. Please read it thoroughly before use and retain it for future reference.
2. Important Safety Information
- Do not store emergency keys inside the safe. Keep them in a secure, separate location.
- Ensure the safe is securely mounted to a wall or floor using the provided expansion bolts to prevent theft.
- Replace batteries promptly when the low battery indicator appears to avoid being locked out.
- Avoid exposing the safe to extreme temperatures or humidity.
- Keep the user manual and any unique key codes in a safe place for future reference.
3. Package Contents
Verify that all items listed below are included in your package:
- 1 x FOWORE Digital Security Safe Box
- 1 x User Manual
- 1 x Fireproof Waterproof A4 Bag
- 2 x Emergency Backup Keys
- 4 x Mounting Screws (Expansion Bolts)

Image: Included components of the FOWORE Safe Box, featuring the safe, fireproof bag, user manual, mounting screws, and emergency keys.
4. Product Features
- Large Capacity: 2.23 cubic feet interior space, ideal for firearms, documents, jewelry, and cash. Includes a fireproof and waterproof bag for added protection.
- Robust Construction: Made from solid cold-rolled steel with recessed pry-resistant door and 3 enhanced steel locking bolts for security. Scratch and stain-resistant powder coating.
- Digital Keypad Lock: Programmable 3 to 8 digit code with an ergonomic, sloped keypad.
- Dual Alarm System: Activates if the wrong combination is entered three consecutive times.
- Silent Mode: Option to mute keypad sounds for discreet operation.
- Removable Shelf: Adjustable shelf for organizing items of various sizes.
- Internal LED Light: Built-in light for visibility in dark environments.
- Dual Opening Methods: Can be opened with a personal code + knob or emergency keys + knob.
- Anchoring Design: Pre-drilled holes on the bottom and back for secure mounting to a wall or floor.
- Low Battery Warning: Visual indicator (green and red lights) for timely battery replacement.
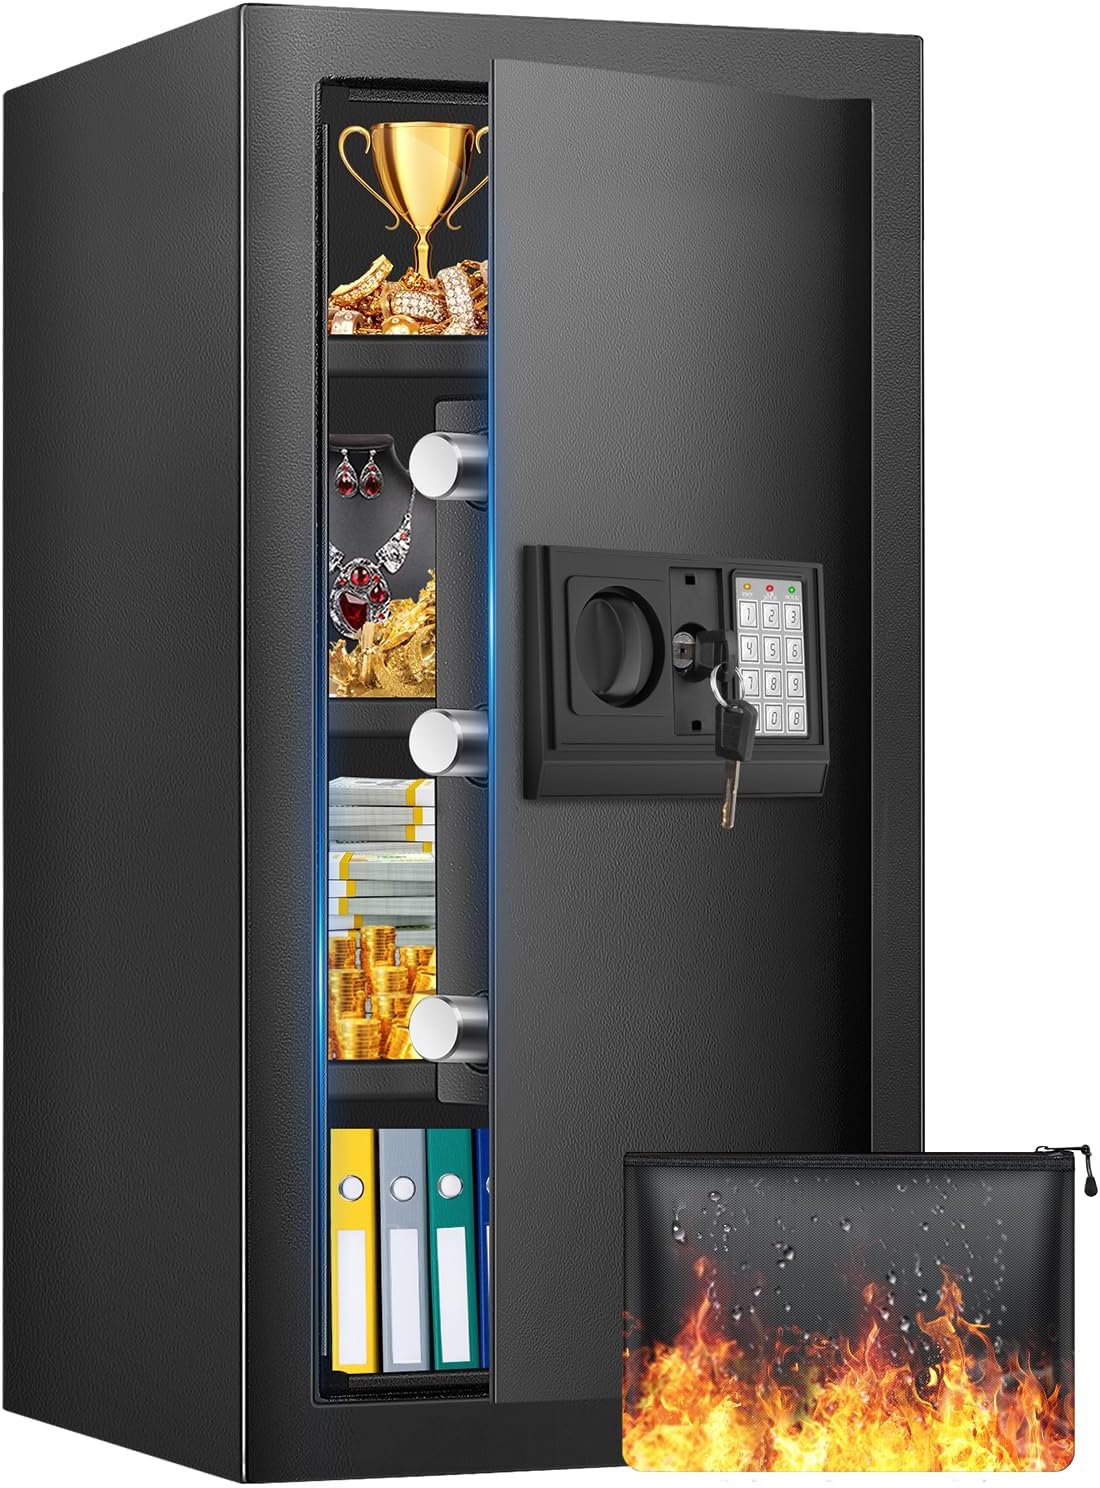
Image: The FOWORE safe box, open to reveal its spacious interior with multiple shelves, designed for storing various valuables.
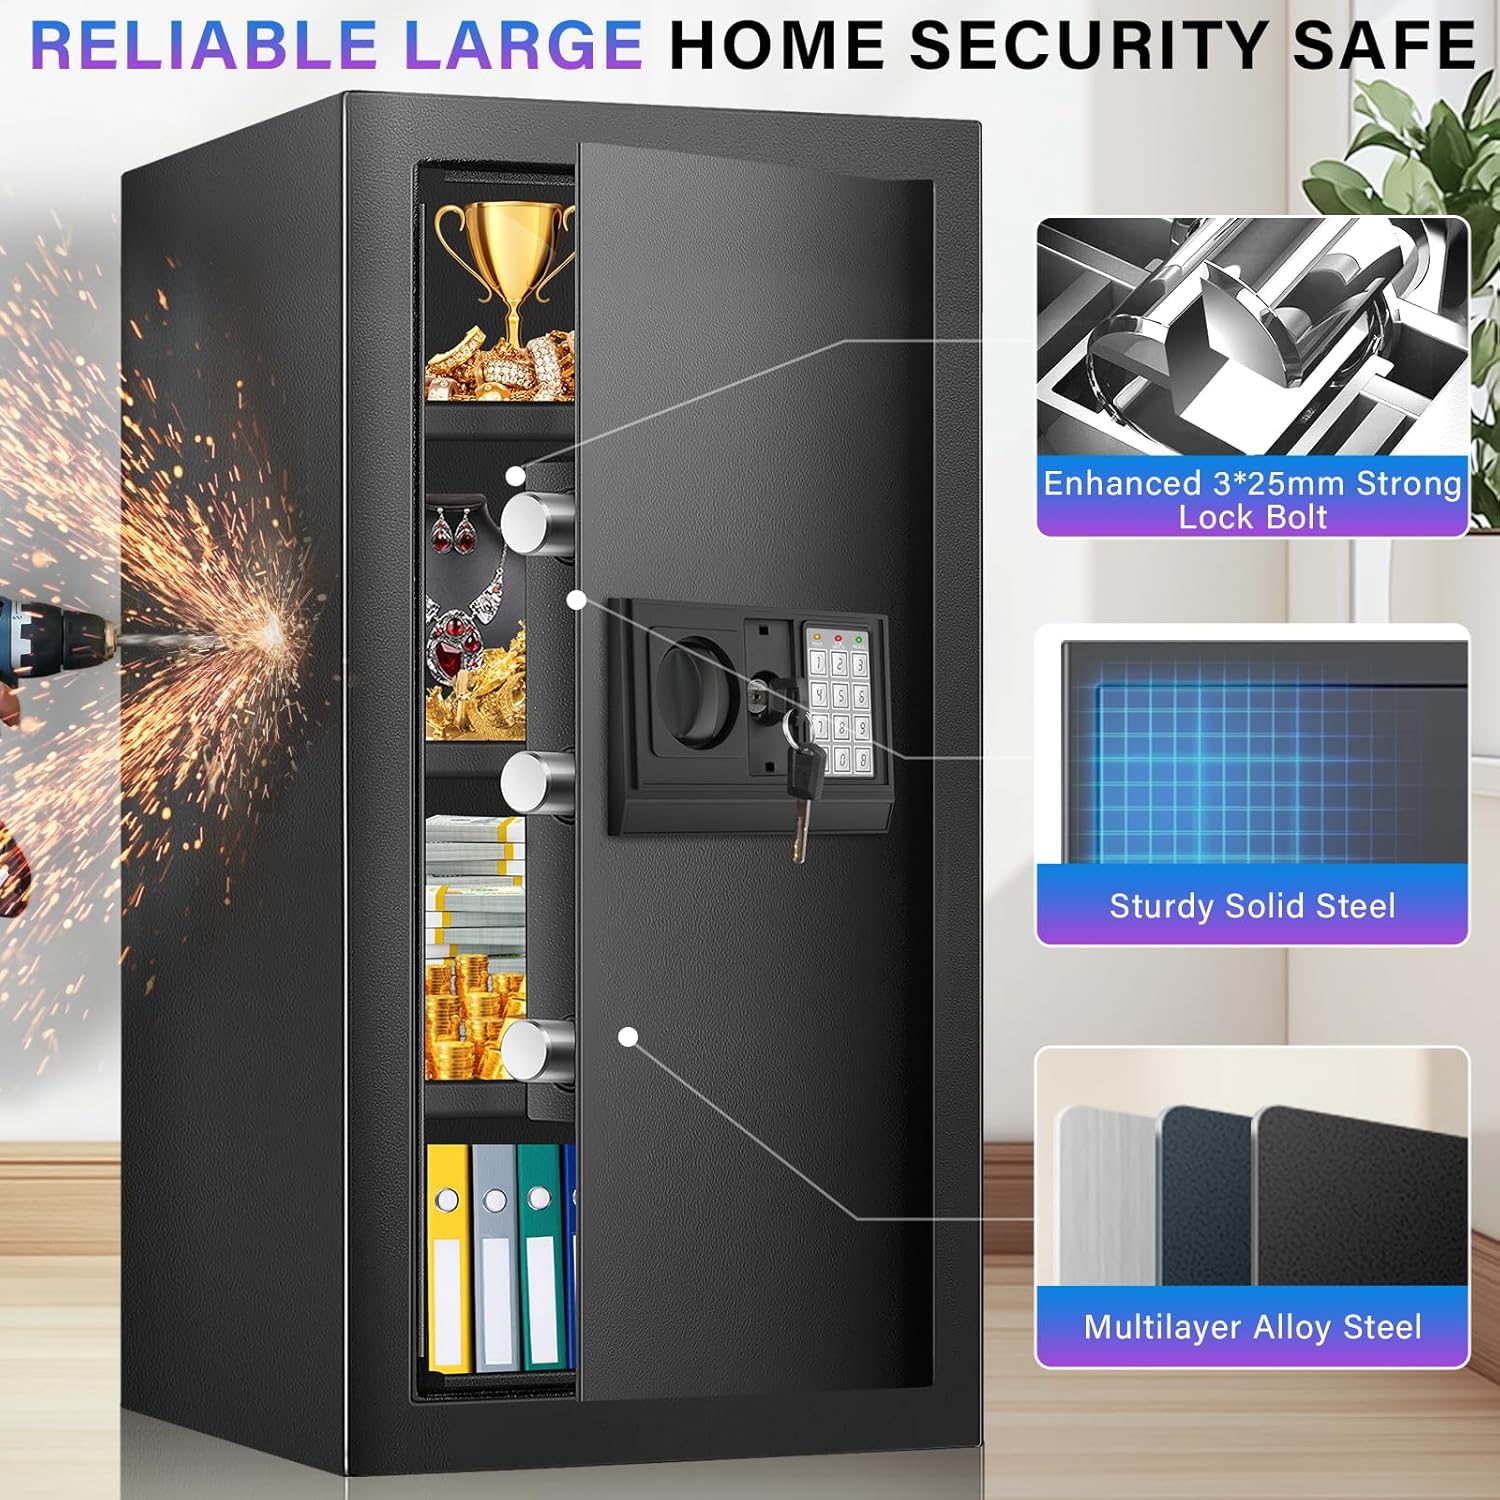
Image: Detailed view of the safe's construction, emphasizing its robust steel body and secure locking mechanism.
5. Setup Guide
5.1. Initial Unlocking
For the first use, the safe must be opened using the emergency backup keys. The initial password is typically 159B/A, but always refer to the sticker on the safe or the included manual for the exact initial code.
- Locate the keyhole cover on the digital keypad.
- Gently remove the cover to expose the keyhole.
- Insert one of the emergency backup keys into the keyhole and turn it clockwise.
- Simultaneously turn the knob on the keypad clockwise to open the safe door.
5.2. Battery Installation
The digital keypad requires 4 AA batteries (not included).
- Open the safe door using the emergency key.
- Locate the battery compartment on the inside of the safe door.
- Insert 4 new AA batteries, ensuring correct polarity (+/-).
- Close the battery compartment cover.
5.3. Setting Your Personal Code
You can set a personal code of 3 to 8 digits.
- With the safe door open, locate the red reset button on the inside of the door (usually near the hinge or battery compartment).
- Press the red reset button. You will hear two beeps, and the yellow light on the keypad will illuminate.
- On the keypad, enter your desired 3 to 8 digit personal code.
- Press 'A' or 'B' to confirm your new code. You will hear a confirmation beep.
- Test the new code with the door open before closing it.

Image: The digital keypad and emergency keyhole, illustrating the two methods of access.

Image: Visual guide demonstrating how to open the safe using either the digital code or the emergency key.
5.4. Mounting the Safe
For enhanced security, it is highly recommended to anchor the safe to a wall or floor.
- Choose a suitable location for mounting.
- Locate the pre-drilled holes on the back and bottom of the safe.
- Mark the drilling points on the wall or floor through these holes.
- Drill pilot holes in the marked locations.
- Align the safe with the drilled holes and secure it using the provided expansion bolts.

Image: Step-by-step guide for securely mounting the safe to a wall or floor.
6. Operating Instructions
6.1. Opening with Digital Code
- Enter your personal 3 to 8 digit code on the keypad.
- Press 'A' or 'B' to confirm. The green light will illuminate.
- Within 5 seconds, turn the knob clockwise to open the safe door.
6.2. Opening with Emergency Key
This method is used if you forget your code or if the batteries are depleted.
- Remove the keyhole cover on the digital keypad.
- Insert an emergency backup key and turn it clockwise.
- Simultaneously turn the knob clockwise to open the safe door.
6.3. Mute Function
To operate the safe silently:
- To activate mute mode: Press "00A" on the keypad.
- To deactivate mute mode: Press "66A" on the keypad.
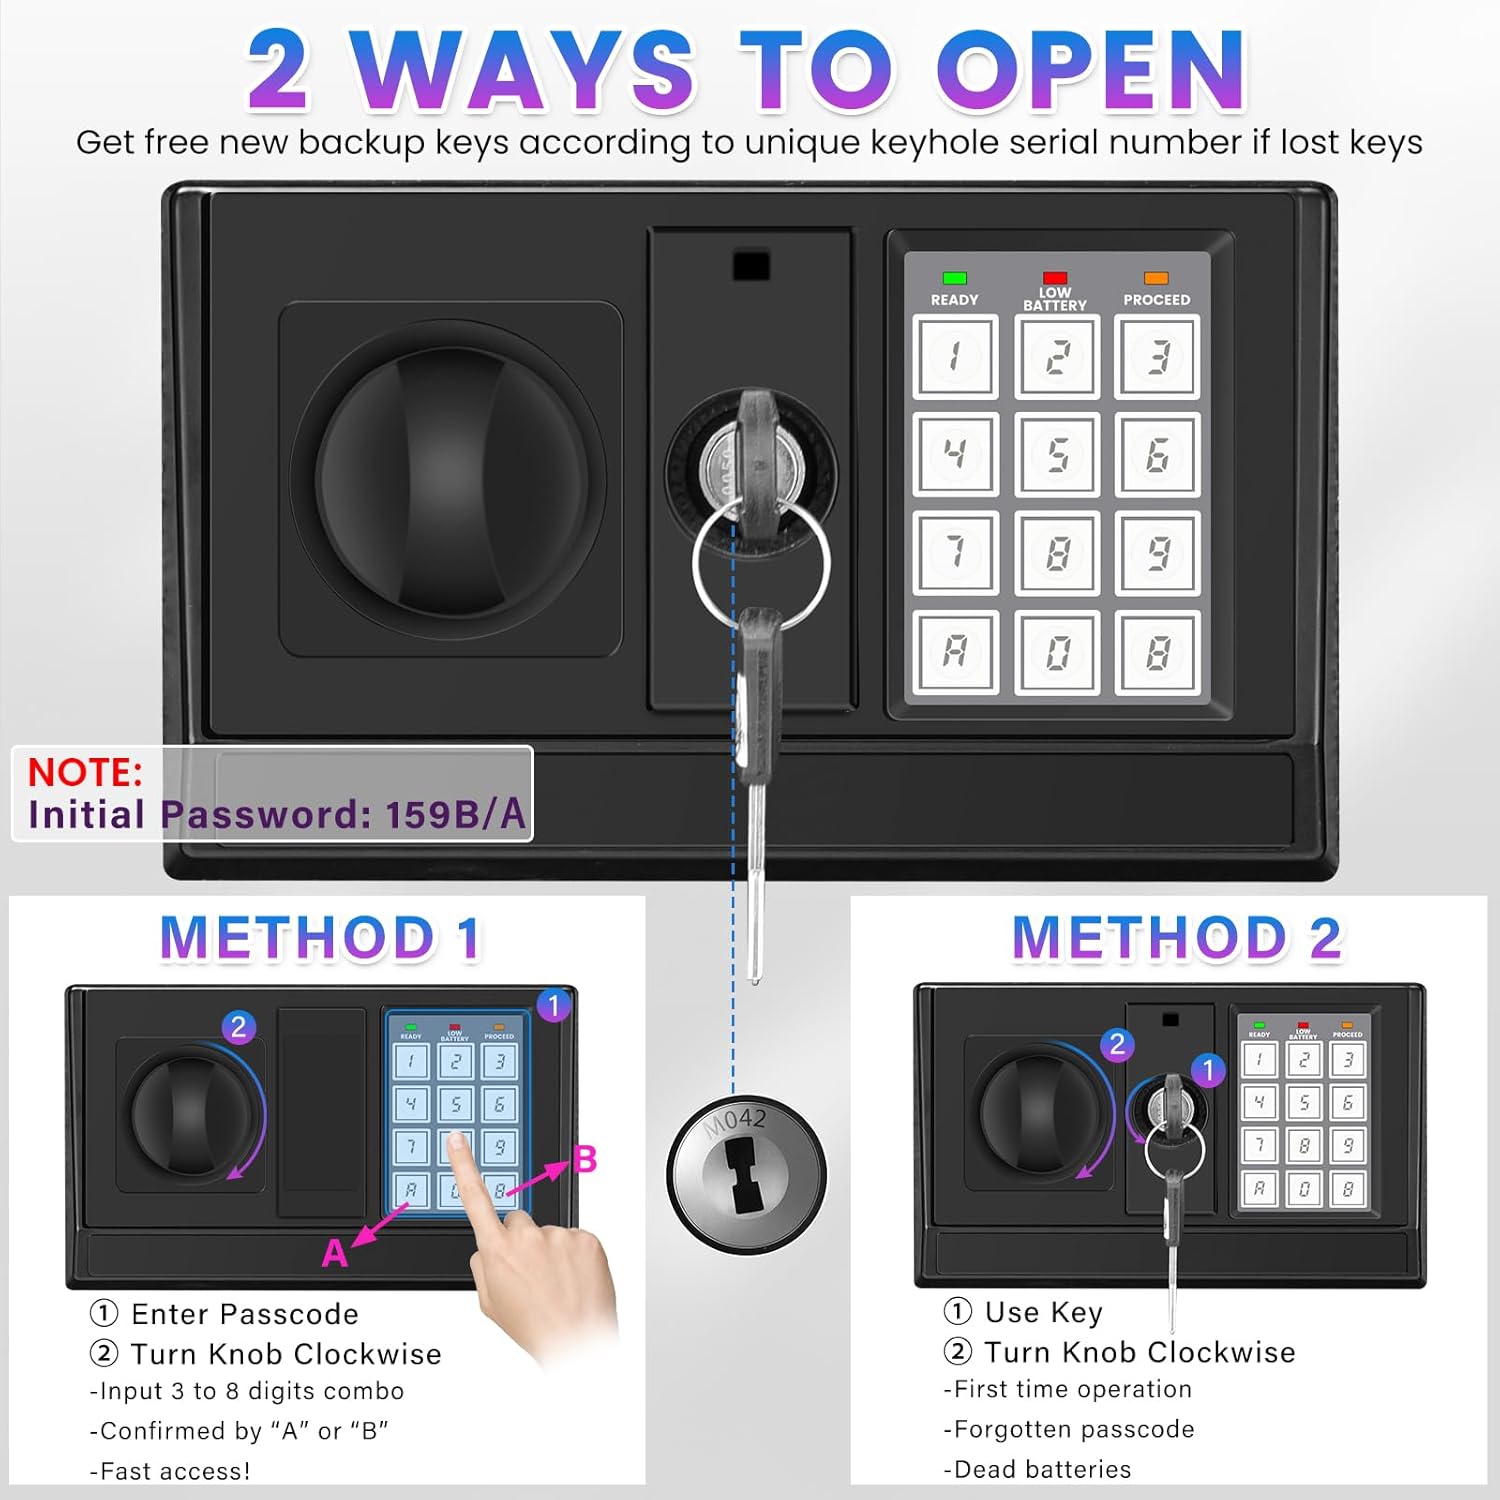
Image: The safe box with an icon indicating the mute function, suitable for quiet environments.
6.4. Anti-Theft Alarm
The safe features an anti-theft alarm system:
- If an incorrect code is entered three consecutive times, the alarm system will activate, and the safe will lock temporarily.
- The alarm will sound, and the keypad lights will flash.
- To stop the alarm, enter the correct code or use the emergency key.

Image: The safe's anti-theft alarm system, which triggers after three incorrect password attempts.
6.5. Low Battery Warning
The safe will indicate low battery status:
- When the green and red lights on the keypad are illuminated simultaneously, it signifies that the batteries are low.
- Replace the batteries immediately to ensure continuous operation and prevent being locked out.
7. Maintenance
- Battery Replacement: Replace all 4 AA batteries with new ones when the low battery warning appears. Do not mix old and new batteries.
- Cleaning: Wipe the safe's exterior with a soft, damp cloth. Avoid abrasive cleaners or solvents that could damage the finish.
- Internal Care: The removable shelf can be cleaned separately. The felt pad inside helps protect items from scratches.
8. Troubleshooting
| Problem | Possible Cause | Solution |
|---|---|---|
| Safe does not open with digital code. | Incorrect code entered; batteries are low or dead; knob not turned within 5 seconds. | Re-enter correct code; replace batteries; turn knob promptly after entering code. Use emergency key if necessary. |
| Alarm sounds unexpectedly. | Three consecutive incorrect code entries. | Enter the correct code or use the emergency key to disarm the alarm. |
| Keypad is unresponsive. | Batteries are completely dead. | Use the emergency key to open the safe and replace the batteries. |
| Cannot set a new personal code. | Reset button not pressed correctly; code not confirmed with 'A' or 'B'. | Ensure the red reset button is pressed until two beeps are heard; confirm the new code by pressing 'A' or 'B'. |
9. Product Specifications
| Feature | Detail |
|---|---|
| Brand | FOWORE |
| Model Number | 70ex |
| Product Dimensions | 13"D x 11"W x 27"H (Approx. 33cm D x 28cm W x 68.5cm H) |
| Size (Specific) | 27.56''H x 11.81D x 13.78W |
| Lock Type | Digital Keypad, Key |
| Capacity | 2.23 Cubic Feet |
| Material | Alloy Steel |
| Special Features | Alarm System, Anti-Theft, Combination Lock, Removable Shelf, Sensor Light |
| Mounting Type | Floor Mount |
| Item Weight | 44.1 pounds (20.05 Kilograms) |
| Batteries Required? | Yes (4 x AA) |
| Batteries Included? | No |
10. Product Videos
Best choice for home safe
Video: A demonstration of the FOWORE safe box, highlighting its features and suitability for home use. This video is provided by the seller, Yuefuwen.
I will show you how much fits inside.
Video: A user demonstrates the internal capacity of the FOWORE safe box, showing various items being stored. This video is provided by the seller, Gabrielle & Jeremy.
11. Warranty and Support
For warranty information, technical support, or any inquiries regarding your FOWORE Digital Security Safe Box, please refer to the contact information provided in your purchase documentation or contact the seller directly. Keep your proof of purchase for warranty claims.

