1. Introduction
Thank you for choosing the Dapper Supply 21-Inch Push Lawn Sweeper. This manual provides essential information for the safe assembly, operation, maintenance, and troubleshooting of your new lawn sweeper. Designed for efficient collection of grass clippings, leaves, and light debris, this tool will help keep your lawn spotless with minimal effort. Please read this manual thoroughly before use and retain it for future reference.

Figure 1: Dapper Supply 21-Inch Push Lawn Sweeper, showcasing its compact design and hopper bag.
2. Important Safety Information
Always observe the following safety precautions to reduce the risk of injury or damage.
- Read all instructions carefully before operating the lawn sweeper.
- Wear appropriate personal protective equipment, including sturdy footwear and eye protection.
- Ensure the work area is clear of people, pets, and obstacles before beginning operation.
- Do not operate the sweeper on excessively steep slopes.
- Keep hands and feet away from moving parts, especially the brushes, during operation.
- Do not attempt to clear jams while the sweeper is in motion.
- Store the sweeper in a dry, secure location, out of reach of children.
- Regularly inspect the sweeper for loose parts, damage, or wear before each use.
3. Package Contents
Verify that all components are present and undamaged upon opening the package. If any parts are missing or damaged, contact Dapper Supply customer support.
- Main Sweeper Unit (with brushes and wheels pre-assembled)
- Handle Assembly (Upper and Lower sections)
- Hopper Bag Frame
- 3.5 cu. ft. Mesh Hopper Bag
- Assembly Hardware (Knobs, bolts, pins)
- Instruction Manual
4. Assembly Instructions
Follow these steps to assemble your Dapper Supply 21-Inch Push Lawn Sweeper. It is recommended to assemble the unit on a flat, clear surface.
4.1. Attach Handle Assembly
- Align the lower handle sections with the mounting points on the main sweeper unit.
- Secure the lower handle sections using the provided bolts and knobs. Ensure they are tightened securely.
- Connect the upper handle section to the lower handle sections, aligning the holes.
- Insert the quick-release pins or bolts to secure the upper handle.
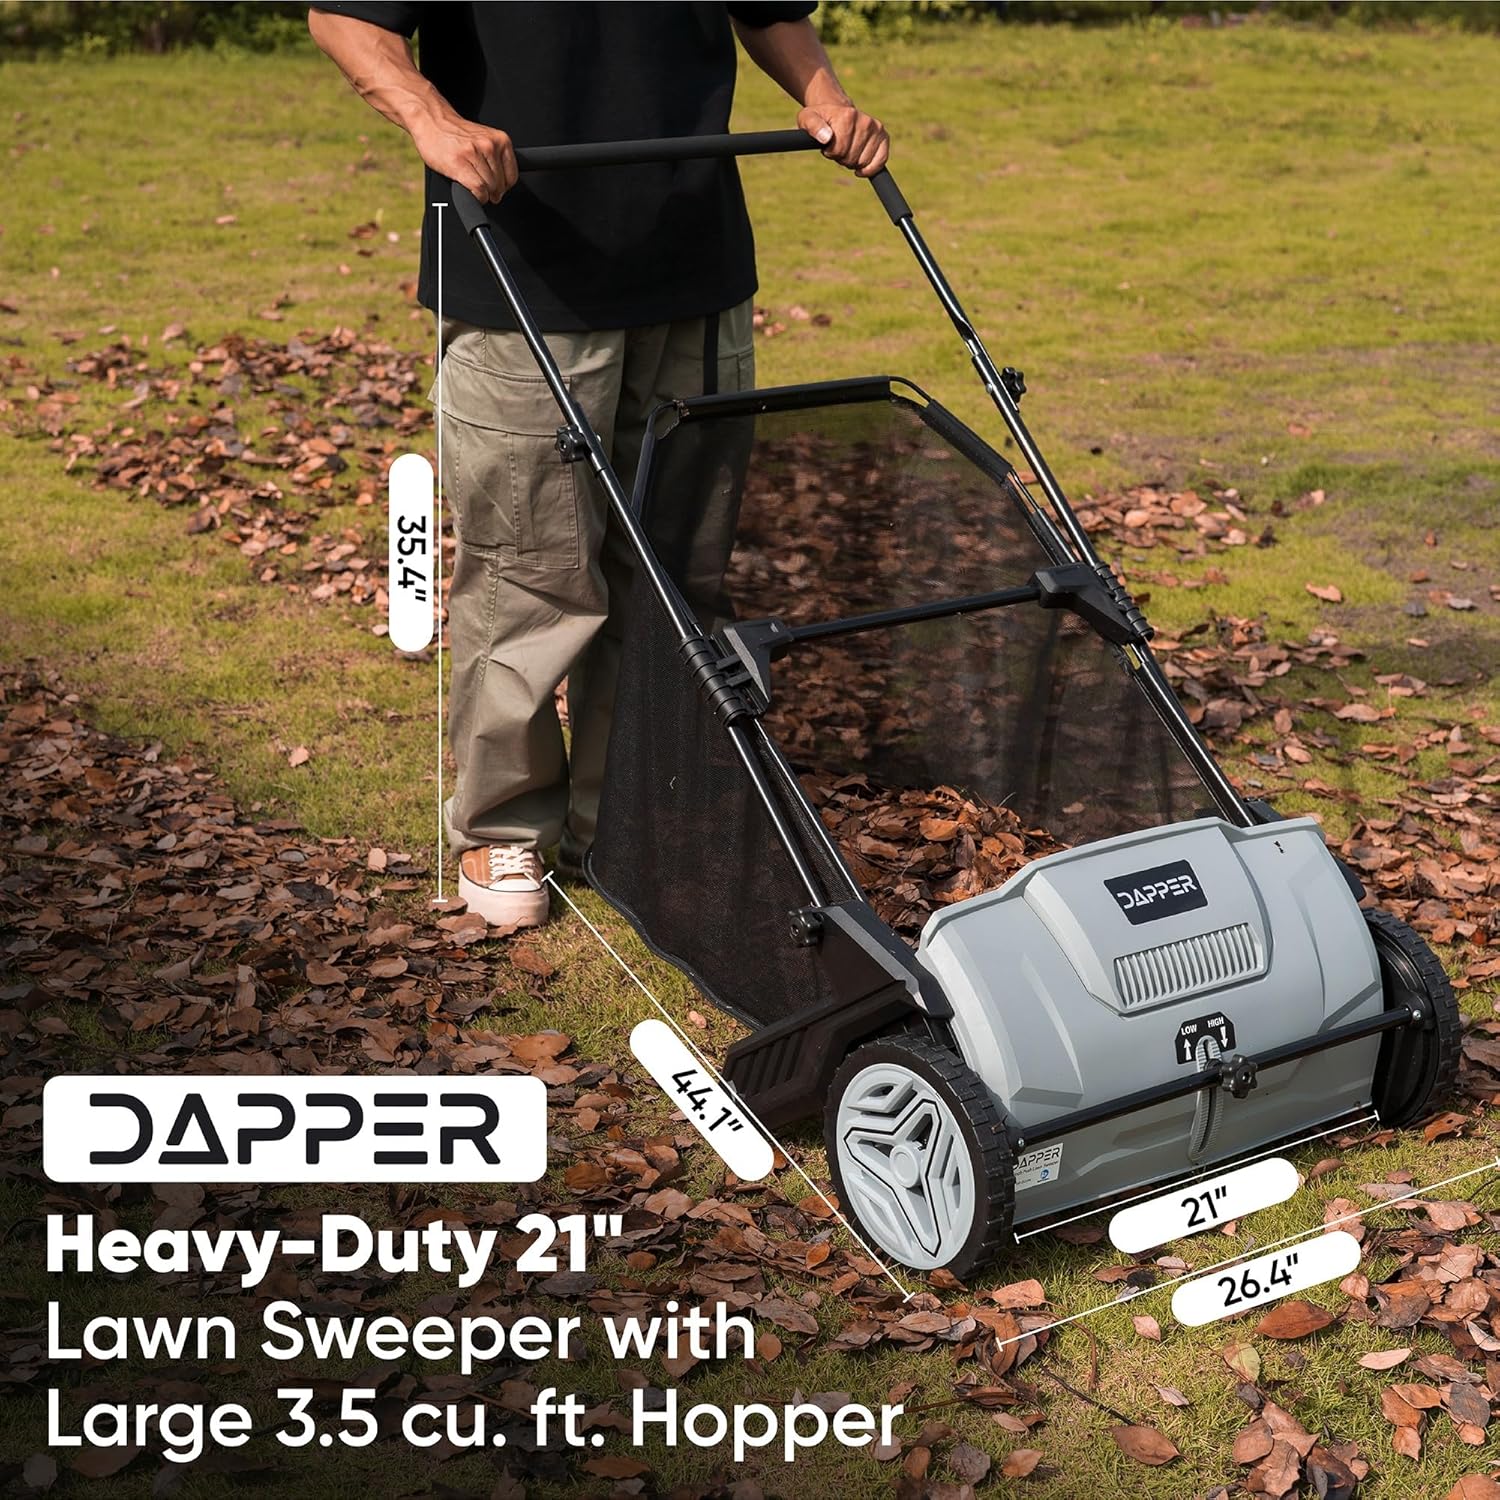
Figure 2: Illustration of the sweeper's dimensions and handle position, aiding in handle assembly.
4.2. Install Hopper Bag Frame
- Unfold the hopper bag frame.
- Attach the hopper bag frame to the designated attachment points on the sweeper's handle assembly. This typically involves sliding the frame into slots or securing it with clips.
4.3. Attach Hopper Bag
- Slide the 3.5 cu. ft. mesh hopper bag over the hopper bag frame.
- Ensure the bag is fully seated and secured around the frame, often with Velcro straps or elastic edges, to prevent debris from escaping.
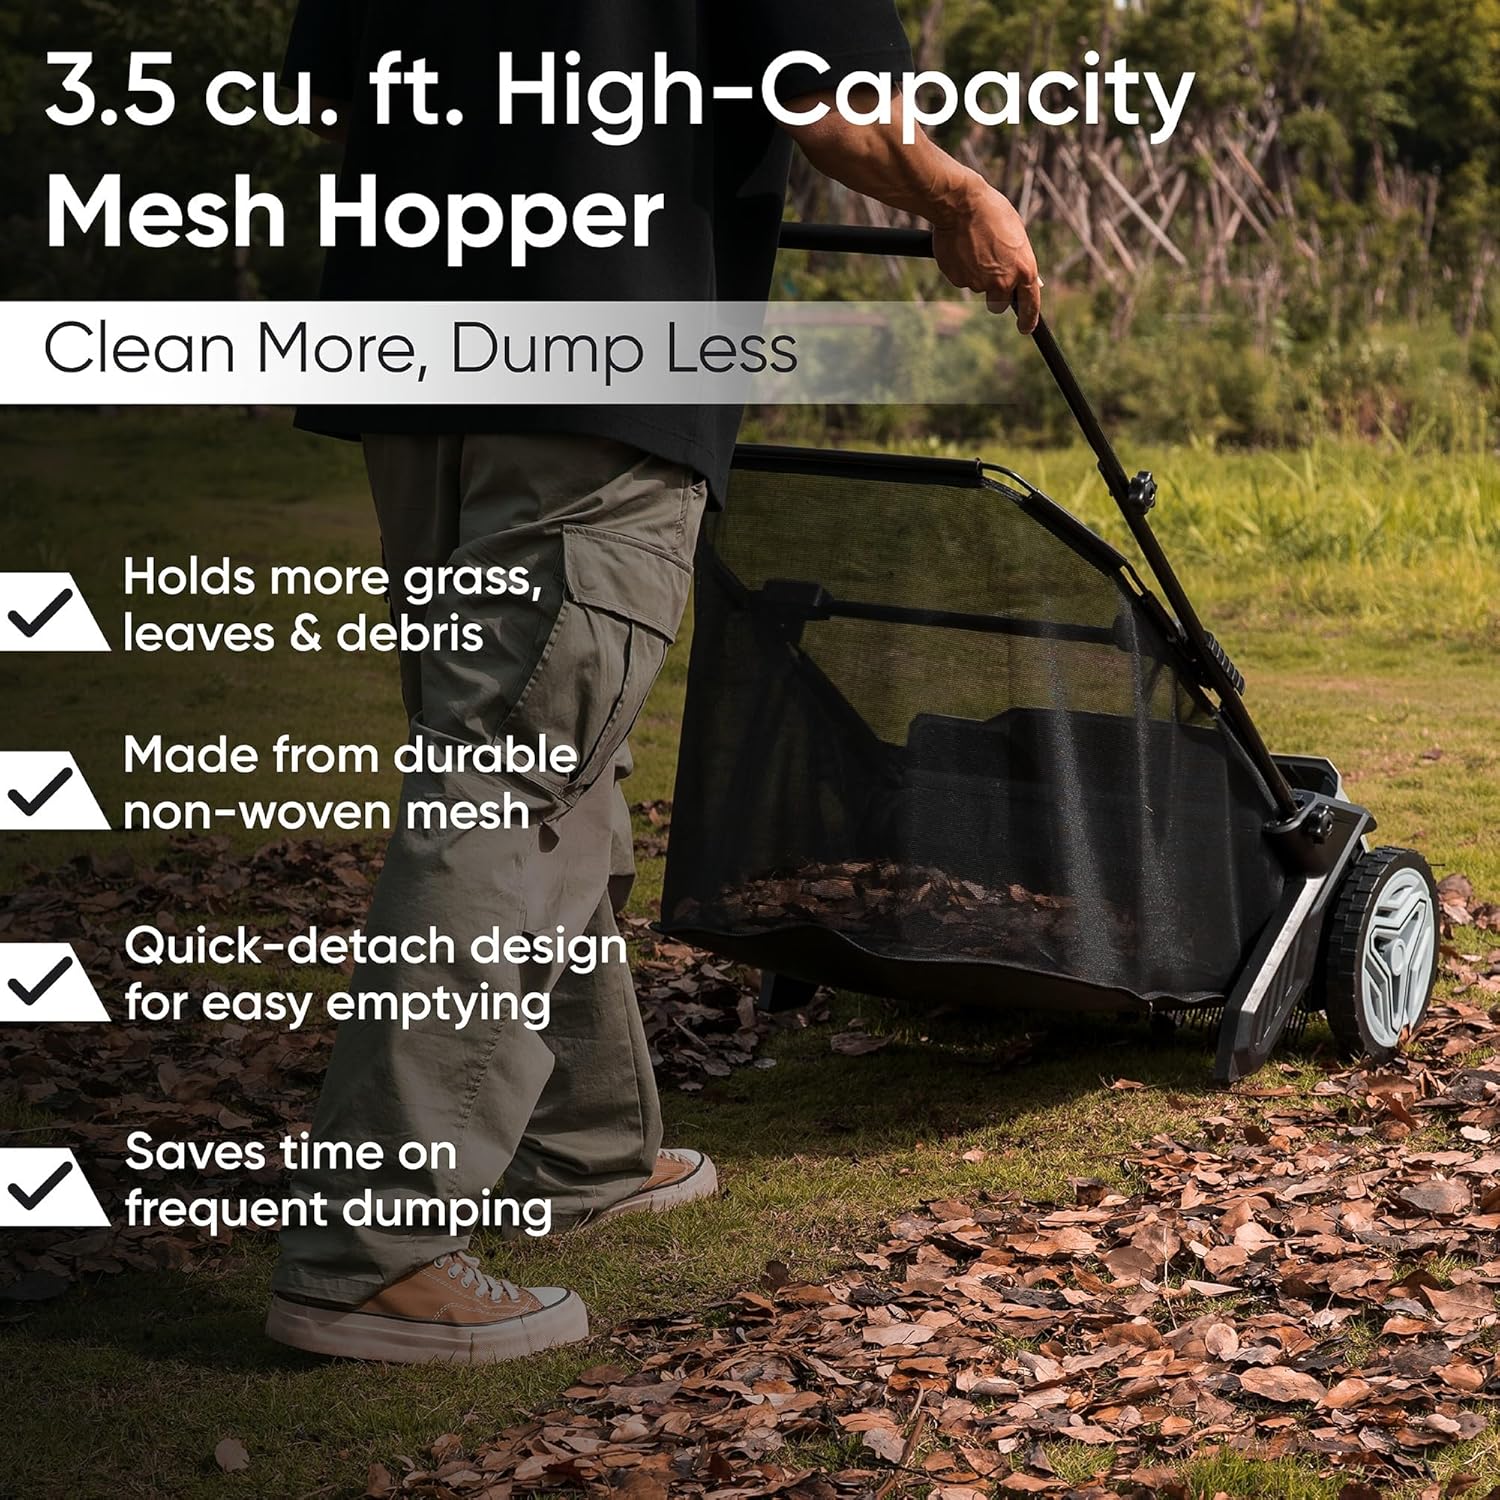
Figure 3: The 3.5 cu. ft. high-capacity mesh hopper bag, ready for attachment to the frame.
4.4. Final Checks
Before first use, ensure all connections are tight and secure. Check that the wheels spin freely and the brushes rotate when the sweeper is pushed.
5. Operating Instructions
5.1. Pre-Operation Checklist
- Clear the area of any large objects that could damage the sweeper or impede operation.
- Ensure the hopper bag is properly attached and empty.
- Check that the brushes are free of debris and rotate smoothly.
5.2. Adjusting Sweeping Height
The Dapper Supply lawn sweeper features an adjustable brush height to optimize performance on various surfaces and for different types of debris.
- Locate the hand-operated knob on the front of the sweeper unit.
- Turn the knob to raise or lower the brushes.
- LOW setting: Ideal for collecting smaller debris like grass clippings, twigs, and small pine cones. This setting brings the brushes closer to the ground for a more aggressive sweep.
- HIGH setting: Recommended for sweeping larger items such as leaves. This setting raises the brushes slightly, allowing them to effectively gather bulkier material without excessive resistance.
- Experiment with different settings to find the optimal height for your specific lawn conditions and debris type.

Figure 4: The adjustable sweeping height knob, allowing customization for different debris types and terrains.
5.3. Sweeping Technique
For best results, push the sweeper at a consistent, moderate pace. Overlapping each pass slightly will ensure thorough coverage.
- Push the sweeper forward; the brushes will rotate and flick debris into the hopper bag.
- Avoid pushing too fast, as this can reduce collection efficiency.
- For stubborn debris, a second pass or adjusting the brush height may be necessary.
- The sweeper is designed for dry debris. Wet leaves or grass may be more difficult to collect.

Figure 5: Demonstrating the effortless push style for comfortable yard cleaning.
5.4. Emptying the Hopper Bag
The 3.5 cu. ft. hopper bag allows for extended use before needing to be emptied.
- When the hopper bag is full, stop the sweeper.
- The hopper bag is designed for easy removal. Simply detach it from the frame.
- Empty the contents into a compost pile, yard waste bag, or designated disposal area.
- Reattach the hopper bag securely to the frame before resuming operation.
6. Maintenance and Storage
6.1. Cleaning
- After each use, remove any accumulated debris from the brushes, wheels, and main unit.
- Clean the hopper bag as needed. It can be rinsed with water and allowed to air dry completely before storage.
- Wipe down all surfaces with a damp cloth. Do not use harsh chemicals or abrasive cleaners.
6.2. Brush Care
- Periodically inspect the dual spinning brushes for wear or damage.
- Remove any tangled grass, pine needles, or other debris that may wrap around the axle or brushes. This ensures optimal sweeping performance.
- Replacement brushes may be available through Dapper Supply customer support if significant wear occurs.
6.3. Storage
- For compact storage, the handle assembly can be easily disassembled using the quick clips on both sides.
- Store the lawn sweeper in a clean, dry area, protected from extreme temperatures and direct sunlight.
- The bottom support feet provide stability, allowing the unit to be stored upright or hung on a garage wall.
7. Troubleshooting Guide
Refer to this table for common issues and their potential solutions.
| Problem | Possible Cause | Solution |
|---|---|---|
| Sweeper not picking up debris effectively. |
|
|
| Difficulty pushing the sweeper. |
|
|
| Pine needles or stringy debris wrapping around axle/brushes. |
|
|
| Hopper bag not staying attached or spilling debris. |
|
|
8. Product Specifications
Technical specifications for the Dapper Supply 21-Inch Push Lawn Sweeper.
| Specification | Detail |
|---|---|
| Brand | Dapper Supply |
| Model Number | DP-LS1104 |
| Power Source | Hand-powered (Manual) |
| Material | Plastic (Main unit), Non-woven (Hopper Bag) |
| Color | Gray |
| Item Weight | 17 Pounds (approx. 7.7 kg) |
| Cutting/Sweeping Width | 21 Inches (approx. 53.3 cm) |
| Hopper Bag Capacity | 3.5 cu. ft. (approx. 99 liters) |
| Product Dimensions (LxWxH) | 48.9"D x 26.4"W x 34.9"H (approx. 124.2cm D x 67.1cm W x 88.6cm H) |
| UPC | 850064526332 |
9. Warranty Information and Customer Support
Dapper Supply stands behind the quality of its products.
9.1. Warranty
The Dapper Supply 21-Inch Push Lawn Sweeper is covered by a 1-year limited warranty from the date of purchase. This warranty covers defects in materials and workmanship under normal use. It does not cover damage resulting from misuse, abuse, neglect, accidents, unauthorized repairs, or normal wear and tear. Please retain your proof of purchase for warranty claims.
9.2. Customer Support
For any questions regarding assembly, operation, maintenance, or warranty claims, please contact Dapper Supply customer support.
- Online Support: Visit the official Dapper Supply website for FAQs and support resources.
- Email Support: [Insert Dapper Supply Support Email Here - e.g., support@dappersupply.com]
- Phone Support: [Insert Dapper Supply Support Phone Number Here - e.g., 1-800-XXX-XXXX]
Note: Specific contact details are not provided in the product data. Please refer to the product packaging or official Dapper Supply website for the most current contact information.


