
1. Introduction
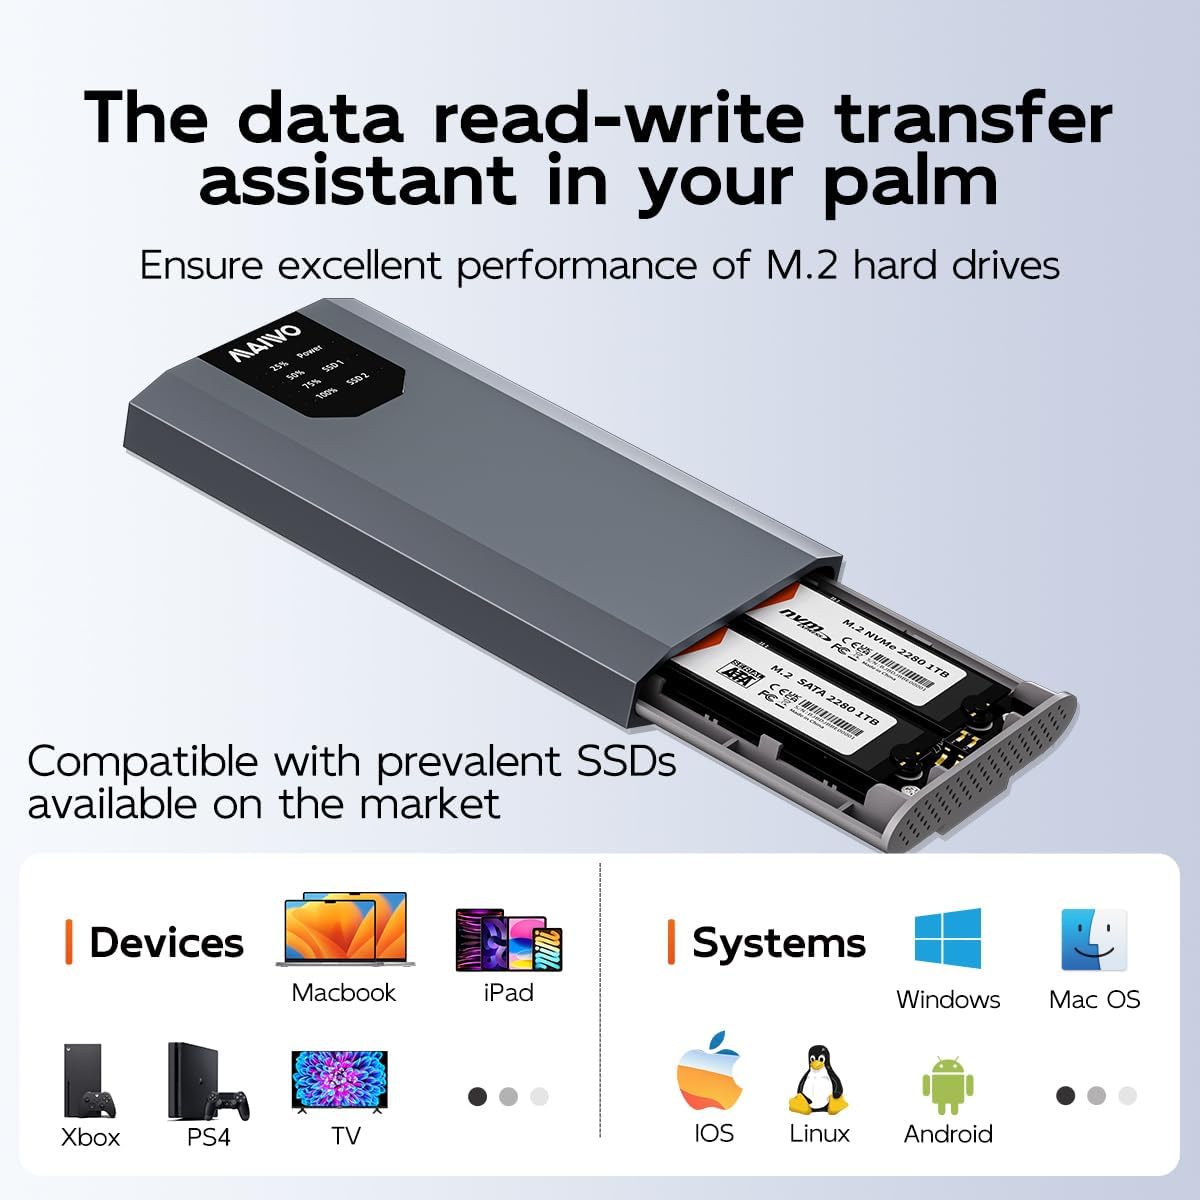
The MAIWO Dual-Bay SSD Enclosure Cloner is a versatile device designed for both data transfer and offline cloning of M.2 NVMe and SATA SSDs. It supports various M.2 SSD sizes (2230, 2242, 2260, 2280) and offers high-speed data transmission via USB 3.2 Gen 2x2. This manual provides detailed instructions for its proper use and maintenance.
2. Package Contents
Please verify that all items listed below are included in your package:
- 1x Dual M.2 NVMe & SATA SSD Enclosure with Offline Clone function
- 1x 5V/3A Power Supply
- 1x USB-A to USB-C Cable
- 1x USB-C to USB-C Cable
- 1x User Manual (this document)
- 2x Silicone Thermal Pads
- 2x Aluminum Thermal Pads
- 2x Silicone Plugs

3. Product Features
- Versatile Compatibility: Supports both M.2 NVMe (M Key) and M.2 SATA (B+M Key) SSDs.
- Offline Cloning: Allows direct disk-to-disk cloning without requiring a computer connection.
- High-Speed Data Transfer: USB 3.2 Gen 2x2 interface provides up to 10Gbps data transfer rates.
- Wide SSD Support: Compatible with M.2 SSD sizes 2230, 2242, 2260, and 2280.
- Efficient Heat Dissipation: Features an aluminum shell, aluminum thermal pads, and silicone thermal pads for optimal cooling.
- Plug-and-Play: No drivers required for standard data transfer operations.


4. Setup Instructions
4.1 Installing M.2 SSDs
- Gently slide open the enclosure cover to reveal the SSD slots.
- Identify the correct slot for your M.2 SSD (NVMe or SATA). The enclosure supports both M Key (NVMe/PCIe) and B+M Key (SATA/NGFF) SSDs.
- Insert your M.2 SSD into the corresponding slot at an angle, ensuring the notch aligns with the slot key.
- Press down the SSD and secure it with the provided silicone plug to hold it in place.
- Apply the included thermal pads to the SSDs for optimal heat dissipation. Place the silicone thermal pad directly on the SSD chips, then the aluminum thermal pad on top of the silicone pad.
- Carefully slide the enclosure cover back into place until it clicks securely.

4.2 Connecting to a Computer
- Connect the provided 5V/3A power adapter to the enclosure's DC IN port and plug it into a power outlet.
- Use either the USB-A to USB-C cable or the USB-C to USB-C cable to connect the enclosure to your computer's USB port. For optimal performance, use a USB 3.2 Gen 2x2 compatible port.
- The enclosure will be recognized as an external storage device. If it's a new SSD, you may need to initialize and format it through your operating system's disk management utility before use.
5. Operating Instructions
5.1 Data Transfer Mode
Once connected to your computer as described in Section 4.2, the installed SSDs will appear as removable drives. You can drag and drop files, copy, paste, and manage data just like any other external storage device. The enclosure supports simultaneous read and write operations for both SSDs.
5.2 Offline Cloning Mode
CAUTION: Back up all data on the target SSD before proceeding. Cloning will erase all existing data on the target SSD.
- Ensure the enclosure is disconnected from any computer.
- Insert the Source SSD into the designated slot (e.g., SSD1).
- Insert the Target SSD into the other slot (e.g., SSD2).
- Verify that the capacity of the Target SSD is equal to or greater than the capacity of the Source SSD.
- Use a small tool (like a screwdriver) to set the cloning direction switch located inside the enclosure. You can choose between NVMe to SATA Clone or SATA to NVMe Clone, depending on your SSD types and desired direction.
- Connect the 5V/3A power adapter to the enclosure and plug it into a power outlet.
- Press and hold the "Clone" button for 3-5 seconds until the indicator lights (25%, 50%, 75%, 100%) begin to flash. This indicates the cloning process has started.
- Monitor the progress indicators. The lights will illuminate sequentially as the cloning progresses.
- Once all four indicator lights (25%, 50%, 75%, 100%) are solid blue, the cloning process is complete.
- Disconnect the power adapter and carefully remove the SSDs.


6. Maintenance
- Keep the enclosure clean and free from dust. Use a soft, dry cloth for cleaning.
- Avoid exposing the device to extreme temperatures, humidity, or direct sunlight.
- Do not drop or subject the enclosure to strong impacts.
- Ensure proper ventilation to prevent overheating, especially during prolonged use or cloning operations.
7. Troubleshooting
| Problem | Possible Cause | Solution |
|---|---|---|
| Device not recognized by computer | Loose USB cable connection, insufficient power, uninitialized SSD, incompatible SSD. | Check USB cable and power adapter connections. Ensure SSDs are properly installed. Initialize and format new SSDs in Disk Management. Verify SSD type (NVMe/SATA) and key type (M Key/B+M Key) are compatible. |
| Offline cloning fails or does not start | Enclosure connected to computer, target SSD capacity too small, incorrect cloning direction, power issue. | Ensure the enclosure is disconnected from any computer. Verify target SSD capacity is equal to or larger than source SSD. Check the cloning direction switch setting. Ensure power adapter is securely connected and providing sufficient power. Re-attempt cloning process. |
| Slow data transfer speeds | Connected to a slower USB port (e.g., USB 2.0), faulty USB cable, operating system/driver issues. | Connect the enclosure to a USB 3.2 Gen 2x2 or USB 3.0/3.1 port on your computer. Try a different USB cable. Ensure your operating system has the latest USB drivers. |
| Enclosure gets hot during use | Normal operation, intensive data transfer/cloning. | Some heat is normal, especially during high-speed operations. Ensure thermal pads are correctly installed. If excessively hot, allow it to cool down before continued use. Ensure adequate airflow around the device. |
8. Specifications
| Feature | Detail |
|---|---|
| Model Number | K2023CL |
| Hardware Interface | USB 3.2 Gen 2x2 |
| Data Transfer Rate | Up to 10 Gbps |
| Compatible SSDs | M.2 NVMe SSD (M Key), M.2 SATA SSD (B+M Key) |
| Supported SSD Sizes | 2230, 2242, 2260, 2280 |
| Max Supported Capacity | Up to 4TB per slot (total 8TB) |
| Power Supply | 5V/3A (External Adapter) |
| Enclosure Material | Aluminum Alloy, ABS |
| Product Dimensions (L x W x H) | 4" x 2.5" x 0.5" (approximately 10.16cm x 6.35cm x 1.27cm) |
| Compatible Platforms | Desktop, PC, Tablet (Windows, Mac OS, Linux, Android, iOS) |
9. Warranty and Support
9.1 Warranty Information
This MAIWO product is covered by a 12-month warranty from the date of purchase. The warranty covers manufacturing defects and malfunctions under normal use. It does not cover damage caused by misuse, accidents, unauthorized modifications, or natural disasters.
9.2 Customer Support
For technical assistance, troubleshooting, or warranty claims, please contact MAIWO customer service. You can typically find contact information on the official MAIWO website or through the retailer where you purchased the product. Please have your model number (K2023CL) and proof of purchase ready when contacting support.