1. Introduction
The RODEDIO V519 OBD2 Scanner is a powerful diagnostic tool designed to help you understand and resolve issues with your vehicle's engine and emissions systems. This manual provides detailed instructions on how to set up, operate, and maintain your scanner to ensure optimal performance and accurate diagnostics.
Key Features:
- Full OBD2 Modes: Supports all OBD2 modes for comprehensive vehicle diagnostics.
- Battery Voltage Test: Integrated feature allows checking battery voltage to diagnose charging system issues.
- Live Data Stream: Real-time data streaming capability provides insights into vehicle's operating parameters.
- I/M Readiness: Checks readiness status for emissions testing to ensure compliance.
- DTC Functions: Read, erase, and lookup diagnostic trouble codes for efficient repairs.
2. Package Contents
Please check the package carefully to ensure all items are present and in good condition:
- RODEDIO V519 OBD2 Scanner (fuselage)
- User Manual
3. Product Overview
The RODEDIO V519 OBD2 Scanner features a user-friendly design with a clear color screen and intuitive button layout for easy navigation and operation.
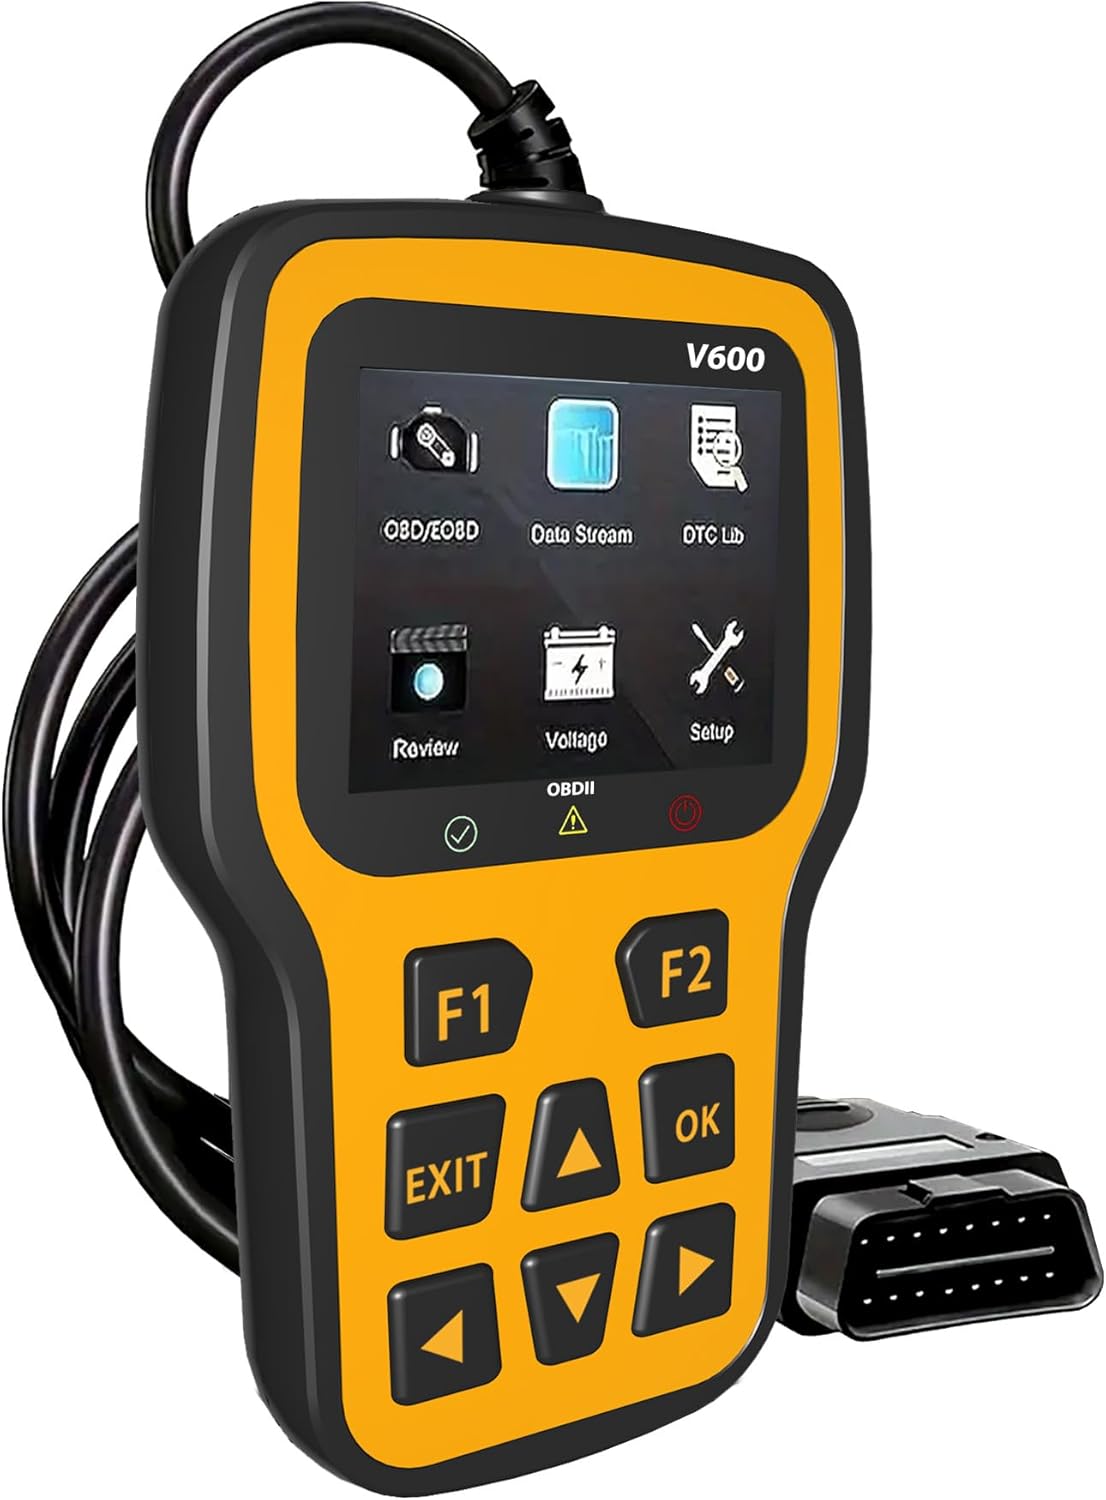
Front view of the RODEDIO V519 OBD2 Scanner, showing the display screen and control buttons.
Component Identification:
- 2.4-inch Color Screen: Displays diagnostic information, menus, and results.
- Function Buttons (F1, F2): Used for specific functions as indicated on the screen.
- Navigation Buttons (Up, Down, Left, Right): For menu navigation and data scrolling.
- OK Button: Confirms selections or enters sub-menus.
- EXIT Button: Returns to the previous screen or exits a function.
- OBDII Connector (16-pin): Connects the scanner to the vehicle's OBDII port.

Detailed view of the RODEDIO V519 scanner highlighting the 2.4-inch color screen and the 16-pin OBDII interface, along with connection status indicators (Red for fault, Yellow for failed, Green for successful).
Dimensions:
The scanner measures approximately 5.1 inches (13 cm) in length, 1.5 inches (3.8 cm) in width, and 7.8 inches (19.8 cm) in height, making it compact and easy to handle.

Image showing the physical dimensions of the RODEDIO V519 OBD2 Scanner, approximately 9.6 cm (3.7 inches) in height and 15.8 cm (6.2 inches) in width.
4. Setup and Initial Use
Follow these steps to set up your RODEDIO V519 OBD2 Scanner and begin diagnostics:
- Locate the OBDII Port: The 16-pin OBDII Data Link Connector (DLC) is usually located under the dashboard on the driver's side of the vehicle. Refer to your vehicle's service manual for the exact location if needed.
- Connect the Scanner: With the vehicle's ignition off, firmly plug the scanner's OBDII connector into the vehicle's DLC.
- Turn On Ignition: Turn the vehicle's ignition to the 'ON' position (do not start the engine). The scanner will automatically power on and establish communication with the vehicle.
- Verify Connection: The scanner's screen will display a connection status. A green indicator typically signifies a successful connection. If the connection fails (yellow or red indicator), ensure the cable is securely connected and the ignition is on.
5. Operating the Scanner
The RODEDIO V519 offers a range of diagnostic functions accessible through its main menu. Use the navigation buttons to scroll through options and the OK button to select.

Overview of the various OBDII functions available on the RODEDIO V519 scanner, including Read Codes, Erase Codes, Live Data, I/M Readiness, Freeze Frame, O2 Sensor Test, On-board Monitor Test, Vehicle Information, and Evap System.
5.1. Full OBD2 Modes
The scanner supports all 10 OBD2 diagnostic modes:
- Read Codes: Retrieves Diagnostic Trouble Codes (DTCs) from the vehicle's computer. These codes indicate specific issues detected by the system.
- Erase Codes: Clears DTCs from the vehicle's memory and turns off the Malfunction Indicator Lamp (MIL) or Check Engine Light. Note: Erasing codes does not fix the underlying problem. Address the root cause before clearing codes.
- Live Data Stream: Displays real-time data parameters from the vehicle's sensors and modules. This can include engine RPM, vehicle speed, oxygen sensor readings, coolant temperature, and more.
- I/M Readiness: Checks the status of the vehicle's emission-related monitors. This is crucial for preparing for emissions tests.
- Battery Voltage Test: Monitors the vehicle's battery voltage in real-time, helping to diagnose potential issues with the battery or charging system.
- DTC Lookup: Provides definitions for generic (P0, P2, P3, B0, C0, U0) and manufacturer-specific (P1, P3, B1, C1, U1) codes.
- Freeze Frame Data: Captures a snapshot of critical vehicle operating conditions at the moment a DTC is set. This data helps in diagnosing intermittent problems.
- O2 Sensor Test: Retrieves oxygen sensor monitor test results for the most recently completed tests from the vehicle's on-board computer.
- On-board Monitor Test: Retrieves test results for emission-related powertrain components and systems that are not continuously monitored.
- Vehicle Information: Retrieves the Vehicle Identification Number (VIN), Calibration ID (CALID), and Calibration Verification Number (CVN) of the vehicle.
- Evap System Test: Initiates a test of the Evaporative Emission Control System (EVAP) for leaks.

Visual representation of the 'Read Codes' function, typically used to retrieve diagnostic trouble codes from the vehicle.

Visual representation of the 'Erase Codes' function, used to clear diagnostic trouble codes and turn off the check engine light.

The scanner screen showing live data parameters and freeze frame information, providing real-time insights into vehicle performance and conditions at the time a fault occurred.

Visual representation of the 'I/M Readiness' function, which indicates whether the vehicle's emission monitoring systems have completed their diagnostic cycles.

The scanner displaying the battery voltage test results, indicating the current voltage of the vehicle's battery.

The scanner screen showing the fault code library, allowing users to quickly query definitions for diagnostic trouble codes.

A close-up of the scanner screen displaying Freeze Frame data, including parameters like DTCFRZE, FUELSYS1, FUELSYS2, LOAD_PCT(%), ETC(°C), and SHRFT1(%).
5.2. Engine Fault Diagnosis
The scanner can quickly read and clear engine fault codes, helping to diagnose and turn off the engine failure light.

The RODEDIO V519 scanner positioned next to a car dashboard, illustrating its use in quickly reading current engine faults and clearing the engine failure light.
6. Maintenance
Proper maintenance ensures the longevity and reliability of your RODEDIO V519 OBD2 Scanner:
- Cleaning: Use a soft, dry cloth to clean the scanner's casing and screen. Avoid using abrasive cleaners or solvents.
- Storage: Store the scanner in a clean, dry environment away from extreme temperatures, direct sunlight, and excessive dust.
- Cable Care: Do not pull on the cable to disconnect the scanner. Always grasp the connector firmly. Avoid bending or kinking the cable excessively.
- Software Updates: Periodically check the manufacturer's website for available software updates to ensure your scanner has the latest vehicle compatibility and features. (Specific update instructions are not provided in this manual; refer to the manufacturer's website for details).
7. Troubleshooting
If you encounter issues while using your RODEDIO V519 OBD2 Scanner, refer to the following common problems and solutions:
| Problem | Possible Cause | Solution |
|---|---|---|
| Scanner does not power on. | Loose connection; Vehicle ignition off; Blown fuse in vehicle's OBDII circuit. | Ensure the OBDII cable is securely connected. Turn vehicle ignition to 'ON'. Check vehicle's fuse box for a blown fuse related to the OBDII port. |
| Communication error with vehicle. | Incorrect protocol; Faulty cable; Vehicle not OBDII compliant. | Verify vehicle is OBDII compliant (most vehicles 1996 and newer). Reconnect the cable. Try on another OBDII compliant vehicle if possible. |
| Cannot clear DTCs. | Ignition not on; Underlying fault still present; Multiple ECUs. | Ensure ignition is on. Diagnose and repair the underlying issue first. Some vehicles may require specific procedures or multiple attempts. |
| Screen is frozen or unresponsive. | Software glitch; Power interruption. | Disconnect the scanner from the vehicle, wait a few seconds, then reconnect. If the issue persists, contact customer support. |
8. Specifications
| Feature | Detail |
|---|---|
| Brand | RODEDIO |
| Model | V519 |
| Item Weight | 8 ounces (approx. 227 grams) |
| Product Dimensions | 5.1 x 1.5 x 7.8 inches (approx. 13 x 3.8 x 19.8 cm) |
| Operating System | Windows XP (for PC connectivity, if applicable for updates) |
| Automotive Fit Type | Universal Fit (for OBDII compliant vehicles) |
| Display | 2.4-inch Color Screen |
| Connectivity | 16-pin OBDII Standard Connector |
9. Warranty and Support
RODEDIO products are manufactured to high-quality standards. For specific warranty information, please refer to the warranty card included with your product or visit the official RODEDIO website. If you require technical assistance, have questions about product operation, or need to report an issue, please contact RODEDIO customer support through the contact information provided on the official website or your purchase platform.


