1. Product Overview
The Navycrest A2PRO is a high-performance dash camera system designed to record events from both the front and rear of your vehicle. It features 4K (2160P) front recording and 2.5K (1440P) rear recording, ensuring detailed capture of road signs and license plates. Equipped with built-in 5G WiFi, G-Sensor, 24/7 parking mode capabilities, and loop recording, the A2PRO provides comprehensive surveillance and peace of mind for drivers.

Figure 1: The Navycrest A2PRO Dash Cam, showcasing its compact design, 4K front camera, rear camera, and the accompanying mobile application interface for easy control and video management. A 64GB memory card is also included.
2. Components (What's in the Box)
Upon unboxing your Navycrest A2PRO Dash Cam, verify that all the following components are present:
- Navycrest A2PRO Dash Cam (Front Unit)
- Rear Camera
- Wiring Trim Tool
- Car Charger with USB Port
- 64GB SD Card (pre-inserted into the Dash Cam)
- Electrostatic Film (for windshield mounting)
- Cable Management Clips
- Adhesive Pad (extra double-sided tape)
- User Manual
- Registration Card

Figure 2: A visual representation of all items included in the Navycrest A2PRO Dash Cam package, ensuring you have everything needed for installation and operation.
3. Setup & Installation
Follow these steps to properly install your Navycrest A2PRO Dash Cam in your vehicle:
- Prepare the Windshield: Clean the area on your windshield where you intend to mount the dash cam. Apply the electrostatic film to this area to prevent direct adhesion of the camera mount to the glass, making removal easier.
- Mount the Front Camera: Attach the front dash cam unit to the electrostatic film using the pre-applied double-sided tape on its mount. Ensure the camera lens has a clear view of the road ahead. The mount is adjustable to optimize the recording angle.
- Install the Rear Camera: Mount the rear camera on your rear windshield using its adhesive. Ensure it has a clear view of the rear.
- Route the Cables: Carefully route the power cable from the front camera to your vehicle's cigarette lighter socket. Use the provided wiring trim tool to tuck the cables neatly along the windshield trim and dashboard, ensuring they do not obstruct your view or interfere with vehicle operation. Connect the rear camera cable to the front unit and route it similarly to the rear of the vehicle.
- Connect Power: Plug the car charger into your vehicle's cigarette lighter socket. The charger includes an additional USB port, allowing you to charge other devices without occupying an extra power outlet.
- Initial Setup: Once powered on, the dash cam will automatically begin recording. Access the menu to adjust settings such as video resolution, loop recording duration, G-Sensor sensitivity, and parking mode preferences.

Figure 3: Simplified installation and wiring diagram for the Navycrest A2PRO Dash Cam, highlighting the placement of the front and rear cameras and the path for cable concealment.
Video 1: A detailed demonstration of the unboxing and installation process for the Navycrest A2PRO Dash Cam, including mounting the cameras and routing the power cables. This video is provided by an influencer and offers practical visual guidance.
4. Operating Instructions
4.1 Video Recording
The A2PRO dash cam records in high resolution: 4K (2160P) for the front camera and 2.5K (1440P) for the rear camera. It supports seamless loop recording, automatically overwriting the oldest videos when the memory card is full. The included 64GB card provides ample storage, supporting up to 6 hours of footage.

Figure 4: Illustration of the loop recording feature, showing how the dash cam continuously records and overwrites older files to ensure constant operation. A 64GB SD card is provided for immediate use.
4.2 G-Sensor & One-Click Lock
The built-in 3-axis G-Sensor automatically detects sudden movements or collisions, locking the current video segment to prevent it from being overwritten during loop recording. This ensures critical evidence is preserved. You can also manually lock videos by pressing the 'M' button during recording.

Figure 5: The G-Sensor feature automatically locks video footage upon detecting a collision, while a manual 'M' button allows users to lock recordings instantly for important events.
4.3 5G WiFi & App Control
The A2PRO features a 5G WiFi module, offering download speeds up to 8 MB/s, which is four times faster than standard 2.4G WiFi. Connect your smartphone to the dash cam via the dedicated app to view live footage, adjust settings, download recorded videos, and share them directly from your device.
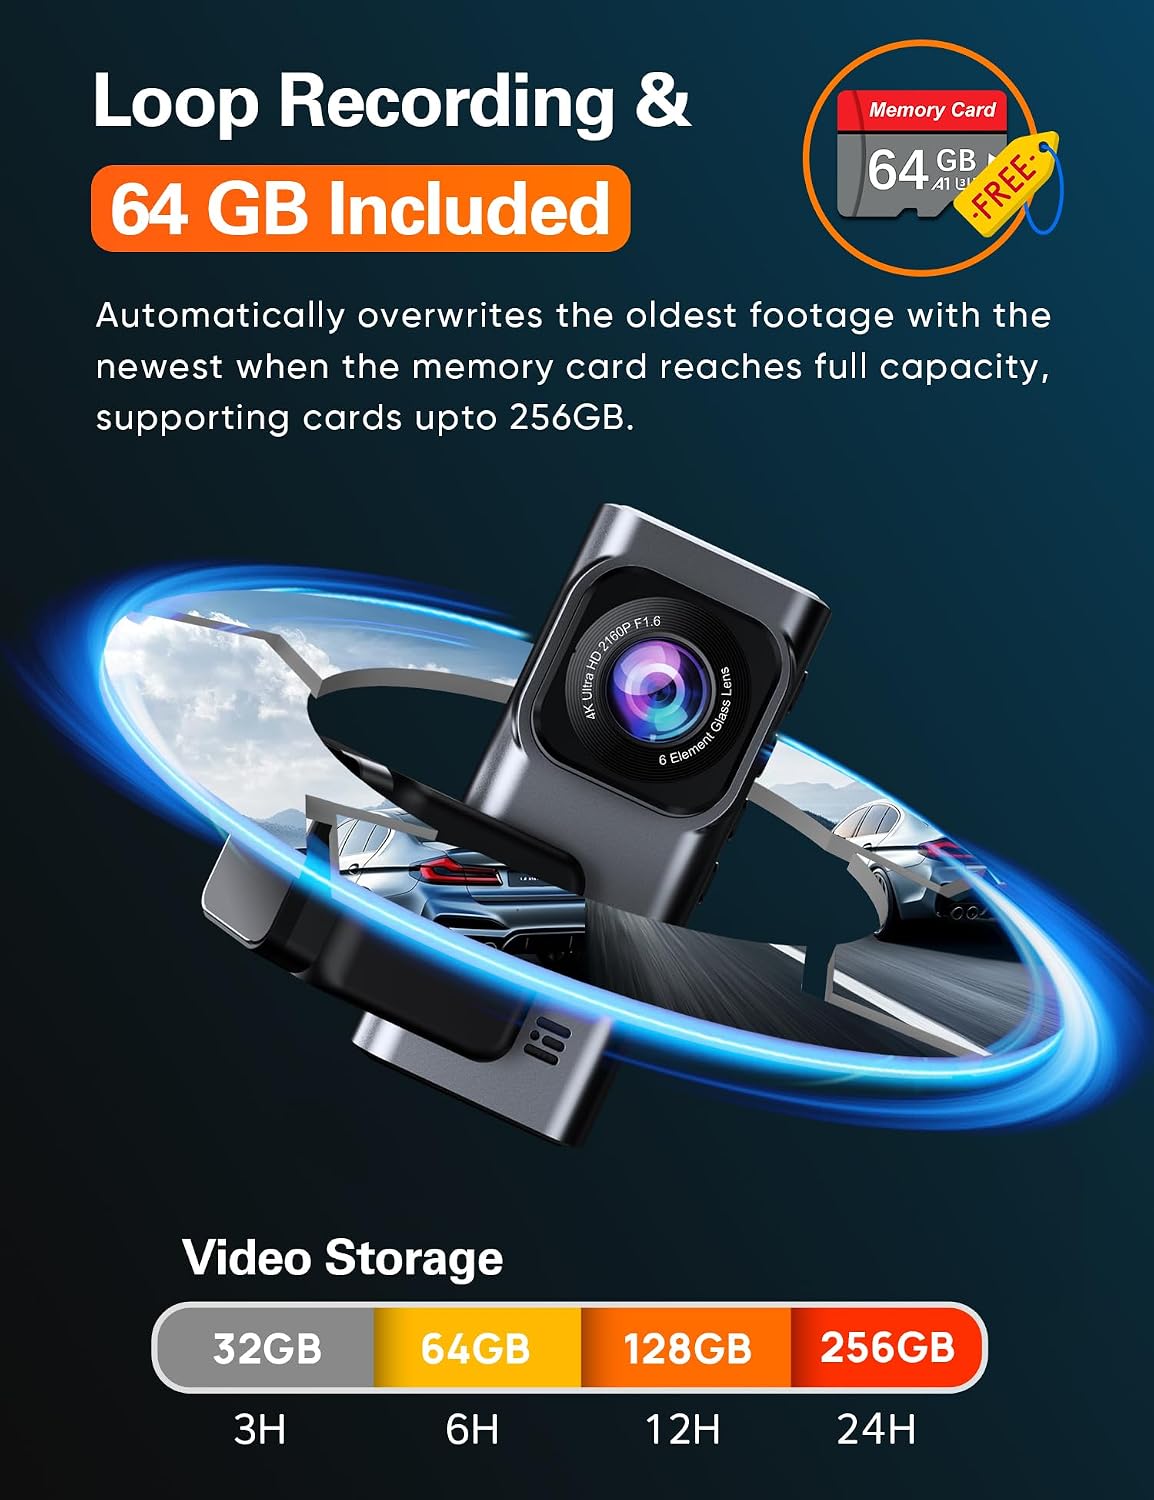
Figure 6: The dash cam's built-in 5G WiFi enables fast data transfer and seamless app control, allowing users to manage recordings and settings directly from their smartphone.
4.4 24/7 Parking Mode
For continuous protection, the A2PRO supports 24-hour parking mode. This function requires an optional Type-C hardwire kit (ASIN: B0BN829V8D, not included). Once installed, you can choose between motion detection, which starts recording when movement is detected, or Time-Lapse Recording, which records continuously at a low frame rate, providing around-the-clock surveillance for your parked vehicle.

Figure 7: The 24/7 parking mode feature provides continuous monitoring of your vehicle when it's parked, helping to protect against theft or damage. An optional hardwire kit is required for this functionality.
4.5 Super Night Vision & WDR
The A2PRO excels in low-light conditions thanks to its SONY sensor, 6-glass lens, and Wide Dynamic Range (WDR) technology. This combination enhances color precision and clarity, ensuring clear video recordings day or night.

Figure 8: Enhanced night vision capabilities of the A2PRO Dash Cam, utilizing a SONY sensor and WDR technology to deliver clear and detailed video footage even in challenging low-light environments.
5. Maintenance
To ensure the longevity and optimal performance of your Navycrest A2PRO Dash Cam, regular maintenance is recommended:
- Regular SD Card Formatting: Format the included 64GB SD card regularly (e.g., once a month) to prevent data corruption and ensure smooth loop recording. This can typically be done through the dash cam's settings menu.
- Clean Lenses and Screen: Periodically wipe the front and rear camera lenses, as well as the IPS screen, with a soft, lint-free cloth to maintain clear image quality and display visibility.
- Check Cable Connections: Ensure all power and camera cables remain securely connected and are not pinched or damaged, which could affect performance.
6. Troubleshooting
If you encounter issues with your Navycrest A2PRO Dash Cam, refer to the following common troubleshooting tips:
- Camera Not Powering On: Ensure the car charger is securely plugged into the cigarette lighter socket and the vehicle's ignition is on. Check the power cable for any visible damage.
- Recording Issues: If the camera is not recording, check if the SD card is properly inserted and formatted. Ensure loop recording is enabled in the settings. If the card is full, formatting it should resolve the issue.
- WiFi Connectivity Problems: If you cannot connect to the dash cam via the app, ensure the dash cam's WiFi is enabled in the system settings. Try restarting both the dash cam and your smartphone's WiFi.
- Poor Video Quality: Clean the camera lenses. Check the video resolution settings to ensure it's set to 4K (front) and 2.5K (rear).
- G-Sensor Too Sensitive/Not Sensitive Enough: Adjust the G-Sensor sensitivity setting (Low, Medium, High) in the video settings menu to suit your driving conditions.
For persistent issues or technical assistance, please contact Navycrest customer support.
7. Specifications
| Feature | Specification |
|---|---|
| Video Resolution | 4K (2160P) Front + 2.5K (1440P) Rear Dual Lens; 4K Single Front |
| WiFi Info | Built-in 5GHz WiFi, 4x download speed (8MB/s) compared to 2.4G WiFi |
| Video Playback Method | From Cellphone App or VLC Player |
| Included Memory Disk | 64GB (pre-inserted into the Dash Cam) |
| Max Memory Disk Support | Support 256GB Max, Class 10, U3 speed Micro SD Card |
| Parking Mode | Support, Record Video at Low Fps, Dedicated Type C Hardwire Kit Required |
| Battery & Charging | NO battery; Cigarette Lighter or Hard Wire, DC5V/2A |
| Mounting Type | Stick Mount on the Front Windshield, Removable Base |
| Operating Temperature | -4°F to 167°F |
8. Warranty & Support
Every Navycrest A2PRO Dash Cam is covered by a one-year quality guarantee from the date of purchase. We are committed to providing excellent customer service and technical assistance.
- Technical Support: We offer 7*24 technical support with a response time within 12 hours.
- Contact Us: If you have any questions, concerns, or require assistance, please email our customer care team. We are dedicated to resolving any arising issues promptly.


