
Kaschun SH-918
Kaschun SH-918 UHF Wireless Microphone System Instruction Manual
Model: SH-918
Introduction
This manual provides detailed instructions for the setup, operation, and maintenance of your Kaschun SH-918 UHF Wireless Microphone System. Please read this manual thoroughly before use to ensure optimal performance and longevity of your device.

Image: The Kaschun SH-918 UHF Wireless Microphone System, featuring two handheld microphones and the receiver unit.
Package Contents
Verify that all items listed below are included in your package:
- 1 x UHF Wireless Receiver
- 2 x UHF Wireless Handheld Microphones
- 1 x Power Adapter
- 2 x Non-Slip Rings
- 2 x Foam Covers
- 1 x Audio Cable (1/4" to 1/4")
- 2 x AA Batteries (for microphones)
- 1 x User Manual (this document)
- 2 x Antennas

Image: All components included in the Kaschun SH-918 Wireless Microphone System package, laid out for inspection.
Product Overview
The Kaschun SH-918 system consists of a main receiver unit and two handheld wireless microphones. The receiver manages signal reception and output, while the microphones capture audio wirelessly.
Receiver Unit
The receiver features an LED display showing channel and frequency information, volume controls for each microphone, and input/output ports for connectivity.
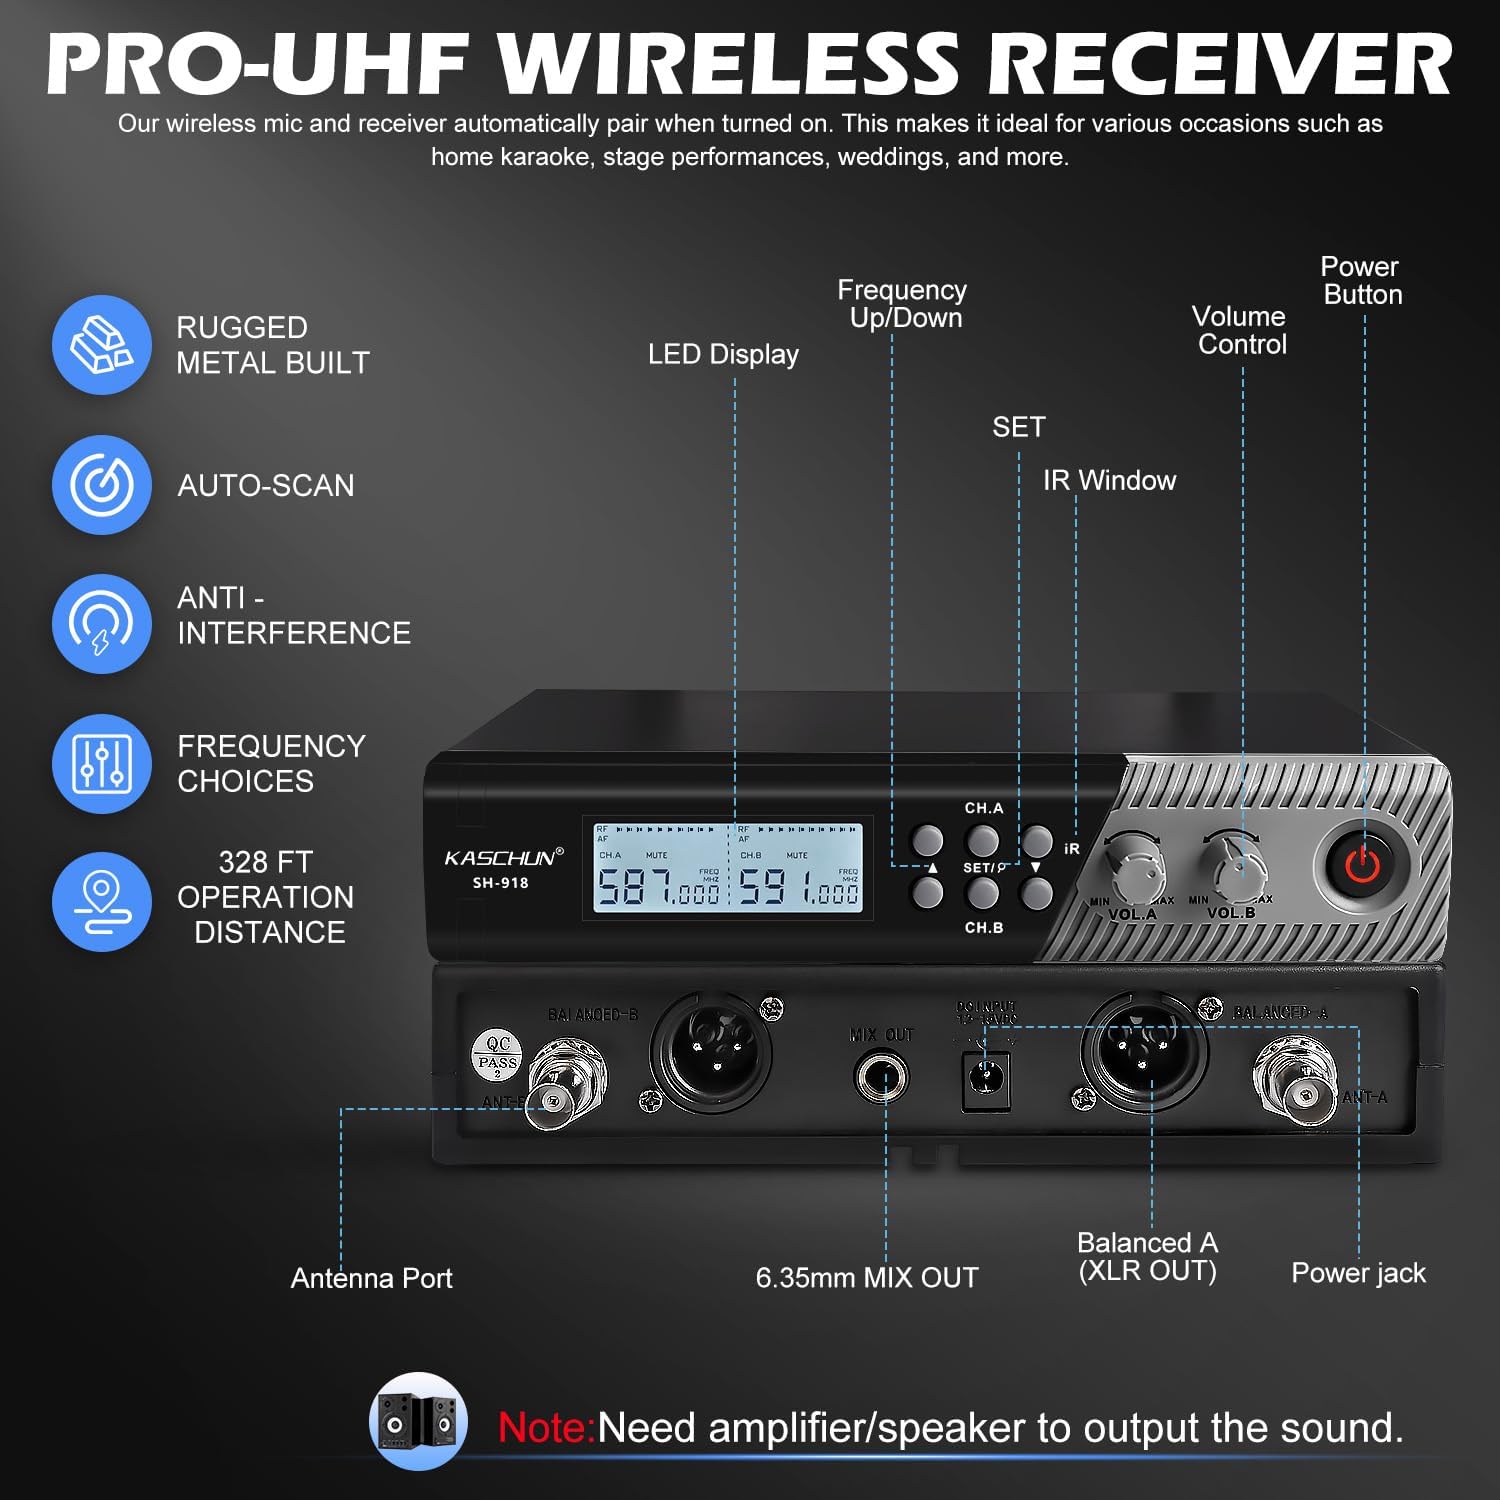
Image: Detailed view of the receiver unit, highlighting the front panel with LED display, control buttons, and volume knobs, as well as the rear panel with antenna ports, audio outputs (XLR and 1/4" mix out), and power input.
Handheld Microphones
Each microphone is equipped with a display for battery level and channel, a power button, and a channel switch button. They are designed for comfortable handling and durable use.

Image: Close-up of a handheld microphone, showing the display for channel and battery level, the power button, and the channel switch button.
Setup Instructions
- Connect Antennas: Screw the two antennas into the corresponding ports on the rear of the receiver unit. Ensure they are securely fastened for optimal signal reception.
Video: An unboxing and setup demonstration of the Kaschun SH-918 system, showing the connection of antennas to the receiver.
- Connect Power: Plug the power adapter into the DC input port on the receiver and then into a power outlet.
- Install Microphone Batteries: Unscrew the bottom part of each handheld microphone and insert two AA batteries, observing the correct polarity. Screw the bottom back on securely.
- Power On Receiver: Press the power button on the front panel of the receiver. The LED display will illuminate.
- Power On Microphones: Lightly press the power button on each handheld microphone. The microphone display will turn on.
- Automatic Frequency Scanning & Pairing: The receiver and microphones are designed to automatically pair upon powering on. If pairing does not occur automatically or if you experience interference, you can initiate an auto-scan:
- On the receiver, tap the "SET/P" button to start scanning for available frequencies.
- Once a frequency is found, align the IR window of the microphone with the IR sensor on the receiver to synchronize the frequency.

Image: Illustration of the auto-scan feature on the receiver and the IR synchronization process for the microphones.
- Connect to Audio System: Use the provided 1/4" audio cable or XLR cables (not included) to connect the receiver's MIX OUT or BALANCED XLR OUT ports to your amplifier, speaker, or mixer.
Note: This system requires an amplifier/speaker to output sound. It is not compatible with laptops, iPads, cellphones, or AV receivers directly. Bluetooth connectivity is not supported.

Image: Visual guide for connecting the wireless microphone system to various audio output devices, indicating compatible (amplifier, karaoke machine, mixer, sound card, outdoor speaker, multimedia equipment) and incompatible devices (laptops, iPads, cellphones, AV receivers, Bluetooth).
Operating Instructions
Microphone Operation
- Power On/Off: Long press the power button on the microphone to turn it on or off.
- Channel Switching: Briefly press the channel switch button on the microphone to cycle through available channels (1-100 per mic).
- Mute Function: The microphone can be muted via the receiver unit.
- Battery Indicator: The microphone's LED display shows the current battery level.
Receiver Operation
- Volume Control: Use the dedicated volume knobs (VOL A, VOL B) on the receiver to adjust the output level of each microphone independently.
- Frequency Adjustment: Use the "SET/P" button and arrow keys on the receiver to manually adjust frequencies if needed.
- Display Information: The receiver's screen displays microphone battery level, volume, RF signal strength, and current frequency.

Image: The Kaschun SH-918 wireless microphone system is suitable for various applications including concerts, weddings, parties, karaoke, gatherings, and church events.
Maintenance
- Battery Replacement: Replace AA batteries in the microphones when the battery indicator shows low power. New AA batteries can provide over 8 hours of continuous use.
- Cleaning: Use a soft, dry cloth to clean the receiver and microphones. Avoid using liquid cleaners or abrasive materials.
- Storage: Store the system in a cool, dry place away from direct sunlight and extreme temperatures when not in use.
- Non-Slip Rings and Foam Covers: Utilize the included non-slip rings for microphone stability and foam covers to reduce plosives and protect the microphone head.
Troubleshooting
| Problem | Possible Cause | Solution |
|---|---|---|
| No sound output |
|
|
| Interference or poor signal |
|
|
| Microphone not pairing |
|
|
Specifications
| Feature | Detail |
|---|---|
| Model Number | SH-918 |
| Brand | Kaschun |
| Connectivity Technology | UHF Wireless |
| Number of Channels | 1 (Receiver supports 2 microphones, each with 100 adjustable frequencies) |
| Operating Range | Up to 328 feet (100 meters) in open space |
| Microphone Form Factor | Handheld |
| Microphone Power Source | 2 x AA Batteries (included) |
| Microphone Battery Life | More than 8 hours (with new AA batteries) |
| Receiver Power Source | Plug In Electric (Power Adapter included) |
| Special Feature | Noise Reduction, Auto Scan Feature |
| Compatible Devices | Amplifier, Speaker, Mixer, PA System (via 1/4" aux input or XLR output) |
| Incompatible Devices | Laptops, iPads, Cellphones, AV Receivers (direct connection), Bluetooth |
| Item Weight (System) | 3.67 pounds (1.67 Kilograms) |
Warranty and Support
This product includes 12 months of after-sales service. In case of any questions or issues, please contact customer support. We are committed to replacing your product with a new one if necessary. Our team will reply to your message within 24 hours.
For support, please refer to the contact information provided with your purchase or visit the official Kaschun website.
Ask a question about this manual
Ask about setup, troubleshooting, compatibility, parts, safety, or missing instructions. Manuals+ will review the question and use this page’s manual context to help answer it.