1. Overview
The ACEMIC Q2/DT-5 is a dual UHF wireless instrument microphone system designed for flutes and other woodwind instruments. It includes two transmitters and one receiver, allowing two instruments to be connected simultaneously or providing a backup for extended performances. This system utilizes UHF frequency for stable transmission, offering clear audio quality with minimal delay, suitable for live performances, PA systems, audio mixers, and speakers.
2. Package Contents
- 2 x Wireless Transmitters (with tie-on microphones)
- 1 x Wireless Receiver
- 1 x 2-in-1 USB Type-C Charging Cable
- 1 x 6.35mm to 3.5mm Audio Adapter
- 1 x Carrying Bag
- 1 x User Manual
Note: Please ensure all components are present upon unboxing.

Image: Contents of the ACEMIC Q2/DT-5 package.
3. Key Features
- Dual Instrument Support: Connects two transmitters to one receiver simultaneously, ideal for multiple performers or instrument changes.
- UHF Stable Transmission: Utilizes UHF frequency and advanced digital audio transmission for clear sound and ultra-short audio delay.
- Extended Range: Offers stable transmission up to 40 meters (132ft) in open areas.
- 20 Preset Channels: Provides 20 adjustable channels to minimize interference and supports up to 4 systems for simultaneous use.
- Wide Compatibility: Suitable for various woodwind instruments including flutes, hulusi, piccolos, bamboo flutes, clarinets, and harmonicas. Includes a 6.35mm to 3.5mm adapter for diverse audio equipment.
- Long Battery Life: Built-in rechargeable batteries offer up to 6 hours of continuous use on a 2.5 to 3-hour charge.
4. Setup Guide
- Charge Devices: Fully charge both transmitters and the receiver using the provided 2-in-1 USB Type-C charging cable. The charging indicator will typically change color or turn off when fully charged.
- Attach Transmitters: Securely attach the tie-on microphones to your flutes or other instruments. Ensure the microphone capsule is positioned to capture the instrument's sound effectively. The flexible gooseneck allows for precise positioning.
- Install Receiver Antenna: Before use, ensure the antenna on the bottom of the receiver is properly installed and extended for optimal signal reception.
- Connect Receiver: Plug the receiver into your audio equipment (PA system, amplifier, audio mixer, or speaker). Use the 6.35mm to 3.5mm adapter if your equipment requires a 3.5mm input.
- Power On: Turn on both the transmitters and the receiver. The system will automatically attempt to pair.
- Pairing (if necessary): If the devices do not pair automatically, short press the channel switching button on the transmitter. The corresponding channel indicator will flash, indicating that the channel has been automatically switched and pairing is in progress. Repeat for the second transmitter if using both.
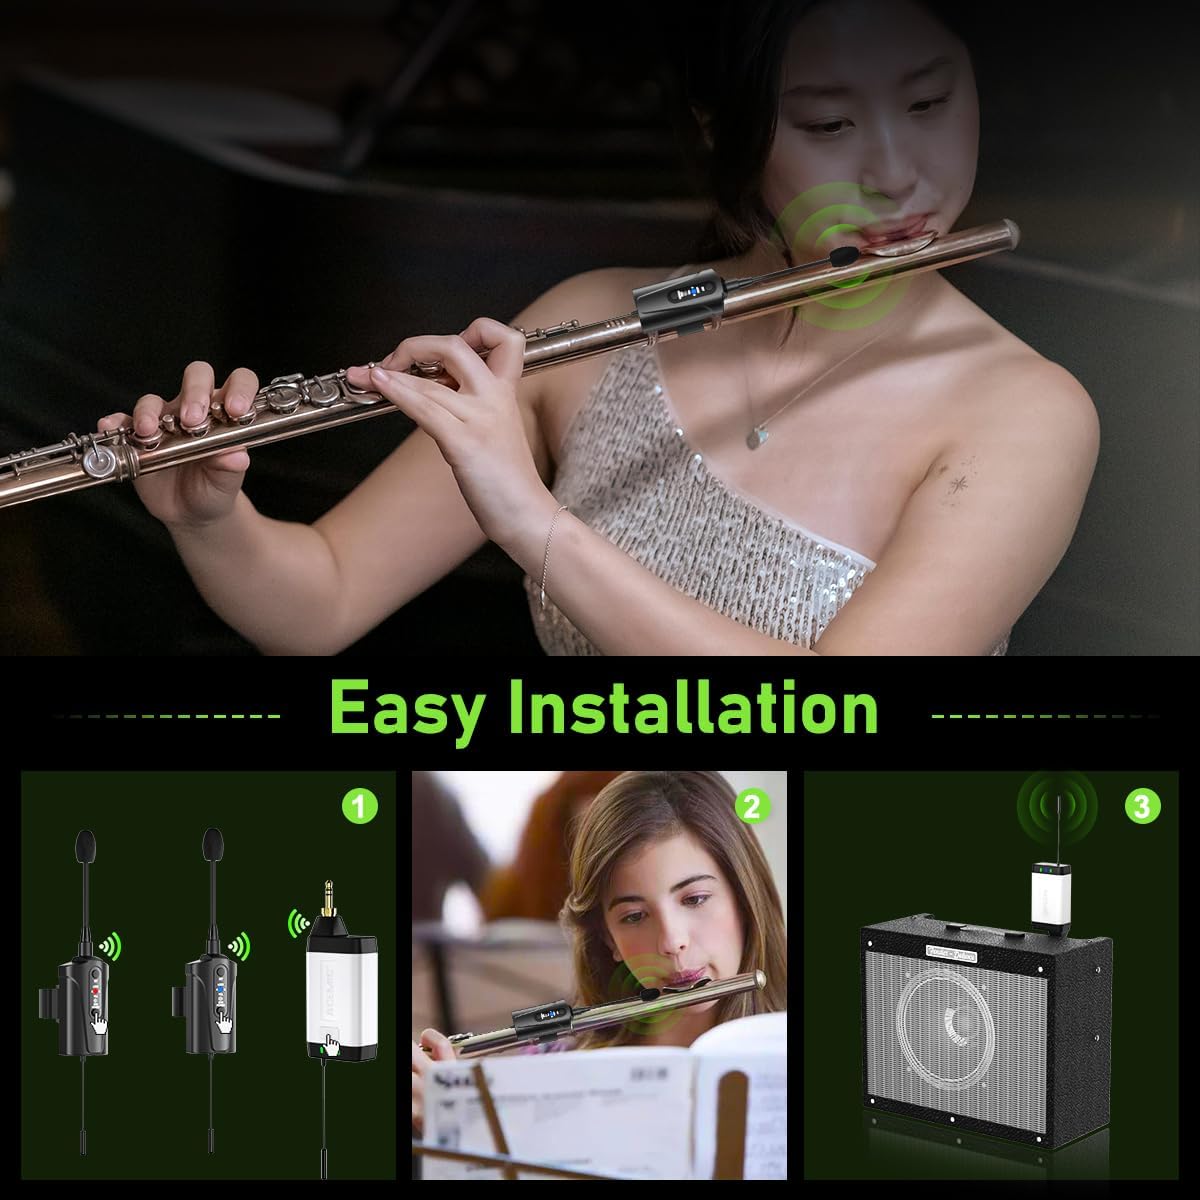
Image: Visual guide for easy installation of the microphone system.

Image: Demonstrating the wireless transmission distance and plug-and-play functionality.
5. Operating Instructions
- Power On/Off: Press and hold the power button on each transmitter and the receiver to turn them on or off.
- Channel Switching: If you experience interference, short press the channel switching button on the transmitter to cycle through the 20 available preset channels. The system will automatically re-pair to the new channel.
- Volume Control: Adjust the volume output from your connected audio equipment. The microphone system itself does not have external volume controls.
- Battery Indicator: Monitor the battery status indicators on the transmitters and receiver. Recharge when the indicator shows low battery.

Image: Illustrating the channel switch button for selecting from 20 adjustable channels.

Image: Charging setup for the transmitters and receiver, highlighting the 5-6 hour battery life.
6. Maintenance
- Cleaning: Use a soft, dry cloth to clean the transmitters and receiver. Avoid using harsh chemicals or abrasive materials.
- Storage: Store the system in the provided carrying bag in a cool, dry place when not in use. Avoid extreme temperatures and humidity.
- Battery Care: For optimal battery life, avoid fully discharging the batteries frequently. Recharge them regularly, even if the system is not used for extended periods.
- Microphone Protection: Handle the microphone capsules carefully to prevent damage.
7. Troubleshooting
- No Sound:
- Ensure all devices (transmitters, receiver, audio equipment) are powered on.
- Check battery levels and recharge if necessary.
- Verify that the receiver is correctly connected to the audio input of your sound system.
- Confirm that the transmitter and receiver are paired (indicated by stable connection lights). If not, try re-pairing by short pressing the channel button on the transmitter.
- Adjust the volume on your audio equipment.
- Interference/Poor Sound Quality:
- Change the channel on the transmitter by short pressing the channel button.
- Ensure the receiver's antenna is fully extended and unobstructed.
- Move the receiver closer to the transmitters.
- Minimize obstacles (walls, large metal objects) between the transmitters and receiver.
- Avoid using the system near other wireless devices operating on similar frequencies.
- Short Battery Life:
- Ensure devices are fully charged before use (2.5-3 hours charging time).
- Battery performance may degrade over time with extensive use.
8. Specifications
| Feature | Specification |
|---|---|
| Model | Q2/DT-5 |
| Brand | ACEMIC |
| Connectivity Technology | UHF |
| Number of Channels | 20 |
| Wireless Transmission Distance | Up to 40 meters (132 ft) in open areas |
| Battery Type | Lithium Polymer |
| Continuous Use Time | Up to 6 hours |
| Charging Time | 2.5 to 3 hours |
| Item Weight | 15.5 ounces (0.44 kg) |
| Package Dimensions | 10.75 x 5.75 x 2.44 inches |
| UPC | 797417770434 |
9. Warranty and Support
For warranty information and technical support, please refer to the product packaging or contact ACEMIC customer service directly. Keep your purchase receipt for any warranty claims.


