
HAPPYMODEL X12 ELRS Pro
Contents
Happymodel X12 ELRS Pro 5in1 AIO Flight Controller User Manual
Model: X12 ELRS Pro
1. Introduction
The Happymodel X12 ELRS Pro 5in1 AIO Flight Controller is an advanced all-in-one solution designed for DIY drones, particularly micro and mini quadcopters. It integrates a flight controller, 12A 4-in-1 ESC, OpenVTX, and an ExpressLRS receiver into a single compact board, simplifying wiring and reducing weight for optimal performance in small builds.
2. Product Features
- Integrated Flight Controller: X12 ELRS Pro v1.1 AIO 5-IN-1 with STM32F411CEU6 MCU and ICM42688P sensor.
- Built-in 12A Blheli_S 4in1 ESC: Supports 1-2S LiPo/LiPo HV input with continuous 12A current (15A peak).
- Onboard 5.8G OpenVTX: Adjustable transmitting power from 0mw to 400mw with MSP control.
- Integrated UART ExpressLRS Receiver: Version V3.0, 2.4GHz RF frequency with SMD antenna.
- Built-in Betaflight OSD: For on-screen display of flight data.
- Voltage and Current Sensors: Integrated for real-time monitoring.
- Compact Design: 25.5mm*25.5mm mounting hole size, weighing only 5.1g.
3. Specifications
| Item Name | X12 ELRS Pro AIO 5-IN-1 Flight controller |
| MCU | STM32F411CEU6 (100MHz, 512K FLASH) |
| Sensor | ICM42688P (SPI connection) |
| Mounting Hole Size | 25.5mm x 25.5mm |
| Power Supply | 1-2S battery input (DC 2.9V-8.7V) |
| ESC Current | 12A continuous, 15A peak (3 seconds) |
| ESC Firmware | Bluejay v0.19.2 |
| VTX Power | 0mw/RCE/25mw/100mw/400mw |
| VTX Channels | 40ch |
| ELRS Firmware | V3.0 |
| Weight | 5.1g |
| Dimensions | 30mm x 30mm x 8mm |

Figure 3.1: The X12 ELRS Pro flight controller weighing 5.1 grams on a digital scale.
4. Package Contents
The Happymodel X12 ELRS Pro 5in1 AIO Flight Controller package typically includes the following items:
- 1x Happymodel X12 ELRS Pro 5in1 AIO Flight Controller
- Power cables (XT30 or similar, depending on version)
- Motor connection cables
- Mounting hardware (screws, rubber grommets)
- Optional: Receiver antenna (if not integrated SMD)

Figure 4.1: Contents of the Happymodel X12 ELRS Pro package, including the flight controller, various cables, and mounting accessories.
5. Setup Guide
5.1. Physical Installation and Wiring
Carefully mount the X12 ELRS Pro flight controller onto your drone frame using the provided mounting hardware. Ensure proper orientation as indicated by the arrow on the board. Connect motors, camera, and other peripherals according to the wiring diagrams below.

Figure 5.1.1: Top view of the X12 ELRS Pro board showing motor pads (M1-M4) and video input/power connections (Video_in, +5V, GND).
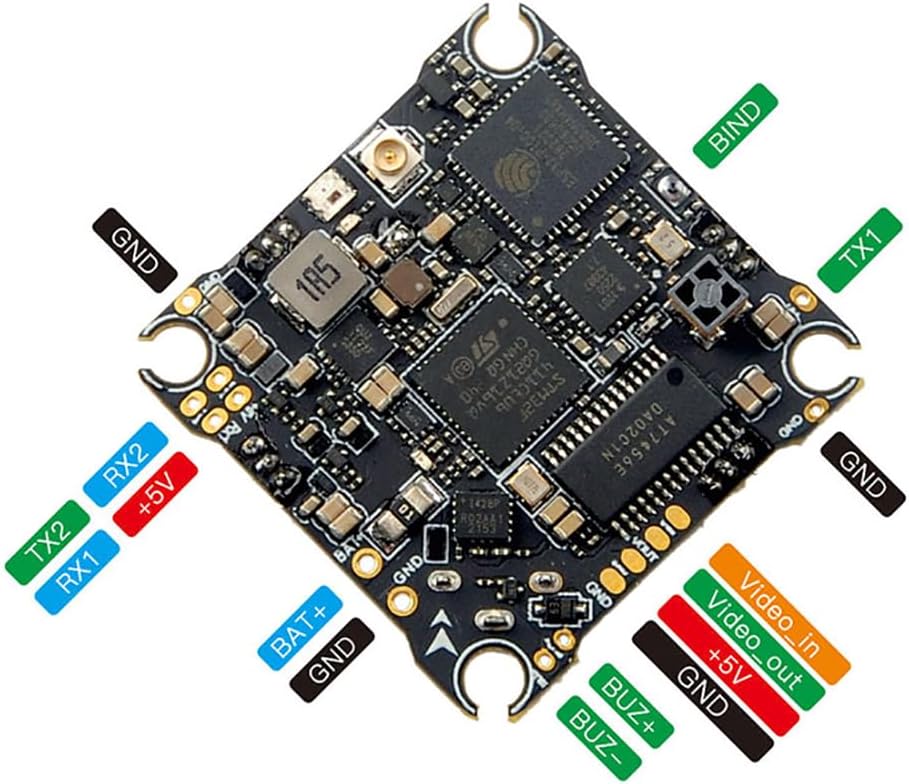
Figure 5.1.2: Bottom view of the X12 ELRS Pro board showing ExpressLRS receiver pads (BIND, TX1, RX1, RX2), battery input (BAT+, GND), and buzzer connections (BUZ+, BUZ-).
5.2. Betaflight Configuration
- Download and install the latest Betaflight Configurator.
- Connect the flight controller to your computer via USB.
- Flash the appropriate Betaflight firmware target (STM32F411) to the board. Ensure you select the correct target for the X12 ELRS Pro.
- Configure basic settings: PID tuning, rates, OSD elements, and modes.
- Verify motor direction and ESC protocol (DSHOT300 is default).
5.3. ExpressLRS Binding
The onboard ExpressLRS receiver needs to be bound to your ExpressLRS transmitter module.
- Power on the flight controller.
- Rapidly power cycle the flight controller three times. The LED on the receiver should start flashing slowly, indicating it's in binding mode.
- On your ExpressLRS transmitter, initiate the binding process. Refer to your transmitter module's manual for specific instructions.
- Once bound, the receiver LED will turn solid.
- Alternatively, you can flash the ELRS receiver firmware via Wi-Fi if your transmitter and receiver are on the same major ELRS version.
5.4. VTX Setup
The OpenVTX can be configured via Betaflight OSD or Betaflight Configurator (MSP control).
- In Betaflight Configurator, navigate to the Video Transmitter tab.
- Select your desired band, channel, and transmitting power (0mw/RCE/25mw/100mw/400mw).
- Ensure your FPV camera is connected correctly to the Video_in pad.
- For PIT mode, refer to Betaflight documentation for configuration.
6. Operating Instructions
Once the flight controller is fully set up and configured, you can proceed with operating your drone.
- Pre-Flight Check: Before each flight, ensure all connections are secure, propellers are correctly installed, and battery is fully charged.
- Arming: Arm the drone using the configured switch on your radio transmitter. Ensure you are in a safe environment before arming.
- Flight: Control the drone using your radio transmitter. Start with gentle movements to get accustomed to its response.
- Disarming: Disarm the drone immediately after landing or in case of an emergency.
Always operate your drone responsibly and in accordance with local regulations.
7. Maintenance
Regular maintenance ensures the longevity and optimal performance of your X12 ELRS Pro flight controller.
- Cleaning: Periodically inspect the board for dust, dirt, or debris. Use a soft brush or compressed air to gently clean the components. Avoid using liquids.
- Connection Check: Regularly check all soldered connections and connectors for looseness or damage. Re-solder or replace as necessary.
- Firmware Updates: Keep your Betaflight and ExpressLRS firmware updated to the latest stable versions to benefit from bug fixes and new features. Always back up your configuration before updating.
- Storage: When not in use, store the flight controller in a dry, anti-static environment, away from extreme temperatures.
8. Troubleshooting
| Problem | Possible Cause | Solution |
|---|---|---|
| Flight controller not powering on. | Incorrect battery connection, short circuit, damaged board. | Check battery polarity and connections. Inspect for visible damage or shorts. Test with a known good battery. |
| Motors not spinning or spinning incorrectly. | Incorrect motor wiring, ESC calibration issue, wrong motor direction in Betaflight, damaged ESC. | Verify motor wiring to M1-M4 pads. Calibrate ESCs in Betaflight. Adjust motor direction in Betaflight Configurator. Check for burnt components on ESC. |
| ExpressLRS receiver not binding. | Incorrect binding procedure, firmware mismatch, transmitter issue. | Ensure correct power cycling for binding. Verify ELRS firmware versions on both RX and TX are compatible. Try flashing RX firmware via Wi-Fi. |
| No FPV video signal. | Incorrect camera wiring, VTX not powered, wrong VTX channel/band, damaged VTX. | Check camera and VTX wiring. Ensure VTX is enabled and configured correctly in Betaflight. Verify VTX channel/band matches your FPV goggles. |
9. Warranty and Support
For warranty information and technical support, please contact Happymodel directly or the retailer from whom you purchased the product. Keep your proof of purchase for any warranty claims.
You can often find additional resources, firmware updates, and community support on the official Happymodel website or relevant FPV forums.
Manufacturer: Happymodel
Ask a question about this manual
Ask about setup, troubleshooting, compatibility, parts, safety, or missing instructions. Manuals+ will review the question and use this page’s manual context to help answer it.