
1. Safety Instructions
Please read and understand all instructions before beginning installation. Failure to follow these instructions may result in electric shock, fire, or personal injury.
- Ensure the power is turned off at the circuit breaker before installation or maintenance.
- All wiring must be in accordance with national and local electrical codes. If you are unfamiliar with wiring, consult a qualified electrician.
- The mounting bracket must be securely fastened to a building structure capable of supporting the fan's weight.
- Do not bend the blade holders during installation, balancing, or cleaning the fan.
- Keep hands clear of the fan blades when the fan is operating.
- This fan is suitable for indoor and covered outdoor use. Do not expose to direct water spray.
2. Package Contents
Verify that all parts listed below are included in your package. If any parts are missing, please contact customer support at ohniyou@ledphy.com.

Image: Detailed view of all components included in the Ohniyou 72 inch ceiling fan package, including blades, motor, light kit, remote, downrods, and mounting hardware.
- Motor
- Blade Arms (x4)
- Blades (x8)
- Light Kit
- Remote and Receiver
- Downrods (8in/20in)
- Rubber Sleeves
- Canopy and Mounting Bracket
- Clamp Pin
- Screws
- Manual
- Balance Kit
- Splice Closure
3. Installation
For a visual guide, please refer to the official installation video:
Video: Official Ohniyou 72 inch Ceiling Fan with Light Installation Guide, demonstrating step-by-step assembly and mounting.
3.1. Assemble Fan Blades and Motor
- Remove the screws between the blade arms.
- Fix the screw on the front of the blade arm to the motor.
- Reinforce connections between blade arms with screws.
- Slide the rubber sleeve into each fan blade.
- Secure each fan blade with screws onto the blade arms.
- Rotate to remove the light panel from the motor.
- Remove one of the screws from the motor.
- Place the metal plate onto the motor, rotate it until the screws align and slide into the slots.
- Tighten and secure with screws.
- Place the LED light panel onto the metal plate.
- Connect the light wires.
3.2. Prepare Downrod and Canopy
- Unscrew the screws securing the canopy.
- Cut the string securing the wires.
- Unscrew the screws on the steel wire.
- Loosen the screws on the motor.
- Thread the canopy and decorative cover through the downrod.
- Pass the steel wire and other wires through the downrod together.
- Secure the downrod to the motor port by installing the cross pin and clamp pin.
- Install the decorative cover onto the downrod.
3.3. Mount to Ceiling and Finalize
- Secure the mounting bracket to the ceiling with screws.
- Hang the downrod onto the mounting bracket.
- Pass the steel wire through the locking clip.
- Wrap the steel wire around the side of the mounting bracket, pull and tighten to secure.
- Tighten the locking clip with screws.
- Stuff the excess wire back into the downrod.
- Connect the receiver: connect wires of the same color.
- Connect the live and neutral wires according to the markings.
- After sorting out all cables, place them along with the receiver into the mounting bracket.
- Install the lampshade.
4. Operating Instructions
4.1. Remote Control
The fan comes with a remote control for convenient operation of all functions. The remote includes a wall-fixed bracket for storage.
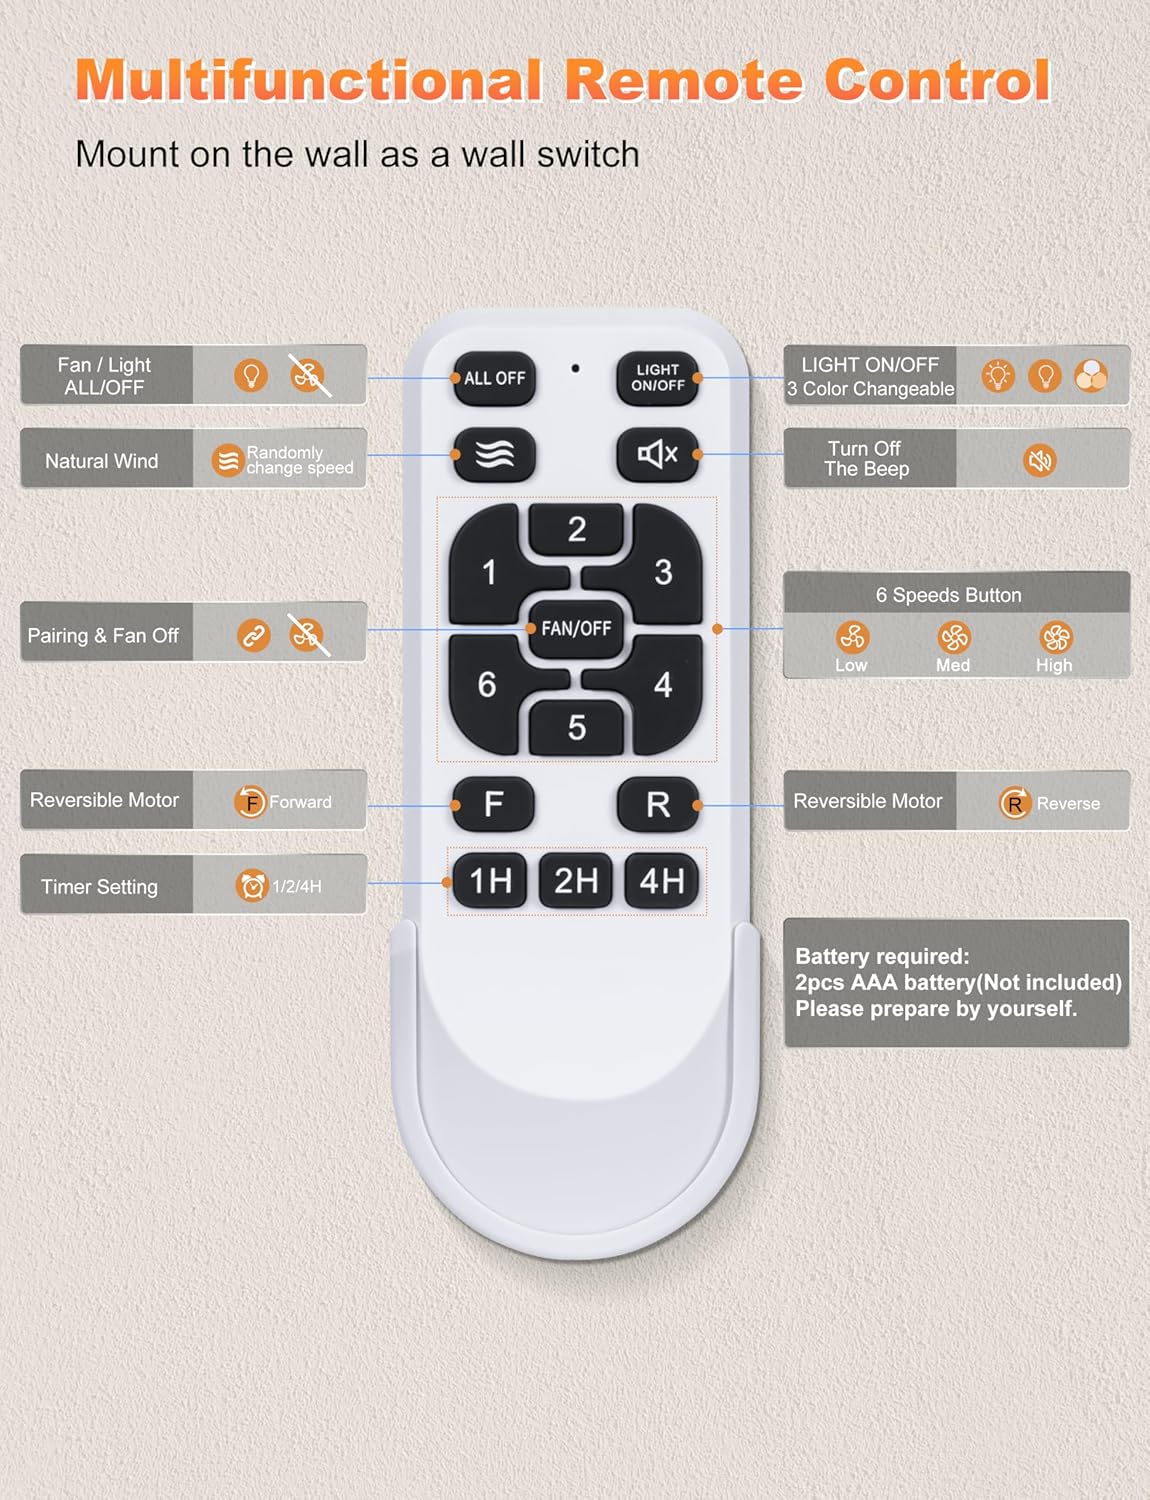
Image: Detailed diagram of the remote control, highlighting buttons for fan/light control, natural wind, 6 speeds, forward/reverse, timer, light ON/OFF, color temperature adjustment, and mute function.
- Fan / Light ALL/OFF: Turns both fan and light on/off.
- Natural Wind: Randomly changes fan speed to simulate natural breeze.
- 6 Speeds Button (1-6): Adjusts fan speed from low (1) to high (6).
- Reversible Motor (F/R): Switches between forward (summer) and reverse (winter) rotation.
- Timer Setting (1H, 2H, 4H): Sets the fan to turn off automatically after 1, 2, or 4 hours.
- Light ON/OFF: Turns the light on or off.
- 3 Color Changeable: Adjusts the light color temperature (3000K, 4500K, 6000K).
- Turn Off The Beep: Mutes the remote control's beep sound.
- Pairing & Fan Off: Used for remote pairing.
4.2. Smart APP Control
Control your fan conveniently via a smartphone app. Scan the QR code below or search "Tiny Smart" in your app store to download.
Download Tiny Smart APPVideo: Tiny Smart APP user guide, demonstrating how to download, pair, and control the fan using the smartphone application.
APP Pairing Steps:
- Turn on your phone's Bluetooth.
- Turn off the wall switch for the fan, wait 5 seconds, then turn it on again.
- Return to the APP interface and hit the Pair button to connect.
4.3. Reversible Function
The fan features a reversible DC motor for year-round comfort.

Image: Illustration of the fan's reversible function, indicating downward airflow for cooling in summer and upward airflow for circulating warm air in winter.
- Summer Mode (Forward Rotation): Blades rotate counter-clockwise, pushing air downwards to create a cooling breeze.
- Winter Mode (Reverse Rotation): Blades rotate clockwise, drawing air upwards to circulate warm air trapped near the ceiling.
4.4. Light Color Temperature (CCT) Adjustment
The integrated LED light offers three color temperature options to suit different scenarios.
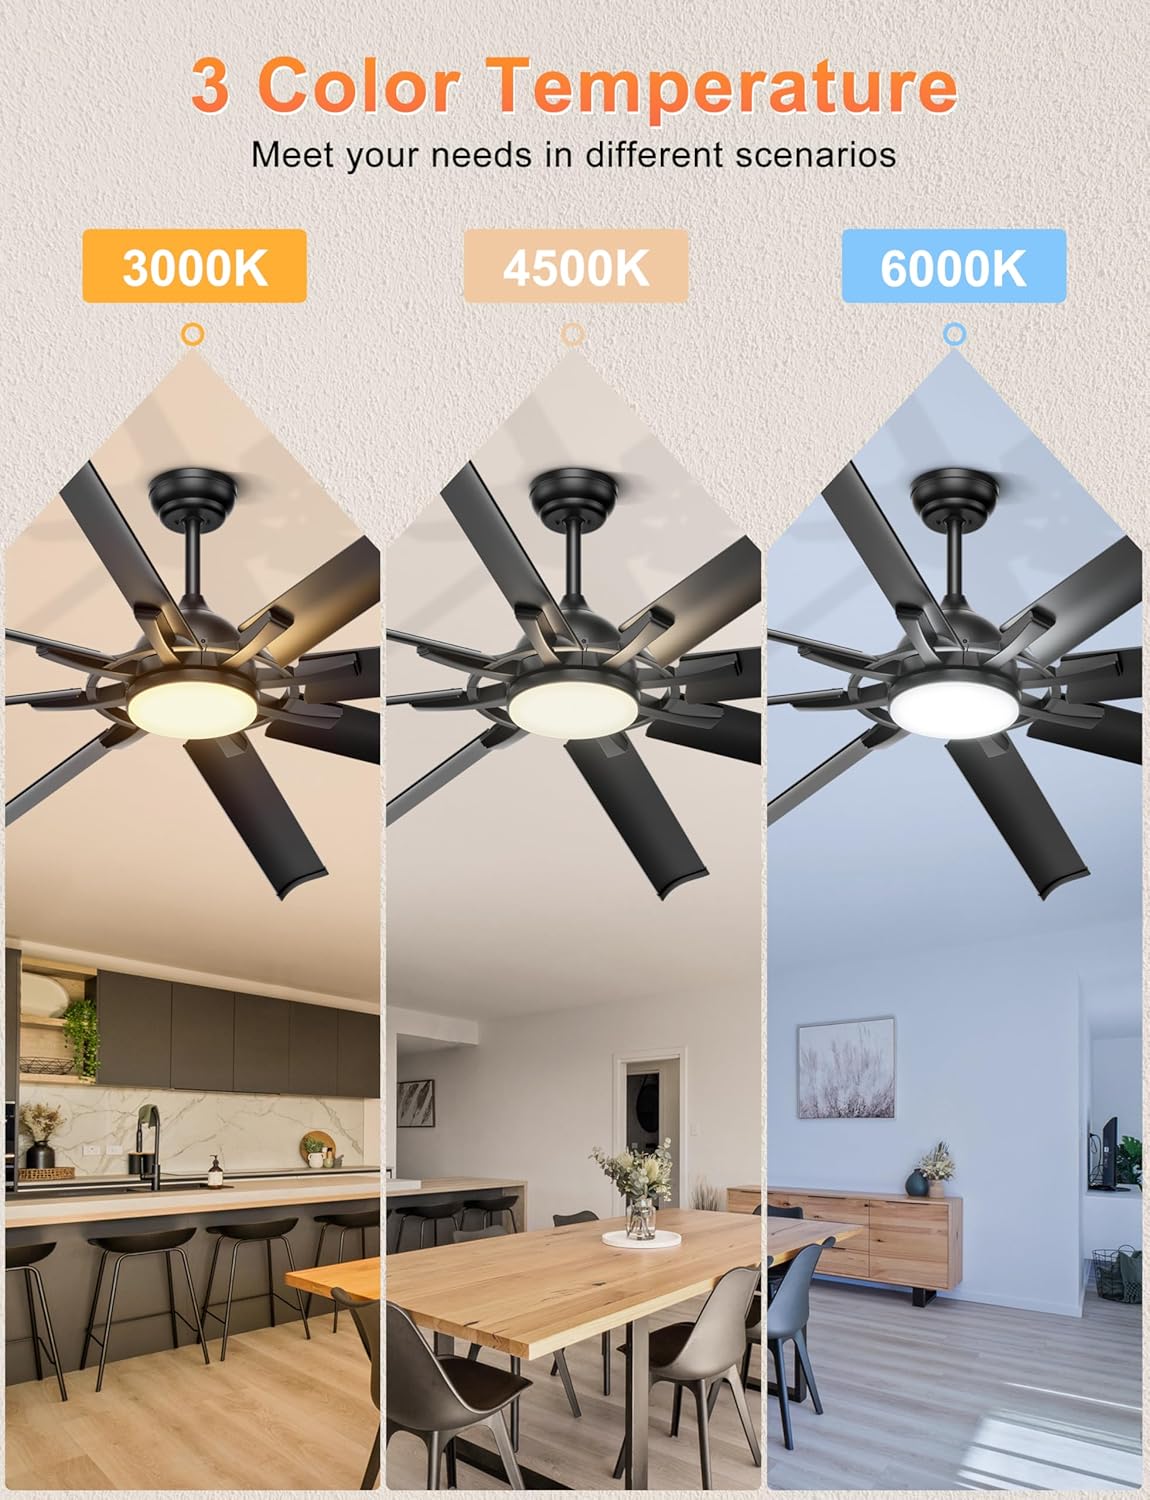
Image: Visual representation of the fan's light at 3000K (warm white), 4500K (neutral white), and 6000K (cool white) in different room settings.
- 3000K (Warm White): Ideal for creating a cozy and inviting atmosphere.
- 4500K (Neutral White): Suitable for general illumination and daily activities.
- 6000K (Cool White): Provides bright, crisp light for tasks or a modern feel.
How to Preserve Light Settings:
- Turn on the light via remote or wall switch.
- Keep the light on for at least 10 seconds, then turn it off.
- After 10 seconds, turn it back on to activate the memory function.
5. Maintenance
Regular maintenance ensures optimal performance and longevity of your ceiling fan.
- Cleaning: Use a soft brush or lint-free cloth to clean the fan blades and motor housing. Do not use abrasive cleaners or solvents.
- Tightening Screws: Periodically check all screws on the fan blades and mounting hardware to ensure they are tight. Loose screws can cause noise and wobble.
- Blade Balance: If the fan wobbles, use the included balance kit to correct the balance of the blades.
- Electrical Connections: Ensure all electrical connections remain secure. If you notice any loose wiring, turn off power at the circuit breaker and consult a qualified electrician.
6. Troubleshooting
If you encounter any issues, please refer to the solutions below. If the problem persists, contact customer support.
6.1. Remote Control Not Working / Pairing
Video: Guide on how to re-pair the remote control if it is not working, showing the power cycle and button press sequence.
- Use the wall switch or another method to cut off power to the fan.
- Wait 5 seconds, then reconnect the power.
- Within three seconds of restoring power, long-press the 'Pairing & Fan Off' button on the remote.
- You will hear a "beeping" sound, indicating successful pairing.
6.2. Missing Parts
Video: Instructions on how to request replacement parts if the product is missing components upon arrival.
If your product is missing parts, please contact customer support at ohniyou@ledphy.com. We will assist you with replacements.
7. Specifications
Detailed technical specifications for the Ohniyou 72 Inch Industrial Ceiling Fan (Model GLX107).
| Feature | Specification |
|---|---|
| Brand | Ohniyou |
| Model Name | GLX107 |
| Size | 72 inch |
| Color | Black with Lights |
| Electric Fan Design | Ceiling Fan |
| Power Source | AC/DC |
| Style | Industrial |
| Product Dimensions | 30.5"D x 11.8"W x 9.45"H |
| Room Type | Garage, Living Room, Outdoor Patio, Shop |
| Special Feature | App Operable, Quiet DC Motor, Remote Controlled, Timer |
| Recommended Uses | Air Circulation, Cooling |
| Noise Level | 35 Decibels |
| Wattage | 65 watts |
| Finish Type | Matte Black |
| Number of Blades | 8 |
| Air Flow Capacity | 6616 Cubic Feet Per Minute |
| Blade Length | 28.7 Inches |
| Speed | 84 RPM |
| Voltage | 120 Volts (AC) |
| Item Weight | 15 Pounds |
| Included Components | Ceiling Fan, Remote |
| Indoor/Outdoor Usage | Indoor, Outdoor |
| Control Method | App, Remote |
| Efficiency | High Efficiency |
| Number of Power Levels | 6 |
| Motor Type | Brushless DC Motor |
| Installation Type | Self-Installation |
| Mounting Type | Downrod Mount |
8. Warranty & Support
For any questions, concerns, or warranty claims, please contact Ohniyou customer support.
Email: ohniyou@ledphy.com
We aim to respond to all inquiries within 12 hours.


