Important Safety Information
Please read this instruction manual carefully before using your Karinear Electric Cooktop. Keep this manual for future reference. Failure to follow these instructions may result in electric shock, fire, or personal injury.
- Ensure the cooktop is connected to a 110V-120V power supply with a proper outlet plug.
- Do not touch hot surfaces. Always use oven mitts or pot holders.
- Supervise children closely when the cooktop is in use or cooling down. Utilize the child safety lock feature.
- Do not immerse the cooktop in water or any other liquid.
- Do not operate the cooktop if it has a damaged cord or plug, or if it malfunctions or has been damaged in any manner.
- Ensure proper ventilation around the cooktop during operation.
- The cooktop is equipped with overheat protection and an automatic shut-off function for safety.
Product Overview
Components
The Karinear 2 Burners Electric Cooktop features a sleek ceramic glass surface with two radiant heating elements. The integrated touch control panel allows for easy operation. The unit is designed for both countertop use and built-in installation.

Image: The Karinear 2 Burners Electric Cooktop, showcasing its black ceramic glass surface and touch control panel.
Key Features
- 110V~120V Compatibility: Designed for standard US household voltage with a convenient plug.
- Multiple Cooking Functions: Offers 9 power levels (approx. 200°F to 800°F) and 8 pre-programmed functions including melt, simmer, steam, boil, fry, roast, stir fry, and fast heat.
- Safety Protection Features: Includes high temperature warning, child safety lock, overheat protection, and automatic shut-off.
- Flexible Installation: Can be used as a portable countertop unit or installed as a built-in cooktop.
- Universal Cookware Compatibility: Works with all heat-resistant cookware materials such as iron, stainless steel, copper, and ceramic.
- No Electromagnetic Radiation: Safe for all users, including pregnant women.

Image: Visual representation of the cooktop's key features, including power, voltage, timer, auto shut-off, child lock, and residual heat indicator.
Setup
Installation Options
Your Karinear Electric Cooktop offers versatile installation options to suit your kitchen layout.
Countertop Use
For countertop use, simply attach the provided bottom bracket or feet to the cooktop. Ensure the cooktop is placed on a stable, flat, heat-resistant surface, away from flammable materials. Plug the cooktop directly into a standard 110V-120V outlet.
Built-in Installation
For built-in installation, a cutout in your countertop is required. Refer to the dimensions below for precise measurements. Ensure adequate clearance for ventilation around the cooktop. Professional installation is recommended for built-in applications.
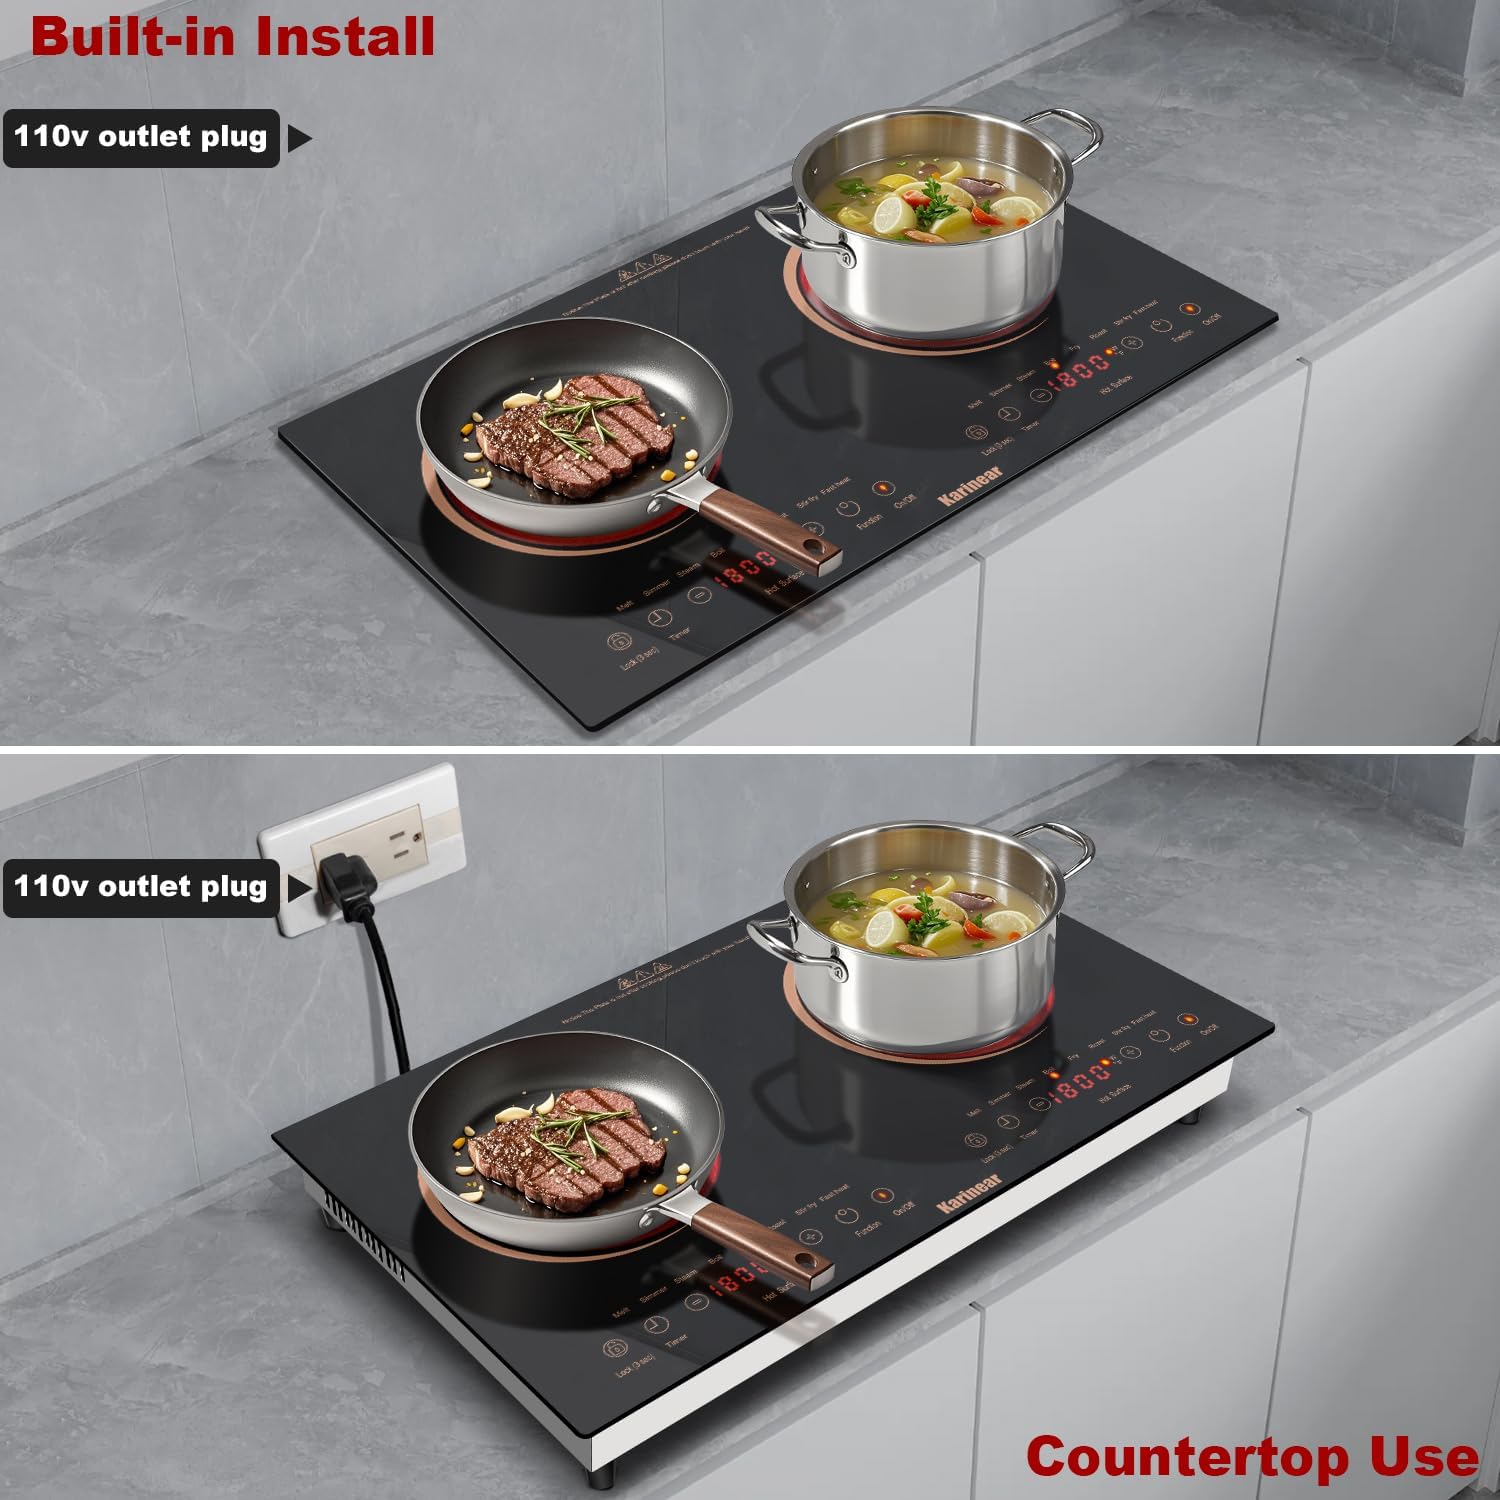
Image: The cooktop demonstrated in both built-in and countertop configurations, highlighting the 110V outlet plug.
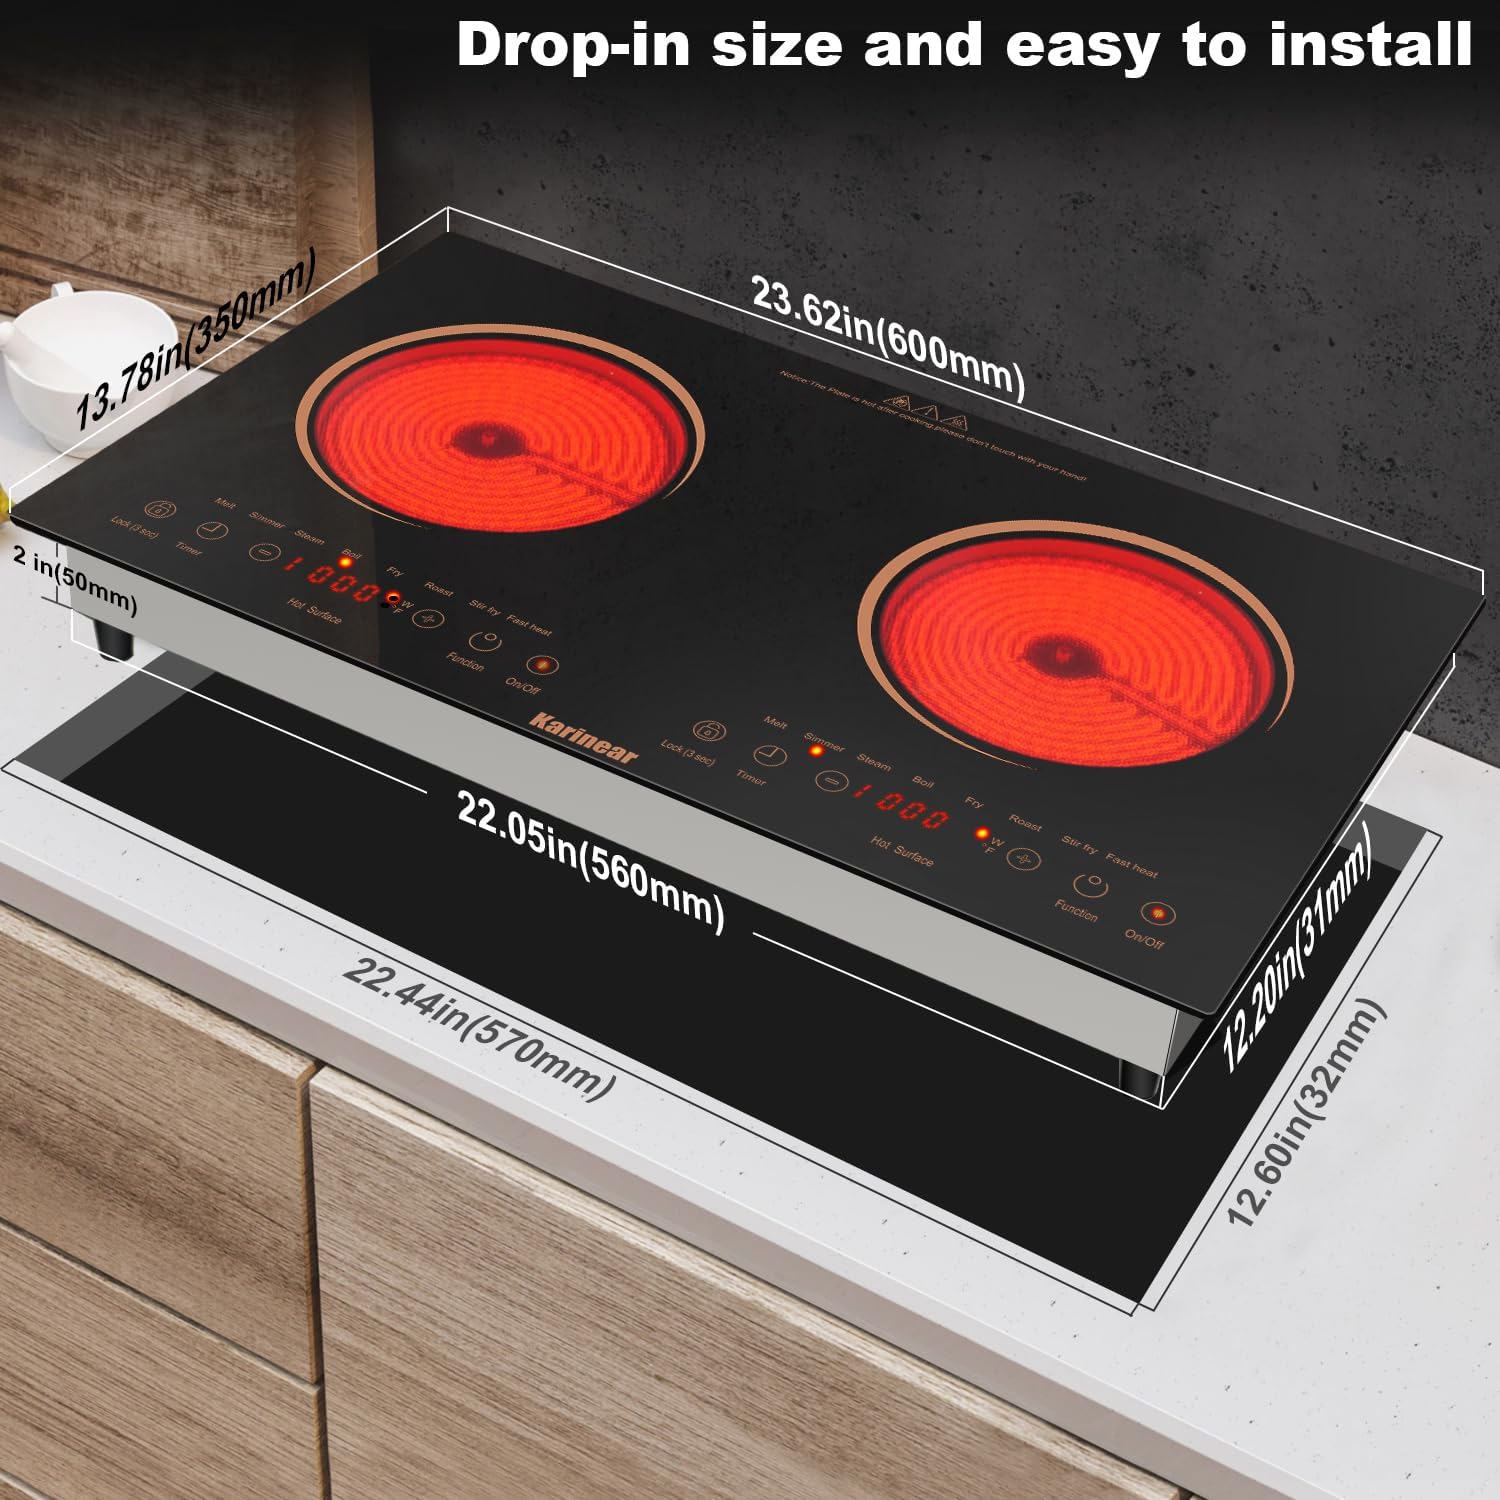
Image: Detailed dimensions for drop-in installation, including overall product size and recommended cutout size for the countertop.
Initial Setup
Before first use, wipe the ceramic glass surface with a damp cloth to remove any dust or residue. Ensure the cooktop is dry before plugging it in. It is normal for a slight odor to be present during the first few uses as manufacturing residues burn off.
Operation
Control Panel Overview
The cooktop features a sensor touch control panel. Each burner has its own set of controls for power adjustment, function selection, and timer settings. The display shows the current power level or temperature.
Powering On/Off
To turn on the cooktop, press the On/Off button. The display will illuminate. To turn off, press the On/Off button again. The cooktop will automatically shut off after a period of inactivity or if a safety feature is triggered.
Adjusting Power Levels
After selecting a burner, use the + and - buttons to adjust the power level from P1 to P9. P1 is the lowest setting, and P9 is the highest, offering temperatures from approximately 200°F to 800°F.

Image: A user demonstrating cooking on the cooktop, highlighting the range of 9 power levels available for various cooking needs.
Cooking Functions
The cooktop comes with 8 pre-programmed cooking functions. Press the Function button to cycle through options such as melt, simmer, steam, boil, fry, roast, stir fry, and fast heat. Each function is optimized for specific cooking tasks.
Timer Function
The timer can be set from 1 to 240 minutes. Press the Timer button, then use the + and - buttons to set the desired cooking duration. The cooktop will automatically shut off once the timer expires.

Image: The cooktop displaying the timer function set to 120 minutes, illustrating its use in a countertop setting.
Child Safety Lock
To activate the child safety lock, press and hold the Lock (3 sec) button for a few seconds until 'LoC' appears on the display. This prevents accidental operation. To deactivate, press and hold the Lock (3 sec) button again until 'LoC' disappears.

Image: The cooktop's control panel indicating the 'LoC' (Lock) status, demonstrating the child safety lock feature in a kitchen environment.
Cookware Compatibility
The radiant heating technology of this cooktop makes it compatible with all types of heat-resistant cookware. This includes, but is not limited to, iron, stainless steel, copper, ceramic, glass, and aluminum pots and pans.

Image: An array of cookware types, including iron, stainless steel, and ceramic, demonstrating the cooktop's broad compatibility.
Maintenance
Cleaning Instructions
Regular cleaning will maintain the appearance and performance of your cooktop. Always ensure the cooktop is cool and unplugged before cleaning.
- For daily cleaning, wipe the ceramic glass surface with a soft, damp cloth and mild detergent.
- For stubborn stains, use a ceramic cooktop cleaner and a scraper (often included with the package). Tilt the scraper at a 45-degree angle to gently remove burnt-on food.
- Avoid abrasive cleaners, scouring pads, or harsh chemicals, as these can scratch or damage the surface.
- Clean the control panel with a soft, damp cloth. Do not allow water to seep into the controls.

Image: A hand wiping the cooktop surface with a cloth, illustrating the ease of cleaning the ceramic glass.
Storage
If storing the cooktop for an extended period, ensure it is clean and dry. Store it in a cool, dry place, protected from dust and moisture. If used as a portable unit, ensure the feet are securely attached for stability.
Troubleshooting
Before contacting customer support, please refer to the following table for common issues and their solutions.
| Problem | Possible Cause | Solution |
|---|---|---|
| Cooktop does not turn on. | No power supply; Child safety lock activated. | Check if the plug is securely in the outlet. Ensure the circuit breaker is not tripped. Deactivate the child safety lock by pressing and holding the 'Lock (3 sec)' button. |
| Uneven heating or slow heating. | Incorrect cookware; Cookware not centered. | Ensure you are using flat-bottomed, heat-resistant cookware. Center the cookware on the heating element. |
| Loud beeping noise from buttons. | Normal operation. | The beeping sound is an audible confirmation of touch input and is a normal function of the cooktop. |
| Loud fan noise during operation. | Normal cooling fan operation. | The cooktop uses internal fans to cool components during and after operation. This noise is normal and ensures proper functioning and longevity of the appliance. |
| Error code displayed. | Internal malfunction or sensor issue. | Unplug the cooktop for 5 minutes, then plug it back in. If the error persists, contact customer support. |
| Feet/stand screws are too short for countertop use. | Manufacturing variation or incorrect screws. | Ensure you are using the correct screws provided for the feet. If they are genuinely too short, contact customer support for replacement screws or source appropriate screws locally that match the thread and length required for secure attachment. |
Specifications
| Brand | Karinear |
| Model Info | GD36BRAL-K |
| Part Number | US-KNC-PF602SGB-GO-UL |
| Color | Gold |
| Material | Ceramic Glass |
| Heating Elements | 2 |
| Product Dimensions (D x W x H) | 23.6" x 13.77" x 2.95" |
| Wattage | 2000 watts |
| Controls Type | Touch |
| Voltage | 110-120 Volts (AC) |
| Burner Type | Radiant |
| Item Weight | 15.57 pounds |
| Installation Type | Drop-In or Countertop |
| Special Features | Automatic Shut-Off, Safety Lock, Timer |
Warranty and Support
Warranty Information
Karinear products are manufactured with high-quality materials and craftsmanship. For specific warranty details regarding your electric cooktop, please refer to the warranty card included in your product packaging or visit the official Karinear website. Keep your purchase receipt as proof of purchase for warranty claims.
Customer Support
If you encounter any issues not covered in this manual or require further assistance, please contact Karinear customer support. You can often find contact information on the brand's official website or through the retailer where you purchased the product.
For more information and to explore other Karinear products, visit the Karinear Store on Amazon.