
1. Introduction
Thank you for choosing the HiFonics TXE 3000/1 Class D 1-Channel Amplifier from the Titan EVO series. This amplifier is engineered to deliver powerful and clear audio performance for your car's subwoofer system. It features a compact design, robust construction with cast aluminum side panels, and advanced functionalities like high-level inputs with EPS (Error Protection System) and an automatic on/off function for modern vehicle systems. This manual provides essential information for proper installation, operation, and maintenance to ensure optimal performance and longevity of your amplifier.
2. Safety Instructions
- Read all instructions: Before installing or operating the amplifier, carefully read and understand all instructions in this manual.
- Professional installation recommended: For optimal performance and safety, professional installation by an authorized HiFonics dealer is highly recommended.
- Power source: Connect the amplifier only to a 12V DC negative ground electrical system.
- Wiring: Ensure all wiring is correctly connected and properly insulated to prevent short circuits and electrical hazards. Use appropriate gauge wires for power and ground connections.
- Fusing: Always use an external fuse on the main power cable, located within 18 inches (45 cm) of the vehicle's battery.
- Ventilation: Mount the amplifier in a location that allows for adequate air circulation to prevent overheating. Do not cover the amplifier's heat sink.
- Avoid moisture: Do not expose the amplifier to moisture, water, or extreme temperatures.
- Volume levels: Prolonged exposure to high volume levels can cause hearing damage. Adjust the volume to a safe and comfortable level.
- Maintenance: Do not attempt to service the amplifier yourself. Refer all servicing to qualified service personnel.
3. Setup and Installation
3.1 Unpacking
Carefully remove the amplifier and all included accessories from the packaging. Verify that all components are present:
- HiFonics TXE 3000/1 Amplifier
- Wired Bass Level Remote Control
- Mounting hardware (screws)
- User Manual
3.2 Mounting the Amplifier
Choose a mounting location that provides adequate ventilation and protection from moisture. Common locations include under a seat, in the trunk, or behind a panel. Ensure the mounting surface is solid and secure.
- Place the amplifier in the desired location and mark the mounting holes.
- Drill pilot holes if necessary, ensuring no wires or fuel lines are damaged.
- Secure the amplifier using the provided mounting screws.
3.3 Wiring Connections
Proper wiring is crucial for performance and safety. Refer to the diagram below for terminal connections.

Image 1: Rear view of the TXE 3000/1 amplifier, illustrating the power input and speaker output terminals. The power input section includes GND (Ground), REM (Remote), and +12V terminals. The speaker output section shows terminals for connecting a subwoofer.
- Power Connection (+12V): Connect a heavy-gauge power cable (e.g., 4 AWG or larger, depending on cable length) from the vehicle's positive battery terminal to the amplifier's +12V terminal. Install an appropriate fuse holder with a fuse (not included) within 18 inches (45 cm) of the battery.
- Ground Connection (GND): Connect a heavy-gauge ground cable of the same size as the power cable from the amplifier's GND terminal to a clean, unpainted metal point on the vehicle's chassis. Ensure a solid, low-resistance connection.
- Remote Turn-On (REM): Connect a remote turn-on wire (e.g., 18 AWG) from your head unit's remote output to the amplifier's REM terminal. If using high-level inputs, the amplifier features an automatic on/off function, making the REM connection optional.
- Speaker Output: Connect your subwoofer(s) to the amplifier's speaker output terminals. Ensure correct polarity (+ to + and - to -). This is a 1-channel (mono) amplifier, designed for subwoofer applications.
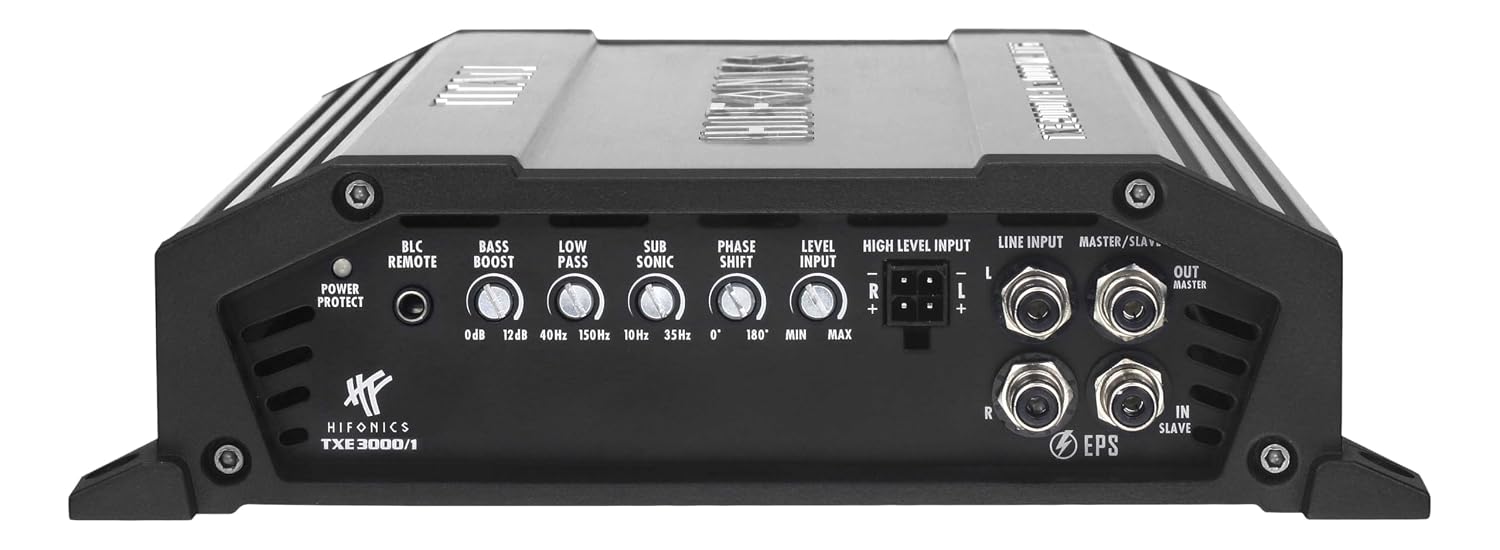
Image 2: Top view of the TXE 3000/1 amplifier's control panel. This image displays the RCA line inputs (L/R), high-level inputs, and various adjustment knobs for BLC Remote, Bass Boost, Low Pass, Sub Sonic, Phase Shift, and Level Input.
3.4 Signal Input
The TXE 3000/1 offers both RCA (low-level) and High-Level inputs.
- RCA Input: Connect RCA cables from your head unit's subwoofer or pre-amp output to the amplifier's LINE INPUT (L/R) RCA jacks. These are screwed RCA jacks for secure connection.
- High-Level Input with EPS: If your head unit does not have RCA outputs, use the HIGH LEVEL INPUT. This system includes EPS (Error Protection System) and an automatic on/off function, which detects an audio signal and turns the amplifier on/off without a separate remote wire.
4. Operating and Adjustments
Once installed, you can fine-tune the amplifier's settings for optimal sound performance.
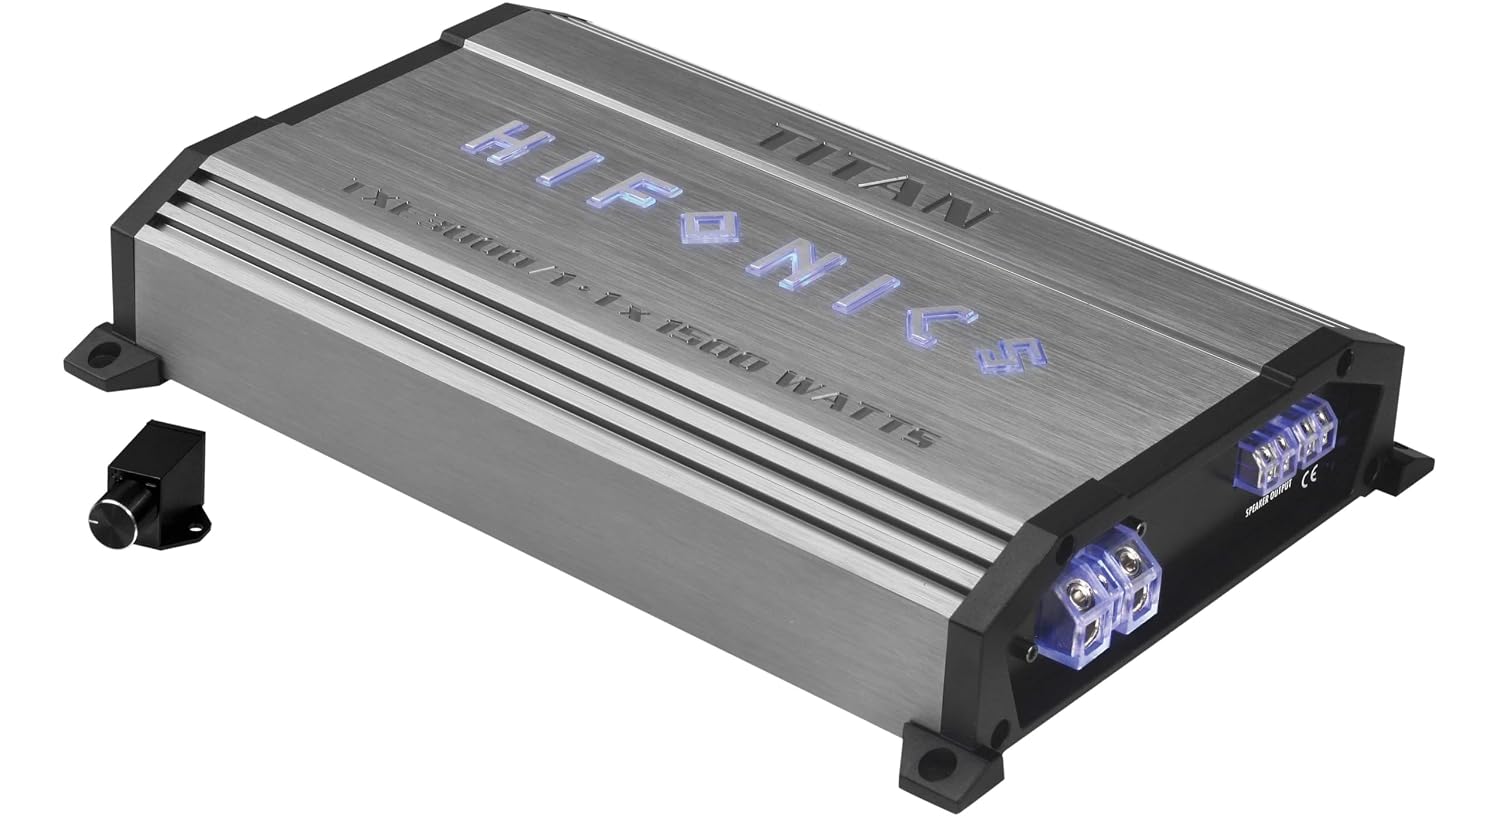
Image 3: Angled view of the HiFonics TXE 3000/1 amplifier, highlighting its brushed aluminum heat sink, illuminated HiFonics logo, and the distinctive blue lighting around the terminal connections.
4.1 Control Panel Functions
- BLC REMOTE: Port for connecting the wired bass level remote control.
- BASS BOOST (0-12dB): Adjusts the bass emphasis at a specific frequency. Use sparingly to avoid distortion.
- LOW PASS (LPF 40-150 Hz): This filter allows only frequencies below the set point to pass through to the subwoofer. Set it according to your subwoofer's capabilities and your system's overall sound.
- SUB SONIC (10-35 Hz): A high-pass filter for subwoofers, preventing extremely low, inaudible frequencies from being played, which can waste power and damage the subwoofer.
- PHASE SHIFT (0-180°): Adjusts the phase of the subwoofer output relative to the main speakers. This helps to achieve better integration and impact.
- LEVEL INPUT (MIN-MAX): This gain control matches the amplifier's input sensitivity to the output voltage of your head unit. Start with the gain at minimum and slowly increase until the desired volume is achieved without distortion.
- MASTER/SLAVE Function: Allows linking multiple TXE 3000/1 amplifiers for increased power output. Connect the 'OUT MASTER' of the master amplifier to the 'IN SLAVE' of the slave amplifier.
4.2 Bass Level Remote Control
The included wired remote control allows you to conveniently adjust the subwoofer's output level from the driver's seat. Connect it to the BLC REMOTE port on the amplifier.
5. Maintenance
Regular maintenance ensures the longevity and optimal performance of your amplifier.
- Cleaning: Use a soft, dry cloth to wipe the amplifier's exterior. Do not use harsh chemicals or abrasive cleaners.
- Ventilation: Periodically check that the amplifier's heat sink fins are free from dust and debris to ensure proper cooling.
- Connections: Occasionally inspect all power, ground, remote, and speaker connections to ensure they are secure and free from corrosion.
- Fuse: If the amplifier stops working, check the external fuse near the battery. Replace it with a fuse of the same rating if blown. Never use a higher-rated fuse.
6. Troubleshooting
If you experience problems with your amplifier, consult this section before contacting support.
| Problem | Possible Cause | Solution |
|---|---|---|
| Amplifier does not turn on (Power LED off) |
|
|
| No sound output |
|
|
| Distorted sound |
|
|
| Amplifier goes into protection mode (Protection LED on) |
|
|
7. Specifications
| Feature | Specification |
|---|---|
| Model | TXE3000/1 |
| Amplifier Type | Class D, 1-Channel (Mono) |
| RMS Power Output @ 4 Ohms | 1 x 700 W |
| RMS Power Output @ 2 Ohms | 1 x 1000 W |
| RMS Power Output @ 1 Ohm | 1 x 1500 W |
| Low Pass Filter (LPF) | 40 - 150 Hz, adjustable |
| Sub Sonic Filter | 10 - 35 Hz, adjustable |
| Bass Boost | 0 - 12 dB |
| Phase Shift | 0 - 180° |
| High-Level Inputs | Yes, with EPS (Error Protection System) |
| Auto Turn-On Function | Yes (via High-Level Input) |
| Remote Control | Wired Bass Level Remote Control included |
| Dimensions (L x W x H) | 310 x 217 x 57 mm (12.2 x 8.5 x 2.2 inches) |
| Weight | 3.5 kg (7.7 lbs) |
| Compliance | RoHS |
8. Warranty Information
HiFonics products are designed and manufactured to the highest quality standards. This product is covered by a limited warranty against defects in materials and workmanship. The duration and terms of the warranty may vary by region and retailer. Please retain your proof of purchase for warranty claims. For specific warranty details, refer to the warranty card included with your product or contact your authorized HiFonics dealer.
9. Customer Support
If you have any questions or require technical assistance regarding your HiFonics TXE 3000/1 amplifier, please contact your authorized HiFonics dealer or visit the official HiFonics website for support resources and contact information. When contacting support, please have your product model number (TXE3000/1) and proof of purchase readily available.