
1. Introduction
This manual provides detailed instructions for the setup, operation, maintenance, and troubleshooting of your JamesDonkey J2 75% Wireless Mechanical Gaming Keyboard. Please read this manual thoroughly to ensure proper use and to maximize your keyboard's performance.

Image 1.1: The JamesDonkey J2 75% Wireless Mechanical Gaming Keyboard, featuring an 82-key layout with RGB backlighting and a rotary knob.
2. Package Contents
Please verify that all items are present in your package:
- JamesDonkey J2 75% Wireless Mechanical Gaming Keyboard
- USB-C Cable
- 2.4 GHz Wireless Receiver
- Keycap Puller
- Switch Puller
- User Manual (this document)
3. Setup
3.1. Charging the Keyboard
Before initial use, it is recommended to fully charge the keyboard. Connect the provided USB-C cable to the keyboard's USB-C port and the other end to a powered USB port on your computer or a USB wall adapter. The charging indicator light will show the charging status.
3.2. Connectivity Modes
The JamesDonkey J2 keyboard supports three connectivity modes: 2.4 GHz wireless, Bluetooth 5.1, and wired USB-C. A switch located on the back of the keyboard allows you to select your preferred mode.

Image 3.1: Rear view of the keyboard showing the 2.4G/BT mode switch and the USB-C port. The 2.4 GHz receiver is stored magnetically next to the port.
3.2.1. 2.4 GHz Wireless Connection
- Locate the 2.4 GHz wireless receiver, typically stored magnetically next to the USB-C port on the keyboard.
- Plug the receiver into an available USB port on your computer.
- Slide the mode switch on the back of the keyboard to the '2.4G' position.
- The keyboard should automatically connect. The 2.4 GHz indicator light will illuminate.
3.2.2. Bluetooth Connection
- Slide the mode switch on the back of the keyboard to the 'BT' position.
- On your computer or device, enable Bluetooth and search for new devices.
- The keyboard will appear as 'JamesDonkey J2' (or similar). Select it to pair.
- The Bluetooth indicator light will flash during pairing and become solid once connected. The keyboard can connect to up to three Bluetooth devices. Refer to the operating section for switching between paired devices.
3.2.3. Wired USB-C Connection
- Connect the provided USB-C cable to the keyboard's USB-C port.
- Connect the other end of the cable to a USB port on your computer.
- The keyboard will automatically switch to wired mode and function without needing to adjust the mode switch.
4. Operating Instructions
4.1. Basic Key Functions
The JamesDonkey J2 features an 82-key layout, including a function row, navigation cluster, and a rotary knob.
4.2. Rotary Knob Functionality
The multi-function rotary knob, located in the top right corner, controls media functions:
- Rotate Clockwise: Increase volume
- Rotate Counter-clockwise: Decrease volume
- Press: Mute/Unmute audio
4.3. RGB Backlighting Control
The keyboard features customizable RGB backlighting. Use the following key combinations to adjust the lighting effects:
- Fn + \|: Change lighting effect mode
- Fn + ↑: Increase brightness
- Fn + ↓: Decrease brightness
- Fn + ←: Adjust lighting speed/direction
- Fn + →: Adjust lighting speed/direction
- Fn + Del: Toggle RGB on/off
4.4. Indicator Lights
The keyboard includes indicator lights for Caps Lock, Bluetooth connection, and 2.4 GHz connection, located above the navigation keys.
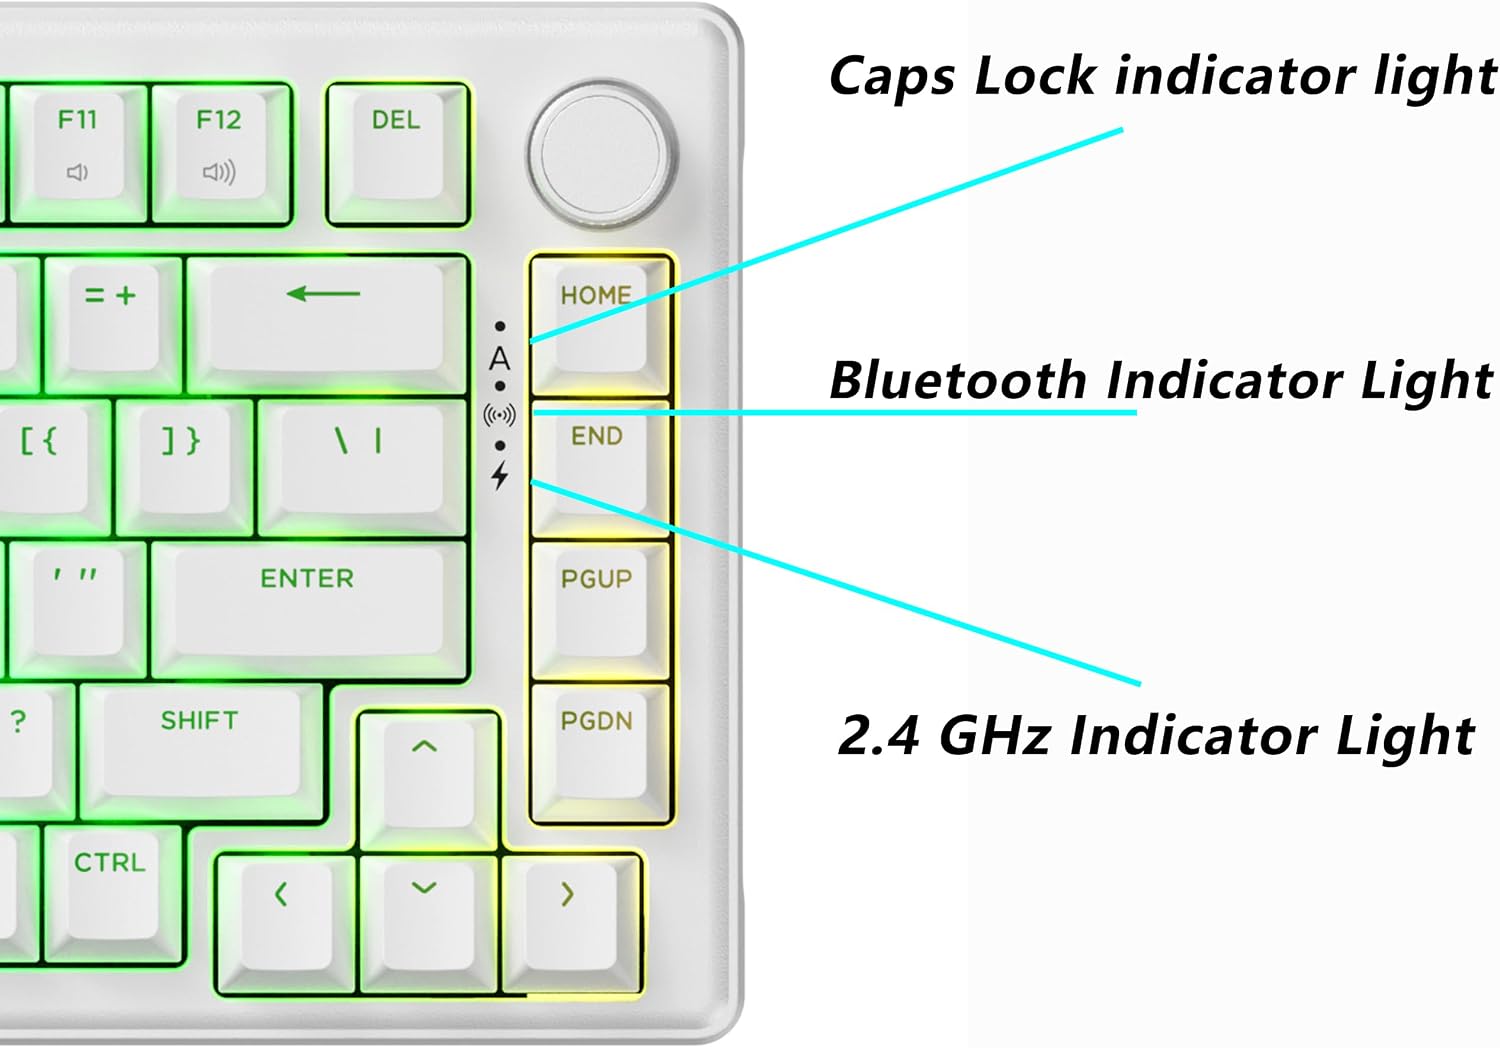
Image 4.1: Close-up of the indicator lights on the right side of the keyboard, showing Caps Lock, Bluetooth, and 2.4 GHz status.
4.5. QMK/VIA Software Customization
The JamesDonkey J2 supports QMK/VIA firmware, allowing for extensive customization of key remapping, macros, and shortcuts. You can use the Keychron Launcher web app or a compatible VIA client to configure your keyboard.

Image 4.2: Screenshot of the QMK/VIA software interface, demonstrating options for customizing key assignments and macros.
For detailed instructions on using QMK/VIA, please refer to the official QMK documentation or the Keychron Launcher web app's guide.
5. Maintenance
5.1. Cleaning the Keyboard
To maintain optimal performance and appearance, regularly clean your keyboard:
- Disconnect the keyboard from your computer.
- Use a soft, lint-free cloth slightly dampened with water or a mild cleaning solution to wipe down the keycaps and case.
- For dust and debris between keys, use compressed air.
- Avoid spraying liquids directly onto the keyboard.
5.2. Hot-Swappable Switches
The JamesDonkey J2 features hot-swappable sockets, allowing you to change mechanical switches without soldering. This supports most 3-pin and 5-pin MX-style mechanical switches.

Image 5.1: A close-up view demonstrating the hot-swappable nature of the switches, with several switches removed to show the sockets.
5.2.1. Replacing Switches
- Using the provided switch puller, gently grip the top and bottom of the switch you wish to remove.
- Pull the switch straight up with even pressure until it detaches from the socket.
- Align the pins of the new switch with the holes in the PCB socket. Ensure the pins are straight.
- Gently press the new switch down until it clicks into place. Do not force it; bent pins can damage the socket.
5.3. PBT Keycaps
The keyboard is equipped with durable double-shot PBT keycaps, known for their resistance to wear and shine over time.

Image 5.2: A detailed view of the PBT keycaps, highlighting their texture and legends.
5.3.1. Replacing Keycaps
- Using the provided keycap puller, hook the puller onto the keycap you wish to remove.
- Pull the keycap straight up with gentle, even force.
- Align the new keycap with the switch stem and press down firmly until it is seated.
6. Troubleshooting
If you encounter issues with your JamesDonkey J2 keyboard, please refer to the following common solutions:
- Keyboard not responding:
Ensure the keyboard is charged. Check the connectivity mode switch (2.4G/BT/Wired) is in the correct position. For wireless modes, ensure the receiver is properly plugged in or Bluetooth is paired. Try connecting via USB-C cable to rule out wireless issues. - Keys not registering:
If specific keys are not working, the switch might be faulty or improperly seated. Try removing and re-inserting the switch using the switch puller. If the issue persists, replace the switch. - RGB lighting not working:
Ensure RGB is enabled using Fn + Del. Try cycling through lighting modes and adjusting brightness using Fn key combinations. Check if the keyboard battery is low. - Connectivity issues (2.4 GHz/Bluetooth):
For 2.4 GHz, try a different USB port for the receiver. For Bluetooth, unpair and re-pair the keyboard. Ensure no other devices are causing interference. - QMK/VIA software not detecting keyboard:
Ensure the keyboard is connected via USB-C. Verify you are using the correct Keychron Launcher web app or VIA client version.
7. Specifications
| Model | JamesDonkey J2 |
| Layout | 75% (82 Keys) |
| Connectivity | Tri-Mode (2.4 GHz, Bluetooth 5.1, USB-C Wired) |
| Polling Rate | 1000 Hz (2.4 GHz & Wired) |
| Switches | Hot-swappable Super Red Switches (Linear) |
| Keycaps | Double-shot PBT |
| Backlighting | RGB |
| Firmware Support | QMK/VIA |
| Battery | 4000mAh (estimated, based on reviews) |
| Dimensions | 13.78 x 5.91 x 1.97 inches (approx.) |
| Weight | 2.2 pounds (approx.) |
8. Warranty and Support
For warranty information and technical support, please refer to the official JamesDonkey website or contact your retailer. Keep your proof of purchase for warranty claims.


