1. Introduction
Thank you for choosing the Wiby 4G SIM Outdoor Camera with Solar Panel. This device is designed to provide reliable outdoor surveillance with the convenience of 4G cellular connectivity and continuous solar power. Featuring 4MP resolution, motion detection, night vision, and two-way audio, it offers comprehensive monitoring for your property.
This manual provides detailed instructions to help you set up, operate, and maintain your camera effectively. Please read it thoroughly before installation and keep it for future reference.
2. Package Contents
Please check the package for the following items:
- Wiby 4G SIM Outdoor Camera
- Solar Panel (3W)
- Mounting Bracket
- Mounting Screws and Wall Plugs
- User Manual (this document)

Image 2.1: Wiby 4G SIM Outdoor Camera, solar panel, and a smartphone displaying the camera's live feed.
This image displays the Wiby 4G SIM Outdoor Camera, its accompanying solar panel, and a smartphone screen showing the live view from the camera, illustrating the complete system.
3. Product Overview
Familiarize yourself with the main components of your Wiby 4G SIM Outdoor Camera:
- Camera Lens: 4MP resolution for clear images.
- Infrared LEDs: For night vision functionality.
- White Light LEDs: For color night vision and deterrence.
- Microphone: For audio input and two-way communication.
- Speaker: For audio output and two-way communication.
- Antennas: For 4G cellular signal reception.
- SIM Card Slot: For inserting a 4G SIM card.
- MicroSD Card Slot: For local video storage (supports up to 128GB, card not included).
- Reset Button: To restore factory settings.
- USB-C Charging Port: For solar panel connection or direct charging.
- Solar Panel: 3W panel for continuous power supply.

Image 3.1: Wiby 4G SIM Outdoor Camera dimensions.
This diagram illustrates the physical dimensions of the Wiby 4G SIM Outdoor Camera, providing measurements for height, width, and depth to assist with installation planning.
4. Setup and Installation
4.1 SIM Card and MicroSD Card Installation
- Locate the rubber cover on the camera body, usually beneath the rotating head. Open it carefully.
- Insert a Nano-SIM card into the SIM card slot. Ensure the SIM card is active and has a data plan. The camera supports 4G cellular networks.
- Insert a MicroSD card (up to 128GB, not included) into the MicroSD card slot for local storage. Ensure it is inserted correctly.
- Close the rubber cover firmly to ensure water resistance.
Note: The camera relies on a 4G SIM card for connectivity. Wi-Fi connectivity is not supported for primary operation.
4.2 App Installation and Camera Pairing
- Download the dedicated mobile application (e.g., "Tris Home" or similar as indicated in product information) from your smartphone's app store (Android or iOS).
- Register for an account and log in.
- Power on the camera. The camera will emit a startup sound and indicator lights will activate.
- In the app, select "Add Device" or the "+" icon.
- Follow the on-screen instructions to scan the QR code on the camera or manually add the device.
- Once paired, you can access the live view and camera settings.
4.3 Mounting the Camera and Solar Panel
The camera and solar panel are designed for outdoor wall mounting. Choose a location with good cellular signal and direct sunlight exposure for the solar panel.
- Camera Mounting:
- Attach the camera's mounting bracket to the desired wall using the provided screws and wall plugs. Ensure it is securely fastened.
- Slide the camera onto the bracket until it locks into place.
- Solar Panel Mounting:
- Mount the solar panel in a location that receives maximum direct sunlight throughout the day. Use the adjustable bracket to angle the panel for optimal sun exposure.
- Connect the solar panel's USB-C cable to the camera's charging port. Ensure the connection is secure and the port cover is properly sealed.

Image 4.1: Wiby 4G SIM Outdoor Camera and solar panel components.
This image shows the Wiby 4G SIM Outdoor Camera and its solar panel, highlighting their individual components and design for installation.
5. Operating the Camera
Control and monitor your camera using the dedicated mobile application.
5.1 Live View and Pan/Tilt Control
- Open the app and select your camera to access the live video feed.
- Use the on-screen controls to pan (355° horizontal rotation) and tilt (90° vertical rotation) the camera lens to adjust the viewing angle.
- The camera has a wide 110° field of view for its lens.
5.2 Motion Detection and Alerts
- Enable motion detection in the app settings. You can adjust sensitivity levels and set detection zones.
- When motion is detected, the camera will send real-time alerts to your smartphone.
- Recorded video clips of motion events will be stored on the MicroSD card or in the cloud (if subscribed).
5.3 Night Vision
The camera features advanced night vision capabilities:
- Infrared Night Vision: Automatically activates in low light conditions, providing clear black and white video up to 15 meters.
- Color Night Vision: When white light LEDs are enabled (via app settings or motion detection), the camera can capture full-color video even in very dim environments.
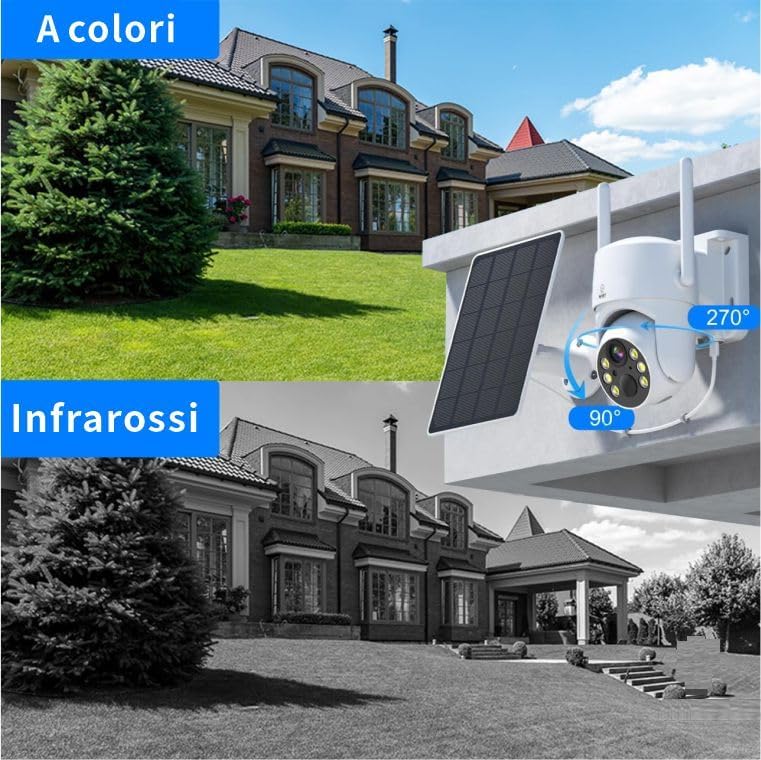
Image 5.1: Night vision comparison.
This image demonstrates the difference between the camera's color night vision (top) and infrared black and white night vision (bottom) capabilities in low-light conditions.
5.4 Two-Way Audio
- Use the microphone icon in the app to speak through the camera's speaker.
- Listen to audio from the camera's surroundings through your smartphone.
5.5 Recording and Playback
- Recordings are triggered by motion detection or can be initiated manually via the app.
- Access recorded footage from the MicroSD card or cloud storage (if applicable) through the app's playback feature.
5.6 Solar Charging
The 3W solar panel continuously charges the camera's internal lithium-ion battery, providing autonomous power. Ensure the solar panel is positioned to receive maximum direct sunlight for optimal charging efficiency.
6. Maintenance
- Cleaning: Periodically clean the camera lens and solar panel surface with a soft, damp cloth to remove dust and dirt. Do not use harsh chemicals.
- Firmware Updates: Check the app regularly for firmware updates to ensure optimal performance and security.
- Battery Health: While solar-powered, extreme weather or prolonged periods of low sunlight may affect battery levels. Monitor battery status via the app.
- Environmental Protection: The camera is IP65 weatherproof, protecting against dust and rain. However, avoid submerging it in water or exposing it to extreme impacts.
7. Troubleshooting
| Problem | Possible Solution |
|---|---|
| Camera not connecting to the app. |
|
| No motion detection alerts. |
|
| Poor night vision quality. |
|
| Solar panel not charging effectively. |
|
8. Specifications
| Feature | Detail |
|---|---|
| Model Number | TV-Q25-4MP |
| Brand | Wiby |
| Use Environment | Outdoor |
| Image Resolution | 4 Megapixels |
| Video Capture Resolution | 1080p (Full HD) |
| Pan/Tilt Angle | 355° Horizontal, 90° Vertical |
| Lens Viewing Angle | 110° |
| Connectivity | 4G Cellular (SIM required) |
| Power Source | Solar Powered (3W panel) with internal Lithium-ion battery |
| Night Vision Range | Up to 15 meters |
| Storage | MicroSD card (up to 128GB, not included), Cloud Storage (subscription may be required) |
| Weather Resistance | IP65 |
| Operating Temperature | -20°C to 55°C (-4°F to 131°F) |
| Compatible Devices | Smartphones (Android, iOS), Tablets |
| Dimensions (LxWxH) | 20 x 25 x 20 cm (approximate) |
| Weight | 900 g (approximate) |
9. Warranty and Support
Wiby provides 24-hour customer support for any technical issues or inquiries you may have regarding your camera. Please refer to the contact information provided with your purchase or on the official Wiby website for assistance.
For warranty details, please consult the documentation included with your product or contact Wiby customer service directly.


