1. Introduction
Thank you for choosing the WORKPROX 150 PSI Cordless Portable Tire Inflator. This device is designed for efficient and convenient inflation of various items, including car tires, motorcycle tires, bicycle tires, and sports balls. It features a powerful motor, dual power supply options, a smart digital display with auto shut-off, and multiple preset modes for ease of use.

Figure 1: WORKPROX 150 PSI Cordless Portable Tire Inflator and included accessories.
2. Safety Information
Please read and understand all safety warnings and instructions before operating this product. Failure to follow the warnings and instructions may result in electric shock, fire, and/or serious injury.
- Keep the work area clean and well-lit.
- Do not operate the inflator in explosive atmospheres, such as in the presence of flammable liquids, gases, or dust.
- Keep children and bystanders away while operating the inflator.
- Always wear eye protection when operating the inflator.
- Do not over-inflate. Follow the manufacturer's recommended pressure for the item being inflated.
- Disconnect the battery pack or power source when not in use or before servicing.
- Store idle inflators out of the reach of children and do not allow persons unfamiliar with the inflator or these instructions to operate the inflator.
3. Package Contents
Verify that all items listed below are included in your package:
- WORKPROX Portable Tire Inflator
- 20V 2.0Ah Rechargeable Lithium Battery Pack
- USB-C Fast Charger
- 12V Car Adapter (13 ft long cord)
- Air Hose (40cm flexible hose)
- 4 Nozzle Adapters (Presta to Schrader valve adapter, tapered valve adapter, needle valve adapter)
- Storage Bag
- Instruction Manual
4. Product Components
Familiarize yourself with the parts of your WORKPROX Tire Inflator:
- Air Hose
- Battery Pack
- Locking Button for Trigger
- Trigger
- Accessory Storage Compartment
- LED Screen (Digital Display)
- Handle
- 12V DC Input Port
- Pressure Unit Button
- Switch Button
- Pressure Increase Button (+)
- Pressure Decrease Button (-)
- Mode Button (M)
- USB-A In/Out Port
- USB-C In/Out PD Port

Figure 2: The removable 20V battery pack features USB-A and USB-C (PD) ports for charging and power output.

Figure 3: Digital display showing real-time pressure and control buttons for mode selection and pressure adjustment.
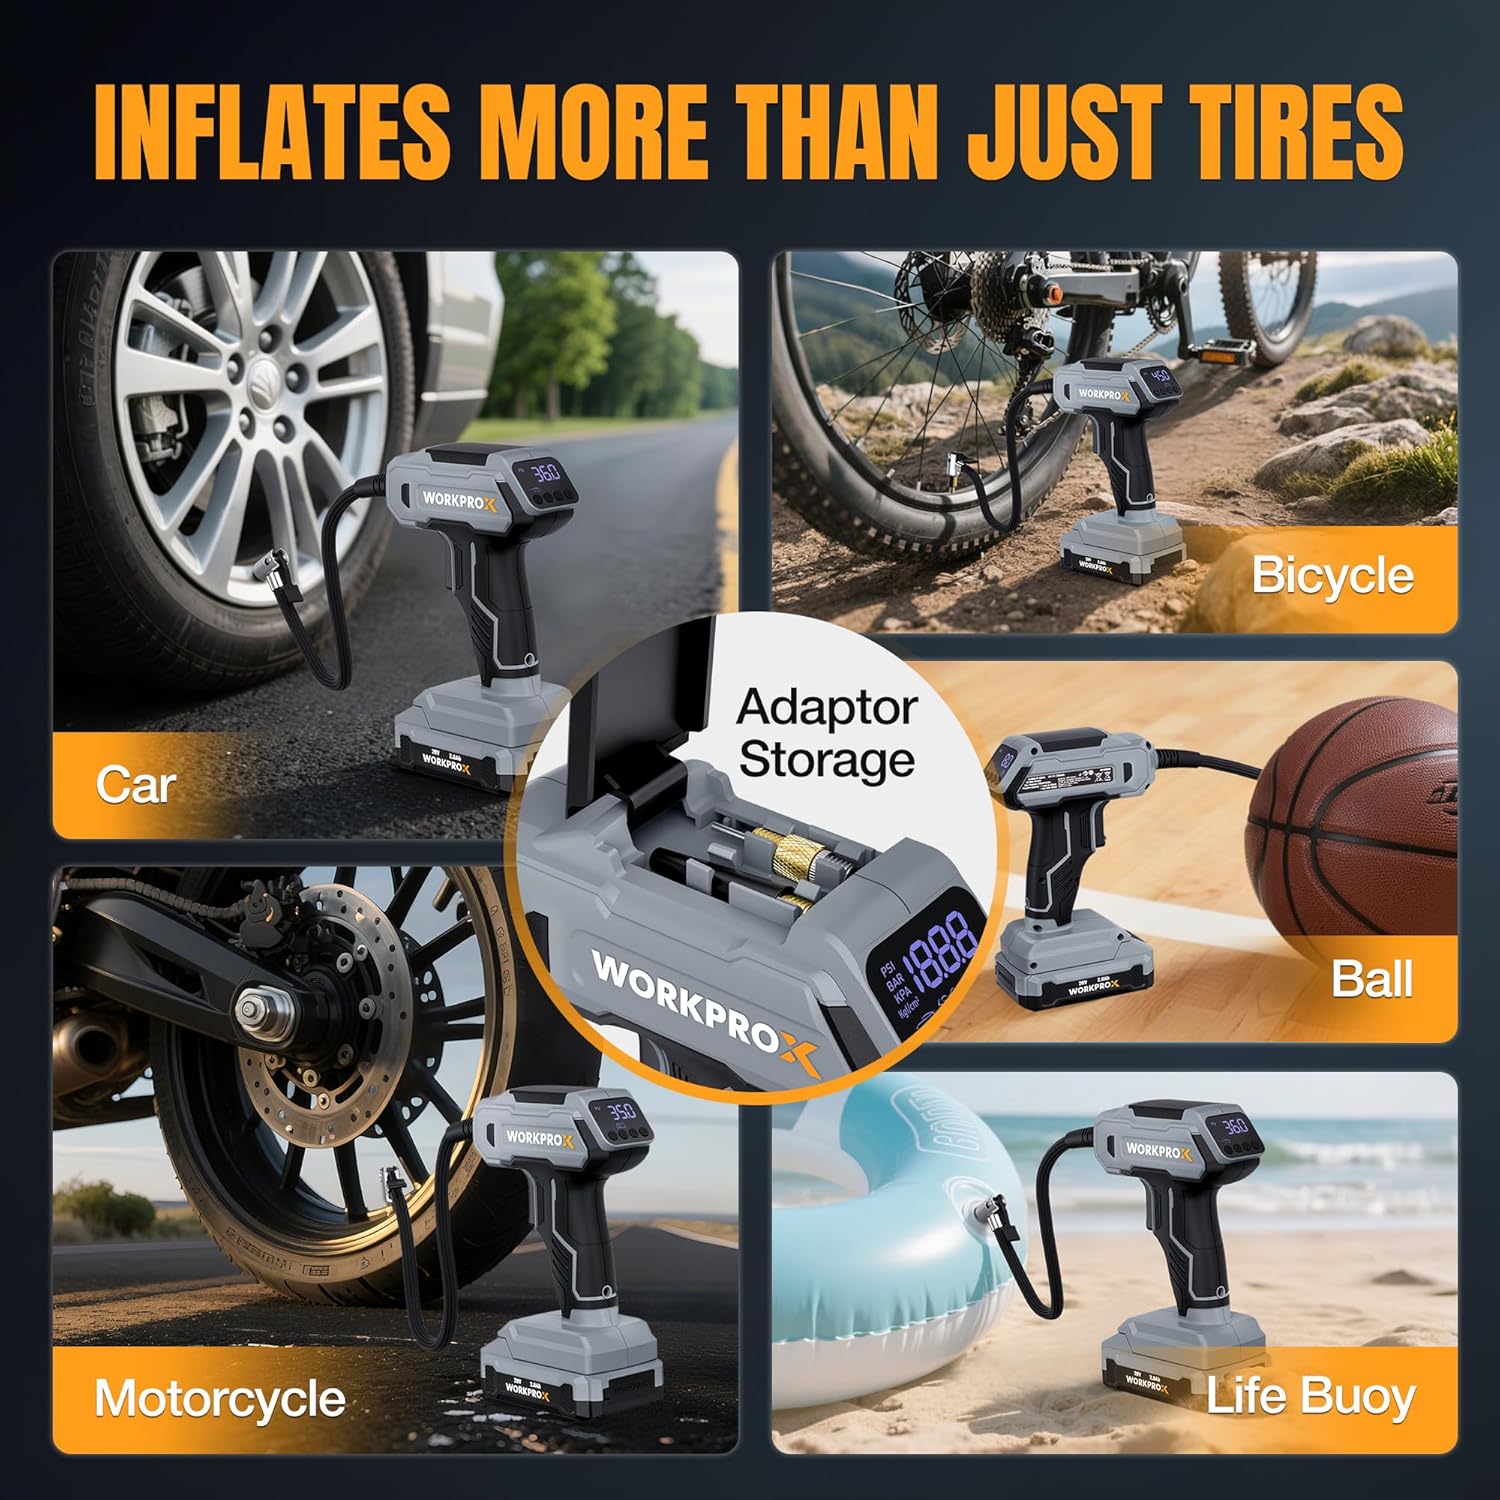
Figure 4: The inflator includes a convenient storage compartment for nozzle adapters.
5. Setup
5.1. Charging the Battery Pack
Before first use, fully charge the 20V lithium battery pack. The battery can be charged directly via the USB-C port on the battery itself using the provided USB-C fast charger, or by connecting the 12V car adapter to the inflator's 12V DC input port.
- Connect the USB-C cable to the battery pack and a suitable USB power source.
- Alternatively, plug the 12V car adapter into your vehicle's 12V outlet and then into the inflator's 12V DC input port.
- The battery level display on the battery pack will indicate charging status.
5.2. Attaching the Battery Pack
Align the battery pack with the base of the inflator handle and slide it in until it clicks securely into place.
5.3. Connecting the Air Hose
Screw the flexible air hose securely onto the inflator's air outlet. Ensure a tight connection to prevent air leakage.
6. Operating Instructions
6.1. Powering On/Off
Press the Power button (usually marked with a power symbol) to turn the inflator on. The digital display will illuminate. Press and hold the Power button to turn it off.
6.2. Selecting Pressure Units
Press the Pressure Unit button (usually marked with 'UNIT' or similar) to cycle through available pressure units: PSI, BAR, KPA, and Kg/cm².
6.3. Choosing an Inflation Mode
Press the Mode button (M) to select from 5 smart preset modes:
- Car Mode: Typically 26-50 PSI
- Motorcycle Mode: Typically 26-43.5 PSI
- Bicycle Mode: Typically 30-80 PSI
- Ball Mode: Typically 4-16 PSI
- Manual Mode: Allows custom settings up to 150 PSI

Figure 5: The digital display allows selection of various preset inflation modes for different items.
6.4. Setting Desired Pressure
After selecting a mode, use the (+) and (-) buttons to adjust the target pressure. The digital display will show the set value. For manual mode, set the desired PSI up to 150 PSI.
6.5. Inflation Process
- Connect: Attach the air hose nozzle securely to the valve stem of the item to be inflated. Ensure a tight seal.
- Start Inflation: Press the Trigger to begin inflation. The digital display will show the real-time pressure.
- Lock Trigger (Optional): For continuous inflation, press the Locking Button for Trigger to keep the trigger engaged without constant pressure.
- Auto Shut-Off: The inflator will automatically stop when the preset pressure is reached, preventing over-inflation.
- Disconnect: Once inflation is complete, release the trigger (if locked) and quickly disconnect the nozzle from the valve stem.

Figure 6: Simple three-step process for inflating items: Connect, Set Pressure & Lock Trigger, Auto-Inflate.
6.6. Using Nozzle Adapters
The inflator includes various nozzle adapters stored in the accessory compartment. Select the appropriate adapter for the item you are inflating (e.g., needle valve for balls, Presta adapter for certain bicycle tires) and screw it onto the air hose nozzle before connecting to the item.
6.7. Dual Power Supply (Battery & 12V DC)
The inflator can be powered by its 20V rechargeable lithium battery for cordless operation or directly from your vehicle's 12V DC outlet using the provided adapter. When the 12V DC adapter is connected, the device automatically switches to 12V DC power, ensuring continuous operation even if the battery is low or removed.

Figure 7: The inflator offers both cordless operation with a 20V battery and continuous power via a 12V car adapter.
6.8. LED Light
The built-in LED light can be activated to illuminate the work area, useful in low-light conditions or emergencies.
Video 1: Demonstration of the WORKPROX Cordless Tire Inflator, highlighting its features including the 20V battery pack and ease of use. This video shows the unboxing, battery installation, and basic operation of the device.
Video 2: A detailed review of the WORKPROX Tire Inflator, showcasing its portability, dual power options, and various attachments. The video emphasizes its utility as a reliable tool for vehicle owners.
7. Maintenance
7.1. Cleaning
Wipe the inflator with a clean, damp cloth. Do not use harsh chemicals or abrasive cleaners. Ensure the air hose and nozzles are free from debris.
7.2. Battery Care
To preserve battery lifespan, it is suggested to recharge the battery between 50% and 75% charge. For long-term storage, charge the device at least once every 3-6 months.
7.3. Storage
Store the inflator and its accessories in the provided storage bag in a cool, dry place, away from direct sunlight and extreme temperatures. Keep out of reach of children.
8. Troubleshooting
| Problem | Possible Cause | Solution |
|---|---|---|
| Inflator does not turn on | Low or dead battery; No 12V DC power; Faulty power button | Charge battery or connect to 12V DC source; Check 12V car outlet; Contact support |
| Slow inflation or no air output | Air hose not securely connected; Nozzle adapter clogged; Low battery; Item too large for inflator capacity | Ensure tight connections; Clean nozzle; Charge battery; Use for recommended items only |
| Inaccurate pressure reading | Loose connection; Sensor malfunction | Ensure tight connection; Contact support |
| Inflator overheats | Prolonged continuous use | Allow the inflator to cool down before resuming use. Avoid continuous operation for extended periods. |
9. Specifications
- Brand: WORKPRO
- Model: WX125352A
- Color: Grey
- Material: Plastic (PA6+GF30 reinforced housing)
- Power Source: Battery Powered (20V 2.0Ah Lithium) & Corded Electric (12V DC)
- Air Flow Capacity: 25 Liters Per Minute
- Maximum Pressure: 150 PSI
- Hose Length: 15.67 Inches (approx. 40cm)
- Inflation Speed: Inflates 195/60R16 tire from 0 to 36 PSI in approx. 4 minutes
- Precision: ±1.5 PSI
- Weight (without battery): 1.3 lbs
- Dimensions (without battery): 5.6" x 2.5" x 7"
- Operating Temperature: 0°C to 45°C
- UPC: 820909615972
10. Warranty and Support
WORKPRO is committed to providing high-quality tools. If you encounter any issues with your WORKPROX Tire Inflator, please refer to the troubleshooting section or contact customer support for assistance. For warranty information and support, please visit the official WORKPRO website or refer to the contact details provided in your product packaging.
WORKPROX - Better Tools Make It Professional


