FIRElood LH80-Z2-NS2
Wood Burning Tool Kit Instruction Manual
Model: LH80-Z2-NS2
Brand: FIRElood
1. Product Overview
This professional wood burning tool kit is designed for pyrography enthusiasts, from beginners to experts. It provides precise temperature control and versatility for various artistic applications on materials such as wood, leather, gourds, and more.
The kit includes:
- Wood burning machine with digital display and adjustable temperature (200~750℃)
- Two wood burning pens (one wire-nib detailer, one solid-point pen)
- 36 pyrography pen heads/tips
- Pen holder
- Screwdriver
- Stainless steel tweezers
- Sponge (for cleaning pen heads, to be used wet)
- Small wooden board for practice
- Carving pen (for scraping dark parts and increasing brightness)
- User manual

Image: Overview of the complete wood burning tool kit, showing the main unit, two pens, various tips, and accessories.
2. Safety Instructions
- Always operate the wood burning tool in a well-ventilated area to avoid inhaling fumes from burning materials.
- Ensure the tool is placed on a stable, heat-resistant surface.
- Do not touch the pen tip or metal parts of the pen when the tool is powered on or hot. They can reach very high temperatures.
- Keep flammable materials away from the heated pen tip.
- Allow the pen and tips to cool completely before changing tips or storing the tool.
- Always unplug the unit when not in use or before performing maintenance.
- Keep out of reach of children and pets.
3. Setup
3.1 Unpacking and Component Identification
Carefully remove all components from the packaging. Verify that all items listed in the "Product Overview" section are present.
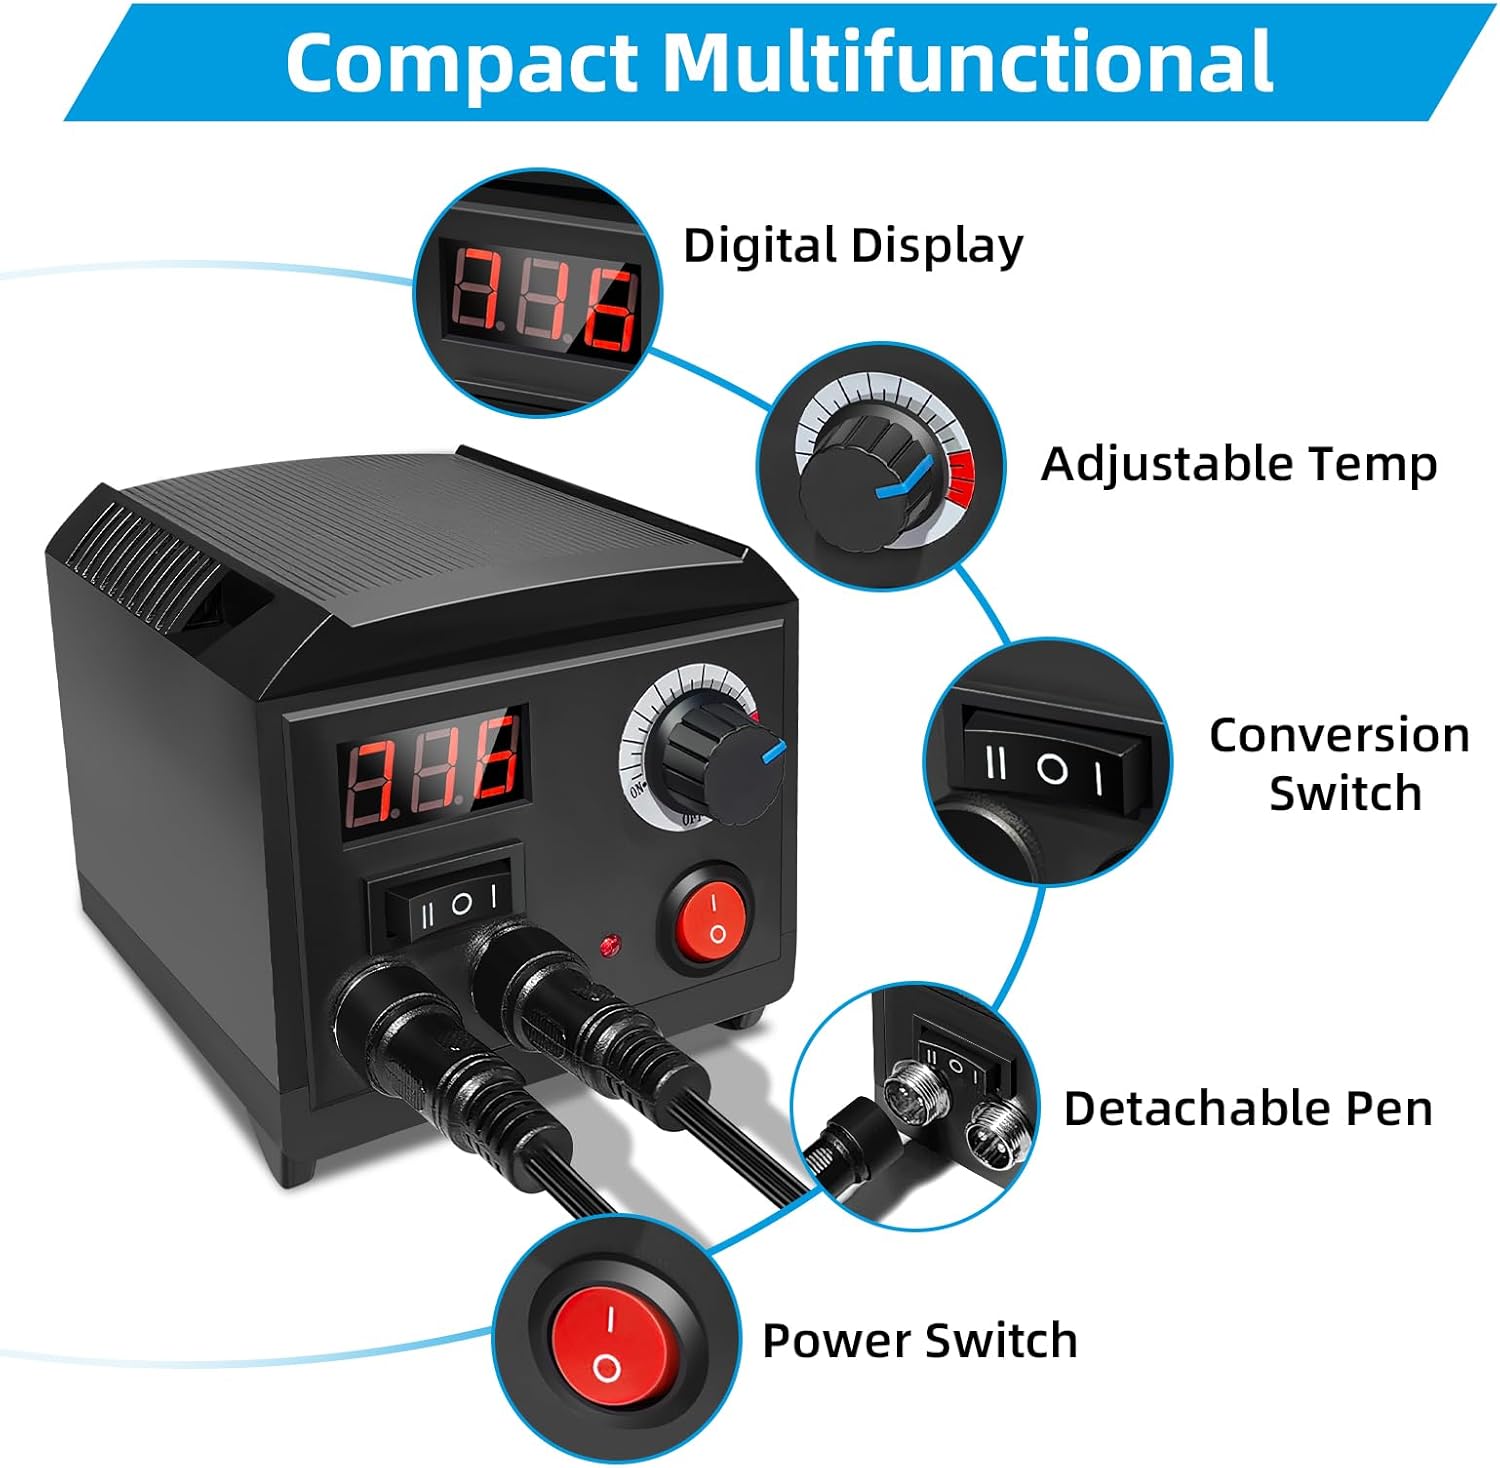
Image: Close-up of the main unit with labels pointing to the Digital Display, Adjustable Temp knob, Conversion Switch, Detachable Pen ports, and Power Switch.
3.2 Connecting the Pens
Connect the two wood burning pens to the designated ports on the front of the main unit. Ensure they are securely plugged in. The unit supports two pens for quick switching during operation.
3.3 Installing Pen Tips
To install a pen tip:
- Ensure the pen is cool and unplugged.
- Loosen the screw on the pen tip holder by more than 4 mm using the provided screwdriver.
- Insert the base of the desired pen tip into the copper wire connection, ensuring it goes in at least 8 mm.
- Tighten the screw firmly to secure the pen tip. A loose connection may prevent proper heating or cause sparking.

Image: A four-panel illustration demonstrating how to loosen the screw, insert the pen tip, tighten the screw, and wipe the tip with a damp sponge.
4. Operating Instructions
4.1 Powering On and Temperature Adjustment
Plug the unit into a suitable power outlet. Press the main Power Switch to turn on the device. The digital display will illuminate.
Use the Adjustable Temp knob to set the desired temperature. The temperature range is 200℃ to 750℃. Start with a lower temperature and gradually increase it as needed for your project and material.

Image: A hand adjusting the temperature dial on the wood burning unit, showing the temperature range from 200°C to 750°C.
4.2 Switching Between Pens
The unit features a Dual-Pen Pyrography Station. You can easily switch between Pen A and Pen B using the Toggle Switch (Conversion Switch) on the main unit. This allows you to use two different types of wire nibs without repeatedly changing tips.
- Press the "II" button to activate Pen A (typically for wire-nib detailer).
- Press the "I" button to activate Pen B (typically for solid-point pen).

Image: Illustrates the process of quickly switching between Pen A and Pen B using the toggle buttons on the main unit.
4.3 Using Different Pen Tips
The kit includes 36 different pen tips for various effects:
- Professional Pen Tips: Primarily used for precise drawing, rendering, and depicting delicate details.
- Solid Copper Pen Tips: Ideal for large area rendering, depicting different levels of shadows, and color blocks.
- Metal Wire Pen Tips: Suitable for basic drawing and rendering.

Image: Demonstrates the application of professional, solid copper, and metal wire pen tips for various pyrography effects.
Practice on the provided wooden board or scrap material to familiarize yourself with different tips and temperature settings before working on your final project.
5. Maintenance
5.1 Cleaning Pen Tips
To maintain optimal performance and extend the life of your pen tips, clean them regularly. When using, the sponge should be soaked in water. Wipe the pen tip with a damp sponge after use to remove dirt and carbon buildup. This ensures maximum effectiveness for the next use.
Important: Always ensure the pen tip has cooled down sufficiently before wiping with a damp sponge to avoid steam burns or damage to the sponge.
5.2 Storage
After use, allow the entire unit and all pens/tips to cool completely. Store the kit in a dry, safe place, away from dust and moisture. Keep all small components, especially the pen tips, organized to prevent loss.
6. Troubleshooting
- Pen Tip Not Heating Up:
- Ensure the unit is powered on and the correct pen (A or B) is selected via the toggle switch.
- Check that the pen tip is securely inserted into the copper wire connection and the screw is tightened firmly. A loose connection can prevent proper heating.
- Verify the temperature setting is appropriate for the desired effect.
- Inconsistent Burning Results:
- Adjust the temperature setting. Different materials and desired effects require different temperatures.
- Ensure the pen tip is clean. Buildup can affect heat transfer.
- Practice on scrap material to find the optimal temperature and pressure for your specific project.
- Sparking at Pen Tip Connection:
- Immediately power off the unit.
- Check that the pen tip is inserted correctly and the screw is tightened very firmly. Sparking often indicates a loose connection.
- If sparking persists after re-securing the tip, discontinue use and contact customer support.
7. Specifications
| Feature | Detail |
|---|---|
| Model Number | LH80-Z2-NS2 |
| Brand | FIRElood |
| Temperature Range | 200℃ - 750℃ |
| Item Weight | 1.9 pounds |
| Product Dimensions | 4.37 x 4.45 x 3.74 inches |
| Color | Black |
| Manufacturer | FIRElood |
8. Warranty and Support
8.1 Warranty Information
The main unit (host) of this wood burning tool kit comes with a 1-year warranty from the date of purchase. Please retain your proof of purchase for warranty claims.
This warranty covers manufacturing defects and malfunctions under normal use. It does not cover damage caused by misuse, accidents, unauthorized modifications, or normal wear and tear of consumable parts like pen tips.
8.2 Customer Support
For any questions, technical assistance, or warranty claims, please contact the manufacturer, FIRElood, through the retailer where the product was purchased. Provide your model number (LH80-Z2-NS2) and a detailed description of the issue when contacting support.