
Introduction
This manual provides detailed instructions for the installation, operation, and maintenance of your GIGABYTE B850 AORUS Elite WIFI7 Motherboard. Designed for AMD Ryzen 9000 Series CPUs, this motherboard offers advanced features and robust performance for various computing needs. Please read this manual thoroughly before proceeding with installation or operation to ensure optimal performance and prevent damage.

Figure 1: Top-down view of the GIGABYTE B850 AORUS Elite WIFI7 Motherboard.
Setup and Installation
Before beginning installation, ensure your workspace is clean and static-free. Always handle the motherboard by its edges and use an anti-static wrist strap.
1. CPU Installation
Carefully open the CPU socket lever. Align the triangular mark on your AMD Ryzen 9000 Series CPU with the mark on the socket. Gently place the CPU into the socket without forcing it. Close the lever to secure the CPU.

Figure 2: Close-up of the CPU socket, compatible with AMD Ryzen processors.
2. Memory (RAM) Installation
This motherboard supports DDR5 memory. Open the clips on both ends of the DIMM slots. Align the notch on the DDR5 memory module with the key in the DIMM slot. Press down firmly on both ends of the memory module until the clips snap into place.

Figure 3: Illustration of DDR5 memory slots, supporting speeds up to 8200MHz+.
3. Storage Device Installation (M.2 SSDs)
The motherboard features PCIe 5.0 and PCIe 4.0 M.2 slots. To install an M.2 SSD, locate the M.2 slot and remove the heatsink if present. Insert the M.2 SSD into the slot at an angle, then gently push it down and secure it with the EZ-Latch Plus mechanism or a screw. Reattach the heatsink for optimal thermal performance.
4. Graphics Card Installation
Insert your PCIe Gen5 x16 graphics card into the primary PCIe slot. Ensure it is seated firmly and secured with the EZ-Latch Plus mechanism. Connect any necessary PCIe power cables from your power supply to the graphics card.

Figure 4: EZ-Latch Plus mechanisms simplify installation of components like M.2 SSDs and graphics cards.
5. Power Connections
Connect the 24-pin ATX main power connector and the 8-pin (or 4+4-pin) CPU power connector from your power supply to the corresponding ports on the motherboard.
6. Rear I/O Panel Connections
Connect your peripherals to the rear I/O panel. This includes USB devices, Ethernet cable, display cables (HDMI/DisplayPort if using integrated graphics), and audio jacks. For Wi-Fi 7, attach the included directional antenna to the designated connectors.
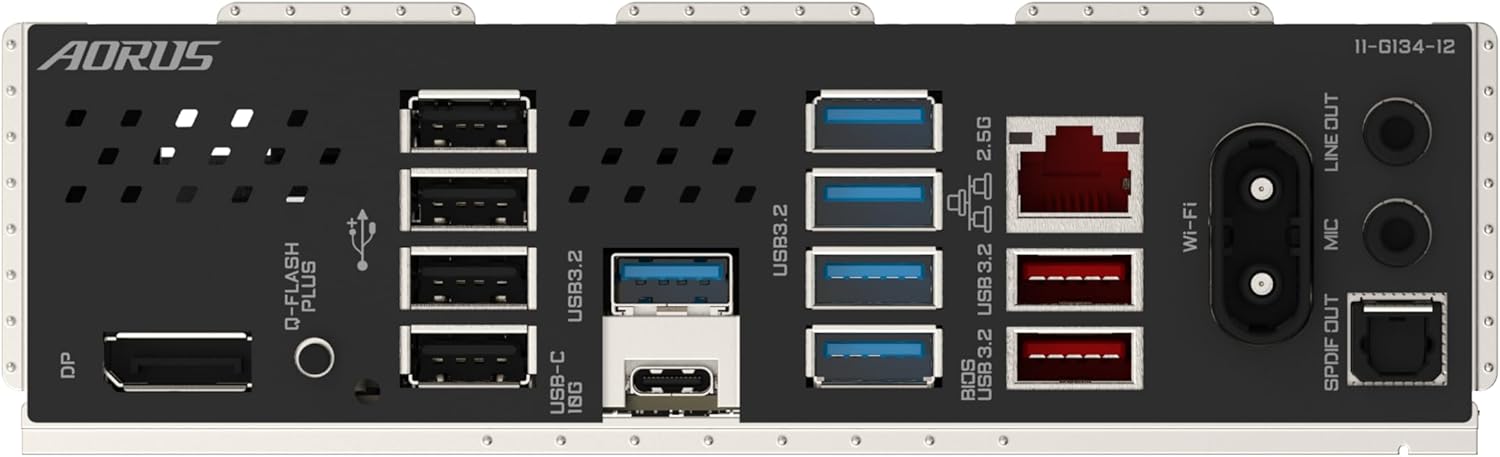
Figure 5: The rear I/O panel features multiple USB ports, 2.5GbE LAN, Wi-Fi 7 antenna connectors, and audio jacks.
Operating Instructions
1. Initial Boot-up and BIOS Setup
After assembling your system, power it on. Press the DEL key during startup to enter the BIOS/UEFI setup. Here you can configure boot order, enable XMP/EXPO for memory, and adjust other system settings. Refer to the GIGABYTE website for detailed BIOS guides.
2. Driver Installation
After installing your operating system (Windows 10/11 recommended), install all necessary drivers from the GIGABYTE official website. This includes chipset drivers, LAN drivers, Wi-Fi drivers, and audio drivers to ensure full functionality and performance.
3. Network Connectivity
Utilize the integrated 2.5GbE LAN for high-speed wired internet or the Wi-Fi 7 module for advanced wireless connectivity. Ensure the Wi-Fi antenna is properly connected for optimal signal strength.
Maintenance
Regular maintenance helps ensure the longevity and stable operation of your motherboard and PC components.
- Dust Removal: Periodically clean dust from inside your PC case, especially from heatsinks and fans, using compressed air. Ensure the system is powered off and unplugged before cleaning.
- BIOS Updates: Check the GIGABYTE support website for the latest BIOS updates. BIOS updates can improve system stability, compatibility, and performance. Use the Q-Flash Plus feature for convenient BIOS updates without installing a CPU, memory, or graphics card.
- Driver Updates: Keep your drivers updated to ensure compatibility and optimal performance with new software and hardware.
- Thermal Management: Ensure proper airflow within your PC case. Monitor CPU and VRM temperatures using system monitoring software to prevent overheating. The motherboard features fully covered MOSFET heatsinks for efficient thermal dissipation.

Figure 6: The motherboard's robust thermal design, including fully covered MOSFET heatsinks, aids in efficient heat dissipation.
Troubleshooting
If you encounter issues, refer to the following common troubleshooting steps:
- No Power/No Boot:
- Check all power connections (24-pin ATX, 8-pin CPU, GPU PCIe power).
- Ensure the CPU, RAM, and graphics card are properly seated.
- Try booting with only one RAM stick in the recommended slot.
- Clear CMOS by removing the CMOS battery for a few minutes or using the Clear CMOS jumper/button.
- Display Issues:
- Ensure your monitor is connected to the graphics card (not the motherboard I/O if a dedicated GPU is installed).
- Check display cable connections.
- Test with a different display cable or monitor.
- Network Connectivity Problems (LAN/Wi-Fi):
- For LAN, ensure the Ethernet cable is securely connected and the router/modem is working. Check for driver updates.
- For Wi-Fi, ensure the antennas are properly attached. Check Wi-Fi drivers and network settings in your operating system.
- If the integrated Ethernet port stops functioning, as reported by some users, try updating the BIOS and LAN drivers. If the issue persists, consider using a PCIe network card as an alternative.
- System Instability/Crashes:
- Ensure all drivers are up to date.
- Check for BIOS updates.
- Verify memory stability using diagnostic tools.
- Monitor system temperatures to rule out overheating.
Specifications
| Feature | Specification |
|---|---|
| Brand | GIGABYTE |
| Model Name | B850 AORUS ELITE WIFI7 |
| CPU Socket | Socket AM5 |
| Compatible Processors | AMD Ryzen 9000 Series |
| Chipset Type | AMD B850 |
| RAM Technology | DDR5 |
| Memory Clock Speed | Up to 8200 MHz (OC) |
| Max RAM Capacity | 256 GB |
| Memory Slots | 4 DIMMs |
| Graphics Interface | PCI Express 5.0 x16 |
| M.2 Slots | 1x PCIe 5.0, 2x PCIe 4.0 |
| LAN | 2.5 Gigabit Ethernet |
| Wireless Connectivity | Wi-Fi 7 |
| USB Ports | USB 3.2 Gen 2x2, USB 3.2 Gen 2, USB 3.2 Gen 1, USB 2.0 |
| Form Factor | ATX |
| Dimensions (L x W x H) | 30.5 x 24.4 x 3.5 cm |
| Weight | 2130 Grams |
Warranty and Support
The GIGABYTE B850 AORUS Elite WIFI7 Motherboard comes with a 3-year warranty. For technical support, driver downloads, BIOS updates, and further product information, please visit the official GIGABYTE website:
You can also refer to the provided safety information and user instructions in PDF format for additional details:


