1. Introduction
Thank you for purchasing the GUOWENHA Night Vision Binoculars. This manual provides detailed instructions for the safe and effective operation of your NV400B/NV400C model. Please read this manual thoroughly before using the device to ensure optimal performance and longevity.
Key Features:
- Durable Construction: Main body crafted from aluminum alloy with a brushed and anodized surface for high toughness and durability.
- Digital Zoom: Supports 1-8x digital zoom for clear observation in various conditions.
- Photo and Video Capabilities: Capture 4K video and 12MP pictures, with integrated photo, video, and playback functions.
- Expandable Storage: Supports up to 128GB TF card (not included) for extended recording.
- Versatile Applications: Ideal for boating, bird watching, travel, hiking, camping, animal observation, sporting events, concerts, and more.
2. Package Contents
Please check the package contents upon unboxing to ensure all items are present:
- Night Vision Binoculars Unit (NV400B or NV400C) x1
- User's Manual x1
- Cleaning Cloth x1
- Pouch x1
- USB Cable x1
- TV Cable x1
- Neck Strap x1
3. Product Overview
Familiarize yourself with the various components and controls of your night vision binoculars.
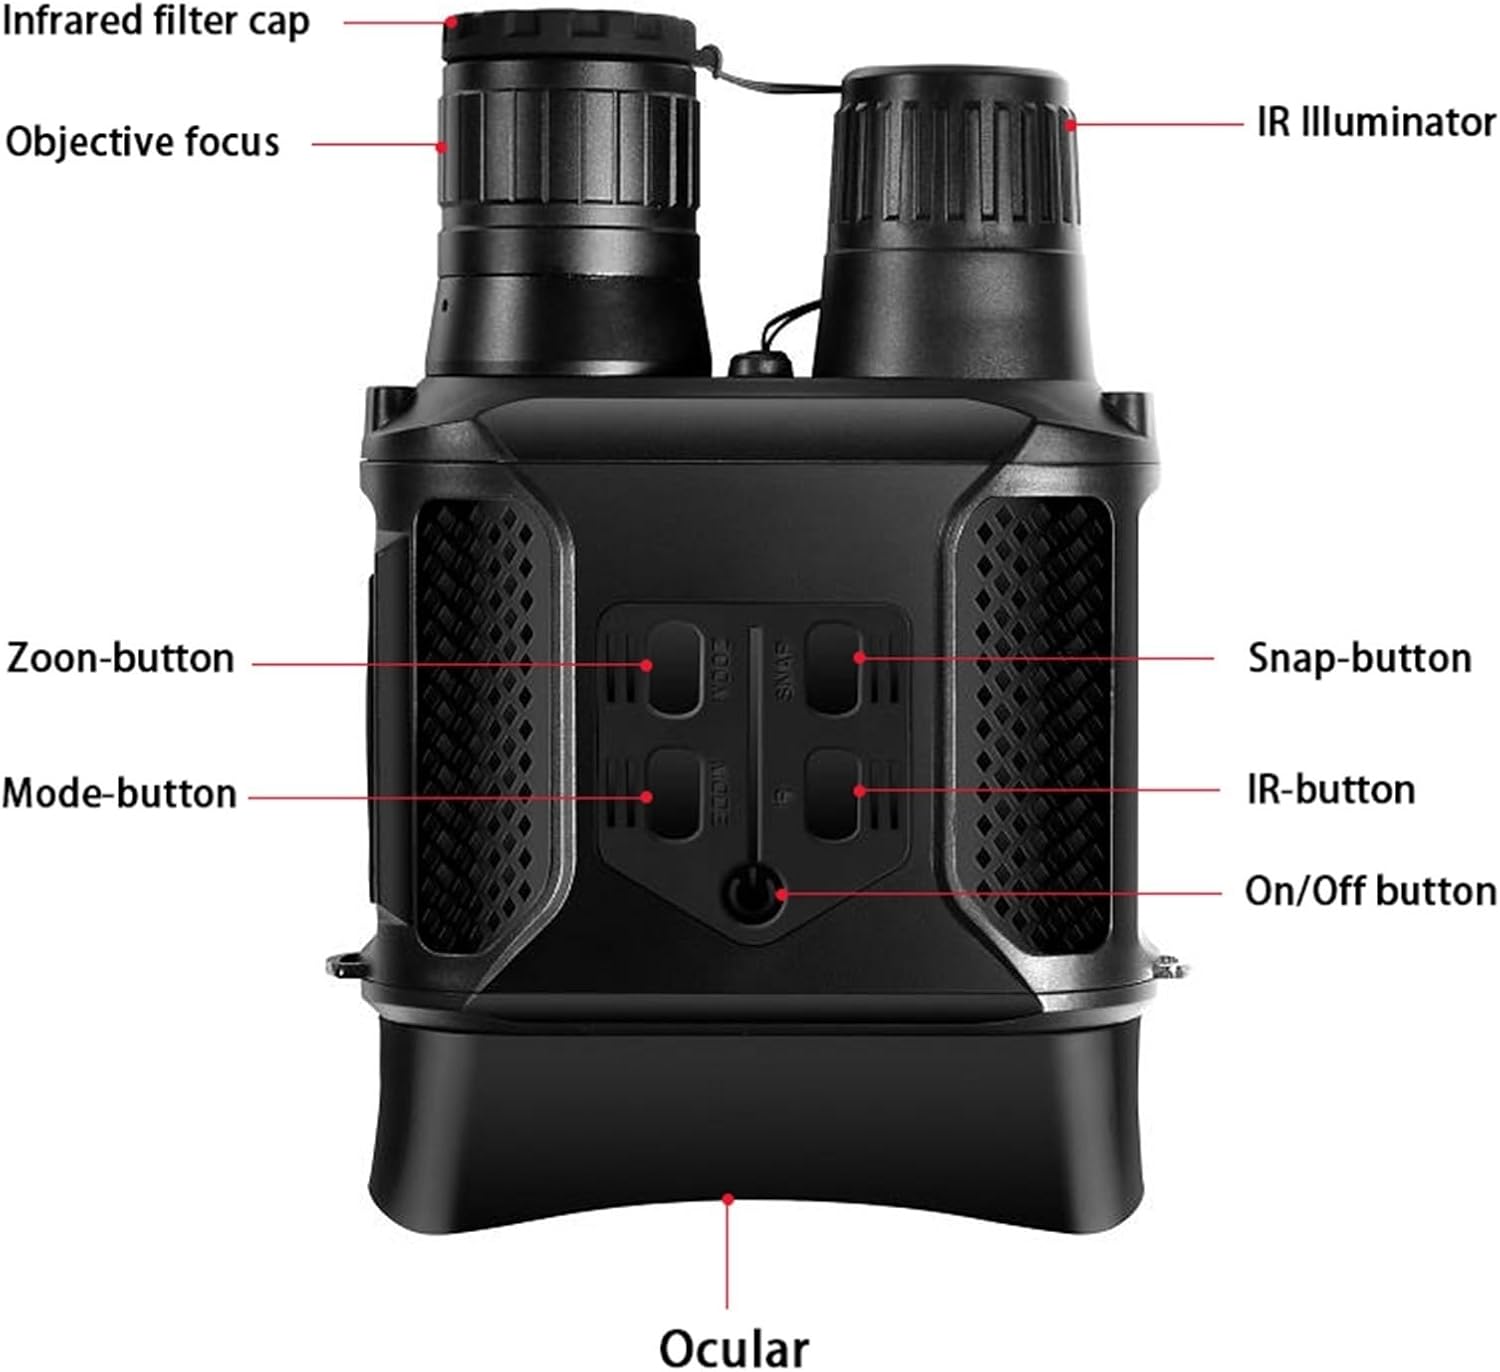
Figure 3.1: Labeled diagram of the Night Vision Binoculars, highlighting key components such as the IR Illuminator, Objective Focus, Zoom button, Mode button, On/Off button, Snap button, IR button, and Ocular.
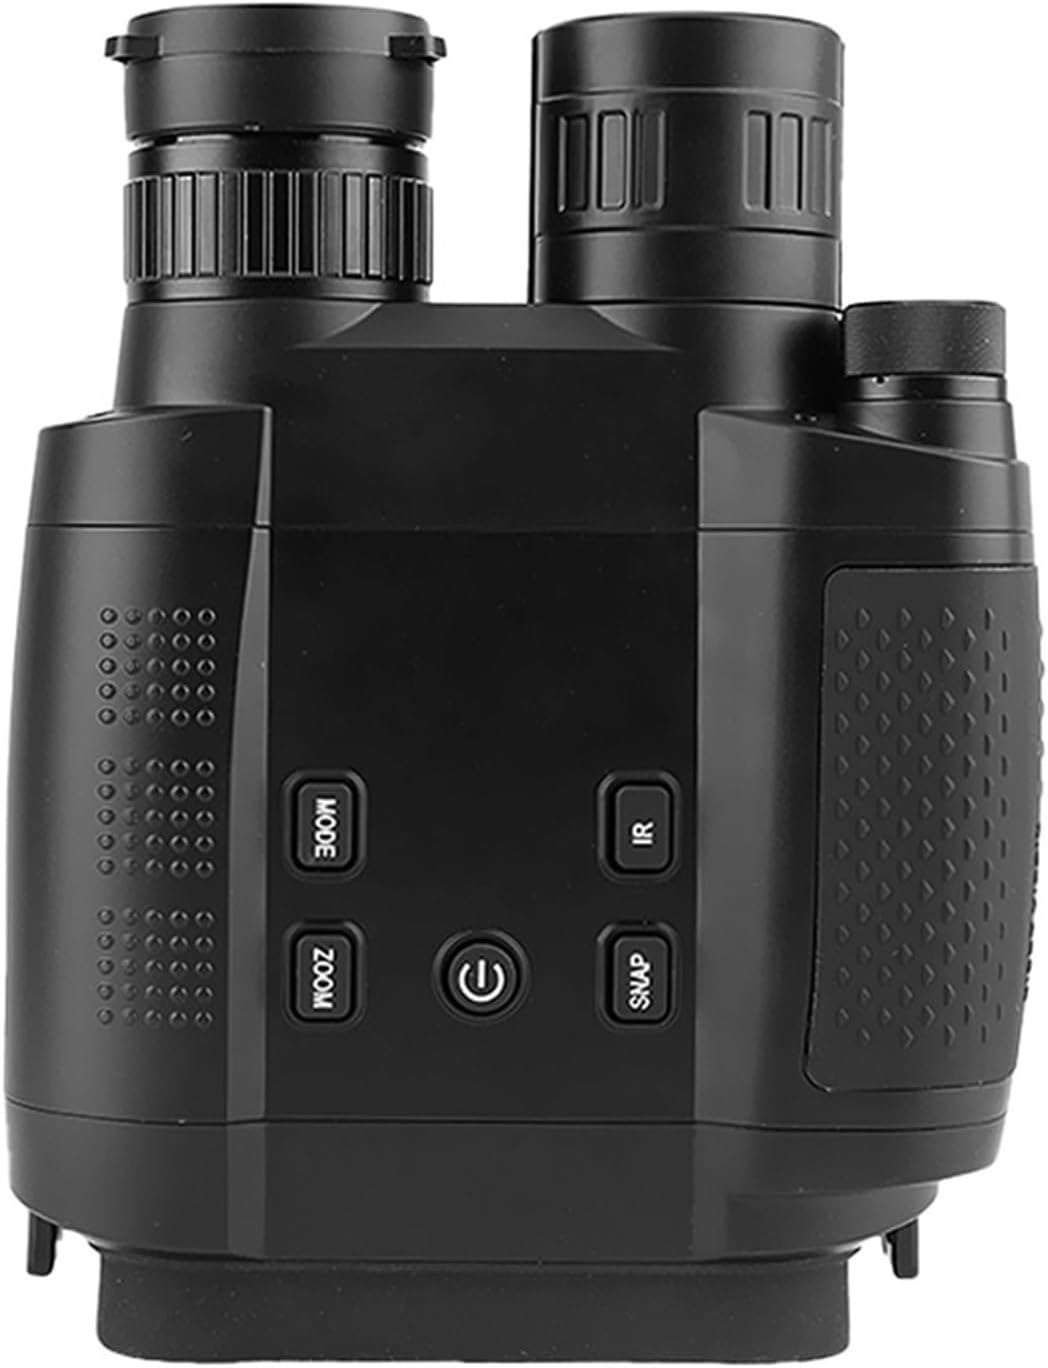
Figure 3.2: Top view of the Night Vision Binoculars, displaying the control buttons: MODE, ZOOM, Power (On/Off), SNAP, and IR.
- Infrared Filter Cap: Protects the objective lens and can be removed for night vision use.
- Objective Focus: Adjusts the focus for clear viewing.
- IR Illuminator: Emits infrared light for night vision capabilities.
- Zoom Button: Controls the digital zoom level.
- Mode Button: Switches between different operating modes (e.g., photo, video, playback).
- On/Off Button: Powers the device on or off.
- Snap Button: Captures photos or starts/stops video recording.
- IR Button: Activates and adjusts the intensity of the infrared illuminator.
- Ocular: The eyepiece through which you view the display.
4. Setup
4.1. Battery Installation
The NV400B model requires 8 AA batteries (4.5V-6V). The NV400C model uses 2 pcs 18650 rechargeable Li-ion batteries (7-8.4V). Ensure correct polarity when inserting batteries.

Figure 4.1: Battery compartment with batteries being inserted. Ensure correct polarity.
- Locate the battery compartments on the underside of the binoculars.
- Twist and remove the battery caps.
- Insert the required batteries according to the polarity indicators (+/-).
- Replace the battery caps and twist to secure them.
4.2. Memory Card Installation
The device supports a TF card (MicroSD card) up to 128GB (not included) for storing photos and videos.
- Locate the TF card slot, usually protected by a rubber cover.
- Open the cover and gently insert the TF card with the gold contacts facing down until it clicks into place.
- Close the rubber cover to protect the slot from dust and moisture.
4.3. Initial Power On
After installing batteries and memory card, press and hold the On/Off button to power on the device. The LCD screen will illuminate.
5. Operating Instructions
5.1. Power On/Off
- To Power On: Press and hold the On/Off button until the screen lights up.
- To Power Off: Press and hold the On/Off button until the screen turns off.
5.2. Adjusting Focus and Viewing
Rotate the Objective Focus ring until the image on the LCD screen appears sharp and clear. The device offers clear viewing in daylight and up to 400 meters in complete darkness (monochrome mode).

Figure 5.1: View through the ocular, displaying a monochrome image of a plant.

Figure 5.2: Demonstrates the device's capability to view objects up to 400 meters in complete darkness using its high-sensitivity CMOS sensor.

Figure 5.3: Illustrates the binoculars' ability to provide clear vision in complete darkness, highlighting features like 7x zoom and 850nm IR illuminator.
5.3. Digital Zoom
Press the ZOOM button to cycle through the available digital zoom levels (1x, 2x, up to 8x depending on model and settings). The zoom level will be displayed on the screen.
5.4. Infrared (IR) Illumination
In low light or complete darkness, activate the IR illuminator. Press the IR button to turn on the IR light and cycle through its intensity levels (5 levels available). Higher IR levels provide brighter illumination but consume more battery power.
5.5. Photo and Video Capture
- Press the MODE button to select either Photo mode or Video mode. An icon on the screen will indicate the current mode.
- In Photo mode, press the SNAP button once to take a picture.
- In Video mode, press the SNAP button once to start recording. Press it again to stop recording.
5.6. Playback
To review captured photos and videos:
- Press the MODE button to enter Playback mode.
- Use the ZOOM and IR buttons (often repurposed as navigation in playback mode) to browse through your files.
- Press the SNAP button to view a photo or play a video.
- Press the MODE button again to exit Playback mode.
5.7. Menu Settings (OSD Menu)
Access the On-Screen Display (OSD) menu to configure various settings:
- Language: Select your preferred language (English, Traditional Chinese, Simplified Chinese, Japanese, French, German, Korean, Italian, Portuguese, Russian, Spanish, Arabic).
- Power Save: Set automatic power-off duration (Off, 1 min, 3 min, 50 min).
- Light Freq: Adjust for 50/60Hz to prevent flickering in certain lighting conditions.
- Date Input: Set the current date and time.
- System Reset: Reset all settings to factory defaults.
- CVBS Output: Connect to an external display via TV cable for VGA resolution output.
6. Maintenance
6.1. Cleaning
- Use the provided cleaning cloth to gently wipe the lenses and display screen.
- For stubborn smudges, use a lens cleaning solution specifically designed for optical surfaces. Apply to the cloth, not directly to the lens.
- Wipe the body of the binoculars with a soft, dry cloth. Do not use abrasive cleaners or solvents.
6.2. Storage
- When not in use for extended periods, remove all batteries to prevent leakage and damage.
- Store the binoculars in the provided pouch in a cool, dry place, away from direct sunlight and extreme temperatures.
- Avoid storing in areas with high humidity.
6.3. Battery Care
- If using rechargeable batteries (NV400C), ensure they are fully charged before use.
- Do not mix old and new batteries, or different types of batteries.
- Dispose of depleted batteries responsibly according to local regulations.
- The device features a low battery warning. Replace or recharge batteries when this indicator appears.
7. Troubleshooting
If you encounter issues with your night vision binoculars, please refer to the following common problems and solutions:
| Problem | Possible Cause | Solution |
|---|---|---|
| Device does not power on. |
|
|
| Image is blurry or out of focus. |
|
|
| Poor visibility in darkness. |
|
|
| Cannot save photos/videos. |
|
|
8. Specifications
Detailed technical specifications for the NV400B and NV400C models:

Figure 8.1: Comparison of key specifications between NV400B and NV400C models.
| Specification | NV400B | NV400C |
|---|---|---|
| Video Resolution | 400x500 | 1280x960 |
| Image Resolution | 640x480 | 1280x960 |
| LCD Resolution | 320x240 | 640x480 |
| IR Illuminator | 850nm, 3W | 850nm, 5W |
| Optical Magnification | 3.5X | 7.2X |
| Digital Zoom | 1X-2X | 1X-2X |
| Objective Lens | 31mm | 31mm |
| Field of View (FOV) | 9° | 7° |
| Max. Viewing Distance | 200m | 200m |
| Close Focusing Distance | 3m/9.84ft | 5m/16.4ft |
| Sounds Recording | No | Yes |
| Speaker | No | Yes, 2W/8R |
| Power Supply | 8pcs AA Batteries 8-12V | 2pcs 18650 Rechargeable Li Batteries 7-8.4V |
Note: The product description also states "Card: Support 32GB" and "Supports inserting a maximum 128GB TF card (not included)". Please refer to your specific model's packaging for definitive memory card and battery requirements.
9. Warranty and Support
GUOWENHA products are manufactured to high quality standards. For information regarding warranty coverage, technical support, or service, please refer to the warranty card included in your package or contact your retailer. Keep your purchase receipt as proof of purchase for any warranty claims.
For further assistance, please visit the official GUOWENHA website or contact customer support through the platform where you purchased the product.