1. Introduction
This manual provides detailed instructions for the setup, operation, and maintenance of your MELONARE Wireless In-Ear Monitor System, model SD-2-1R. This system is designed to deliver high-quality, reliable audio monitoring for musicians, bands, studio professionals, and live events. Please read this manual thoroughly before using the product to ensure optimal performance and longevity.

Image 1.1: Musician utilizing the MELONARE SD-2-1R system for stereo in-ear monitoring.
2. Package Contents
Verify that all items listed below are included in your package:
- 1 x IEM Wireless Transmitter (with adapter cord tie-off for cable management)
- 1 x Bodypack Receiver
- 1 x In-ear Earbuds
- 1 x Power Adapter
- 2 x AA Batteries
- 1 x Antenna
- 1 x Rackmount Kit (for professional setup)
- 1 x User Manual
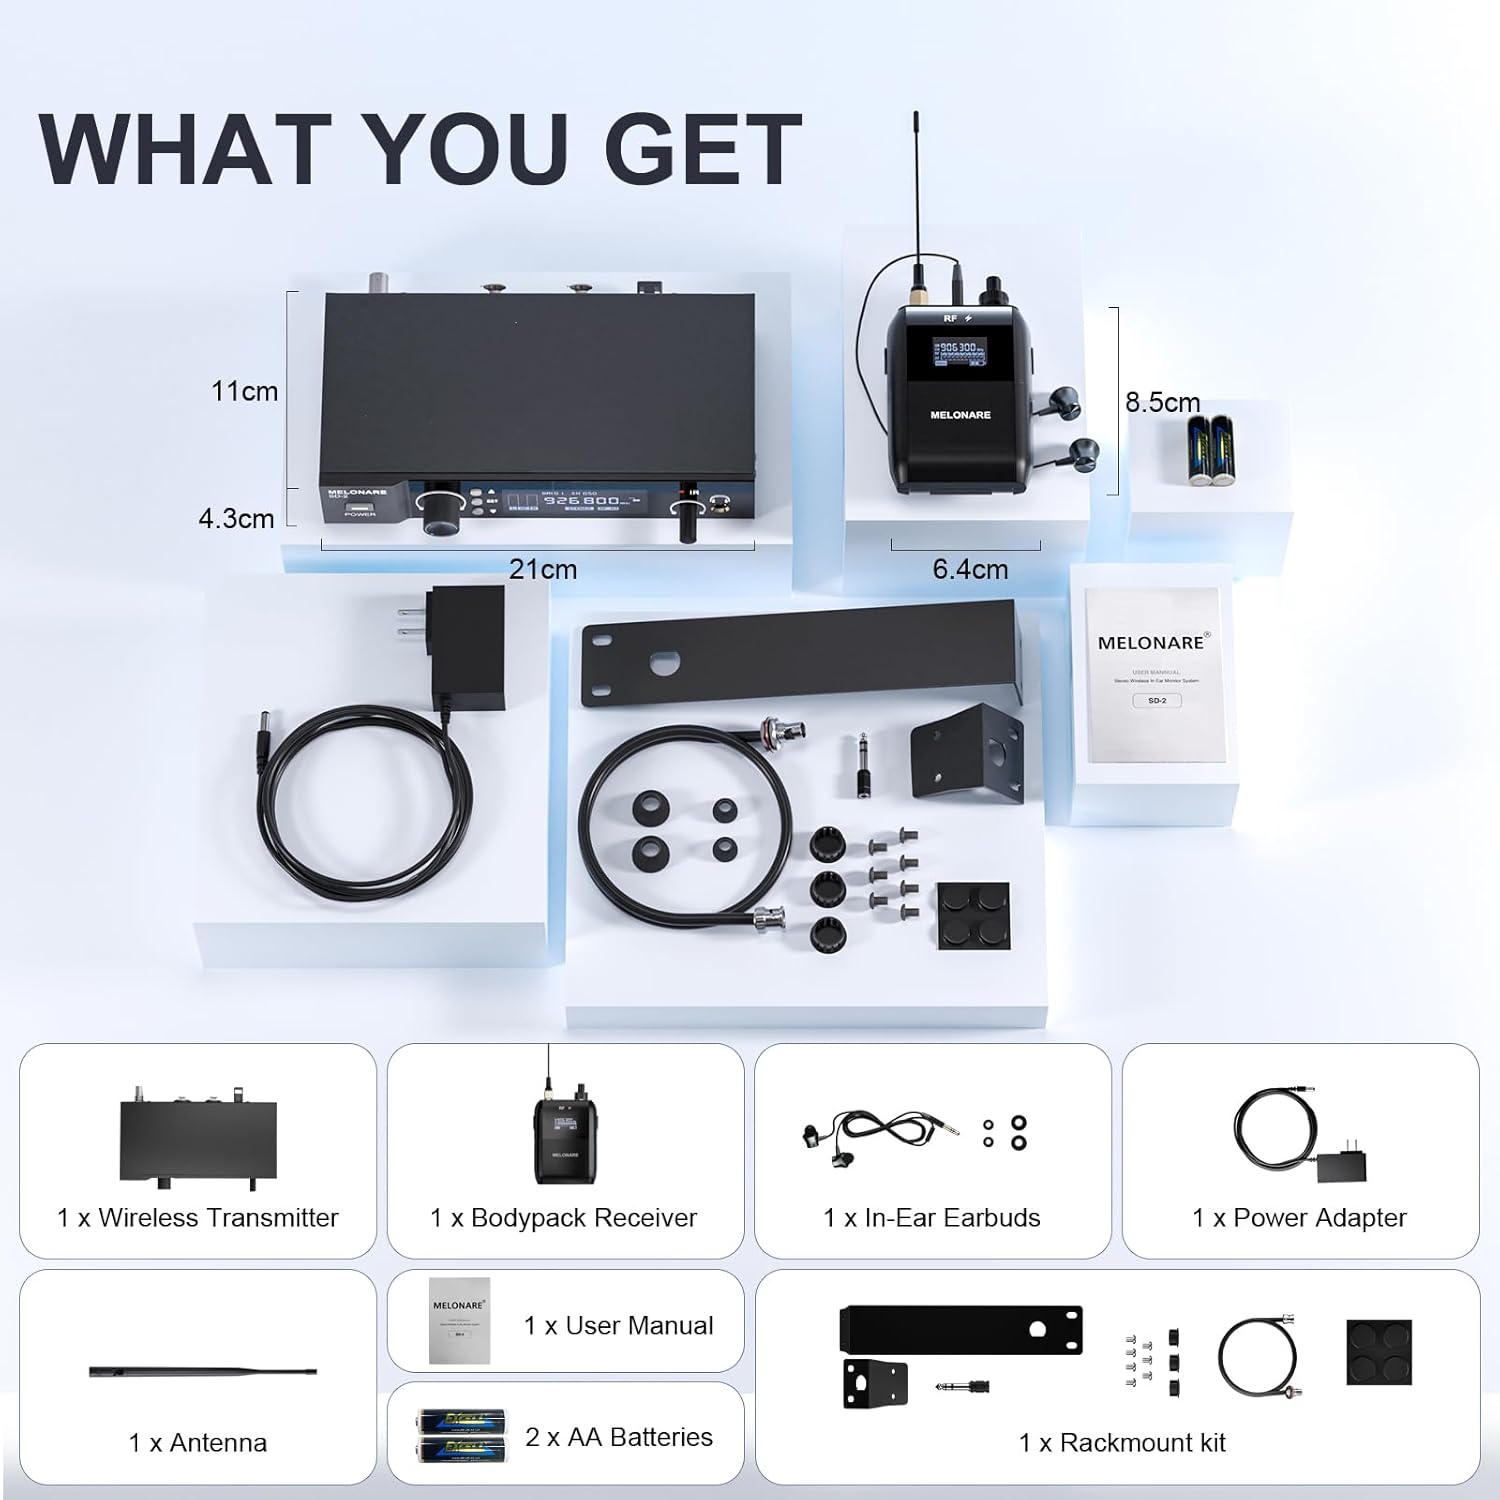
Image 2.1: Overview of all included components in the MELONARE SD-2-1R package.
3. Product Overview
3.1. Transmitter
The transmitter unit sends the audio signal wirelessly to the bodypack receiver. It features various controls and indicators for signal management.

Image 3.1: Front and rear panel of the transmitter, highlighting input/output ports, controls, and display.
- Power Jack: Connects to the power adapter.
- Audio Input Jacks (XLR, Stereo): Accepts audio input from a mixer or other source. Supports both XLR and 1/4 inch connections.
- PAD Switch: A -12dB pad switch to prevent input overload and distortion.
- Antenna Jack: Connects the included antenna for wireless signal transmission.
- Power Button: Turns the transmitter on or off.
- Input Level Control: Adjusts the input audio signal level.
- Up/Down Buttons: Used to manually change frequencies.
- Set Button: Confirms frequency selection and initiates IR sync with the receiver.
- Display Screen: Shows group, channel, frequency, signal meters, stereo indicator, RF indicator, and lock status.
- IR Window: Used for infrared synchronization with the bodypack receiver.
- Audio Output Jack (1/4 inch TRS): For connecting headphones or sending the signal to another source.
- Output Level Control: Adjusts the output volume for the 1/4 inch TRS jack.
3.2. Bodypack Receiver
The bodypack receiver receives the wireless audio signal from the transmitter and delivers it to your in-ear earbuds.

Image 3.2: Front and side view of the bodypack receiver, highlighting controls and indicators.
- Antenna: Receives the wireless signal.
- RF Light: Indicates RF signal presence.
- RF Signal Indicator: Displays the strength of the received RF signal.
- Stereo Indicator: Confirms stereo audio reception.
- Audio Signal Progress Bar: Visual representation of audio signal level.
- Frequency Number: Shows the currently selected frequency.
- Battery Light: Indicates battery status.
- Power/Volume Control Knob: Turns the receiver on/off and adjusts the earbud volume.
- Pan Control Knob: Adjusts the left/right audio balance for stereo monitoring.
- Phone Jack: 3.5mm output for connecting in-ear earbuds.
- Belt Clip: For attaching the bodypack to clothing or a belt.
4. Setup
4.1. Initial Connection
- Connect the antenna to the antenna jack on the rear of the transmitter.
- Connect the power adapter to the transmitter's power jack and plug it into an electrical outlet.
- Connect your audio source (e.g., mixer output) to the XLR or 1/4 inch input jacks on the transmitter. Ensure proper left and right channel connections for stereo operation.
- Insert the AA batteries into the bodypack receiver, observing correct polarity.
- Connect your in-ear earbuds to the 3.5mm phone jack on the bodypack receiver.
4.2. Power On and Auto-Scan
- Press the Power button on the transmitter to turn it on. The display will illuminate.
- Turn the Power/Volume knob on the bodypack receiver clockwise to power it on.
- On the transmitter, press the SET button. The system will automatically scan for the clearest, interference-free frequency. This process ensures reliable signal transmission.

Image 4.1: The intelligent auto-scan function automatically detects and locates the best available frequency.
4.3. IR Synchronization (Pairing)
After the auto-scan completes, synchronize the bodypack receiver with the transmitter:
- Align the IR window on the bodypack receiver with the IR window on the transmitter.
- Press and hold the SET button on the transmitter until the receiver's display shows the same frequency. This indicates successful pairing.

Image 4.2: Hassle-free pairing in seconds using the IR Sync feature.
4.4. Rackmount Installation
The included rackmount kit allows for professional installation of the transmitter into a standard equipment rack.
- Attach the rackmount ears to the sides of the transmitter using the provided screws.
- Secure the transmitter into an available rack space.

Image 4.3: Effortless professional setup with the included rackmount kit.
5. Operating Instructions
5.1. Adjusting Audio Levels
- Transmitter Input Level: Use the Input Level Control on the transmitter to adjust the incoming audio signal. Monitor the display's signal meters to avoid clipping.
- Bodypack Receiver Volume: Use the Power/Volume Control Knob on the bodypack receiver to set your desired listening volume in the earbuds.
- Pan Control: For stereo monitoring, use the Pan Control Knob on the bodypack receiver to adjust the balance between the left and right audio channels, creating a personalized mix.

Image 5.1: Adjusting the pan function on the bodypack receiver for personalized sound balance.
5.2. Frequency Selection
The system offers 50 tunable UHF frequencies. While auto-scan is recommended, you can manually select frequencies:
- Press the SET button briefly to enter frequency selection mode.
- Use the Up and Down buttons to cycle through available frequencies.
- Press SET again to confirm your selection. Remember to re-sync the bodypack receiver after manual frequency changes.
5.3. RF Power Control
The transmitter allows adjustment of RF power (Low/High) to adapt to different environments and optimize signal range.
- Low RF Power: Suitable for smaller venues or when operating multiple systems in close proximity to minimize interference.
- High RF Power: Recommended for larger stages or outdoor environments to maximize signal range (up to 160ft).

Image 5.2: Adjusting RF power for versatile performance in any environment.
5.4. Lock Function
To prevent accidental changes to settings during a performance, activate the lock function:
- Once your desired frequency and RF power settings are configured, press and hold the SET button until a lock icon appears on the transmitter's display.
- To unlock, press and hold the SET button again until the lock icon disappears.

Image 5.3: The lock function secures settings, preventing accidental changes.
5.5. Multi-System Operation
The MELONARE SD-2-1R system supports up to 4 simultaneous systems for larger setups. Ensure each system operates on a unique, interference-free frequency, which can be achieved using the auto-scan function for each transmitter.

Image 5.4: Flexible multi-system operation with up to 4 simultaneous units.
6. Advanced Features
- Immersive Stereo Monitoring: The system provides true stereo sound with independent left and right audio control, allowing for a personalized and immersive listening experience.
- 12dB Pad Switch: An integrated -12dB pad switch on the transmitter prevents input overload, ensuring clean, distortion-free audio even with high-level input signals.
- 24-bit/48kHz Sampling: Delivers exceptional dynamics and CD-quality audio, crucial for professional live performances and studio monitoring.
- Advanced UHF Chip Design: Utilizes an advanced UHF chip design and analog circuitry for a stable signal and interference-free range of up to 160 feet.

Image 6.1: The 12dB Pad Switch ensures clean and distortion-free audio.

Image 6.2: Advanced UHF chip design for clear, stable signals over a 160ft range.
7. Troubleshooting
| Problem | Possible Cause | Solution |
|---|---|---|
| No sound from earbuds | Receiver not powered on; low battery; transmitter not powered on; incorrect frequency; earbuds not connected; volume too low. | Ensure receiver and transmitter are powered on. Check receiver batteries. Verify frequency matching via IR sync. Confirm earbuds are securely plugged in. Increase receiver volume. |
| Interference or static | Conflicting frequencies; excessive distance from transmitter; environmental RF noise. | Perform auto-scan on the transmitter to find a clear frequency. Ensure receiver is within the 160ft operating range. Adjust RF power to 'High' if in a large area. Avoid other wireless devices operating on similar frequencies. |
| Distorted audio | Input signal too high; receiver volume too high. | Activate the -12dB PAD switch on the transmitter. Reduce the input level on the transmitter. Lower the volume on the bodypack receiver. |
| Mono signal only in one earbud (when expecting stereo) | Only one input channel connected to the transmitter. | Ensure both Left and Right audio input channels are connected to the transmitter for stereo operation. If a mono source is used, a Y-splitter cable may be required to send the mono signal to both L/R inputs of the transmitter. |
| Settings change accidentally | Lock function not activated. | Activate the lock function on the transmitter after configuring settings (refer to Section 5.4). |
8. Specifications
| Feature | Specification |
|---|---|
| Model Name | SD-2-1R |
| Connectivity Technology | Wireless (RF) |
| Wireless Communication Technology | RF |
| Frequency Response | 20 Hz - 20,000 Hz |
| Tunable Frequencies | 50 UHF Frequencies |
| Operating Range | Up to 160 feet (interference-free) |
| Simultaneous Systems | Up to 4 |
| Audio Latency | 8.2 Milliseconds |
| Noise Control | Sound Isolation |
| Headphones Jack | 3.5 mm Jack |
| Material | Metal, Plastic |
| Power Source | Transmitter: AC Power Adapter; Receiver: 2 x AA Batteries (included) |
| Item Weight | 3.45 pounds |
| UPC | 810164760241 |
9. Maintenance
To ensure the longevity and optimal performance of your MELONARE Wireless In-Ear Monitor System, follow these maintenance guidelines:
- Cleaning: Use a soft, dry cloth to clean the exterior surfaces of the transmitter and receiver. Do not use liquid cleaners or solvents, as they may damage the finish or internal components.
- Storage: When not in use, store the system in a cool, dry place away from direct sunlight and extreme temperatures. If storing for extended periods, remove batteries from the bodypack receiver to prevent leakage.
- Battery Replacement: Replace AA batteries in the bodypack receiver when the battery indicator shows low power. Always use fresh, high-quality batteries.
- Cable Care: Avoid sharp bends or kinks in cables. Store cables neatly to prevent damage.
- Antenna Care: Handle antennas carefully. Ensure they are securely attached during operation and gently removed for storage.
10. Warranty and Support
MELONARE is committed to providing high-quality products and outstanding customer support. For any questions, technical assistance, or warranty inquiries, please refer to the contact information provided with your purchase or visit the official MELONARE website. Please retain your proof of purchase for warranty claims.


