HUNMPECE97C51E63C2530E52A1F9E664584D0
Instruction Manual
DPC240/DPC241 Mid Motor Display Fixing Bracket
Product Overview
This manual provides essential information for the proper installation and use of the DPC240/DPC241 Mid Motor Display Fixing Bracket. This bracket is specifically designed for use with DPC240 and DPC241 display screens for mid-motor systems. It is not compatible with other instrument types.
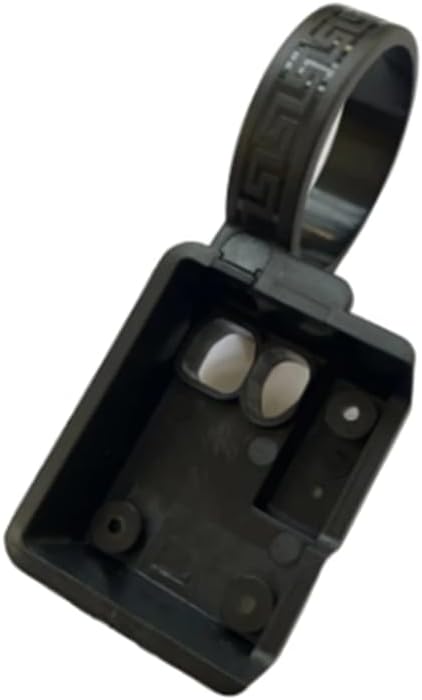
Figure 1: The DPC240/DPC241 Mid Motor Display Fixing Bracket.
Package Contents
Please verify that all components are present before proceeding with installation.
- 1 x DPC240/DPC241 Display Fixing Bracket (Type B)
Note: Other products or instruments shown in promotional images are not included with this bracket.

Figure 2: The DPC240 bracket shown alongside a compatible switch (switch not included).
Specifications
| Attribute | Detail |
|---|---|
| Model | HUNMPECE97C51E63C2530E52A1F9E664584D0 |
| Type | Fixing Bracket (Type B) |
| Compatibility | DPC240 and DPC241 Display Screens for Mid Motors |
| Material | Plastic |
| Color | Black |
| Manufacturer | HUNTAN |
Setup and Installation
This section outlines the general steps for installing the DPC240/DPC241 display fixing bracket. Ensure you have the necessary tools and refer to your display unit's specific instructions for complete assembly.
- Prepare the Mounting Area: Identify the designated mounting location on your mid-motor system for the DPC240 or DPC241 display. Ensure the surface is clean and free from obstructions.
- Position the Bracket: Align the bracket with the mounting points on your display unit. The bracket is designed to securely hold the display in place.
- Secure the Display: Carefully insert the DPC240 or DPC241 display into the bracket. Ensure it clicks or slides into place firmly. The bracket provides a stable base for the display.
- Mount the Assembly: Attach the bracket with the display to your mid-motor system using appropriate fasteners (not included). Ensure all screws are tightened securely to prevent movement during operation.

Figure 3: The DPC240 bracket shown with a compatible display unit and switch, illustrating the intended assembly.
Operating Considerations
Once installed, the bracket requires no specific operation. Its function is to securely hold the display. Ensure the display is properly seated in the bracket before operating your mid-motor system.
Note: This bracket is a passive component. Refer to your DPC240 or DPC241 display manual for operating instructions related to the display unit itself.
Maintenance
The DPC240/DPC241 display fixing bracket is designed for durability and requires minimal maintenance.
- Cleaning: Wipe the bracket with a soft, damp cloth to remove dust or dirt. Avoid using harsh chemicals or abrasive cleaners, which may damage the plastic material.
- Inspection: Periodically check the bracket for any signs of damage, cracks, or loose connections. Ensure the display remains securely seated within the bracket.
- Fasteners: If the bracket is mounted with screws, periodically check that all fasteners are tight to prevent vibration or detachment.
Troubleshooting
This section addresses common issues related to the bracket.
| Problem | Possible Cause | Solution |
|---|---|---|
| Display is loose in bracket | Display not fully seated; incorrect display model. | Ensure the DPC240 or DPC241 display is pushed firmly into the bracket until it locks. Verify you are using the correct display model for this bracket. |
| Bracket feels unstable after mounting | Mounting screws are loose; improper installation. | Check and tighten all mounting screws. Ensure the bracket is installed on a stable, flat surface as intended. |
| Bracket does not fit display | Incorrect display model; bracket damage. | This bracket is only compatible with DPC240 and DPC241 displays. Confirm your display model. Inspect the bracket for any manufacturing defects or damage. |
Warranty and Support
For warranty information or technical support, please refer to the documentation provided with your complete mid-motor system or contact the manufacturer directly. As this is a component part, warranty terms may be covered under the larger system it is integrated with.
Manufacturer: HUNTAN
For further assistance, please contact your point of purchase or the system integrator.
Related Documents - HUNMPECE97C51E63C2530E52A1F9E664584D0
 |
Optical Axis Clamp & Fixing Bracket User Manual - Installation and Maintenance Guide Comprehensive user manual for Optical Axis Clamps and Fixing Brackets, covering introduction, safety precautions, product specifications, installation instructions, and maintenance guidelines for mechanical equipment. |
 |
Fischer KSU Air Conditioner Fixing Kits - Technical Specifications and Installation Guide Detailed information on Fischer KSU and KSU S air conditioner fixing kits for secure wall mounting of HVAC units, pumps, and ventilators. Includes applications, advantages, material properties, and comprehensive technical data with load capacities. |
 |
Fischer Toggle Plug KDS: Secure Fixing for Trapezoidal Metal Ceilings Discover the Fischer Toggle Plug KDS, a versatile fixing element for secure pipe attachment to trapezoidal metal sheet ceilings in sprinkler systems. Features VdS and FM approvals, high tensile load capacity, and easy installation. Ideal for air ducts, ventilation, power lines, and more. |
 |
Motor Mounting Bracket Dimension Specifications Comprehensive dimension specifications for various stepper and servo motor mounting brackets, covering sizes 42mm to 130mm. |
 |
Norestar Outboard Motor Bracket Installation Instructions Detailed installation instructions for the Norestar Outboard Motor Bracket (Model OBM-00), including mounting steps, important notes, and guidance for lowering and raising the motor. |
 |
Alex ONE 760x500mm Radiator Installation Guide Comprehensive installation guide for the Alex ONE 760x500mm radiator by Terma, including parts list, mounting instructions, and safety precautions. |
Ask a question about this manual
Ask about setup, troubleshooting, compatibility, parts, safety, or missing instructions. Manuals+ will review the question and use this page’s manual context to help answer it.