
Devoko 0244BE
Devoko Dressing Table User Manual
Model: 0244BE
Brand: Devoko
1. Introduction
This manual provides detailed instructions for the assembly, operation, and maintenance of your Devoko Dressing Table with Mirror, LED Lighting, and Power Socket. Please read this manual thoroughly before assembly and use to ensure safe and proper operation of the product. Keep this manual for future reference.
The Devoko Dressing Table is designed to offer a comprehensive and organized space for your daily beauty routine. It features a large mirror with adjustable LED lighting, integrated power outlets, and extensive storage solutions including multiple drawers and open shelves.

Figure 1.1: Fully assembled Devoko Dressing Table. This image displays the overall design, including the mirror with LED bulbs, the tabletop, and the multiple storage drawers and open shelves.
2. Important Safety Instructions
WARNING: Failure to follow these instructions may result in electric shock, fire, or serious injury.
- Read all instructions before assembling and using this product.
- Keep all packaging materials away from children.
- Ensure all parts are present and undamaged before assembly. Do not assemble if any parts are missing or damaged.
- Assemble the product on a soft, clean surface to prevent scratches.
- Do not overtighten screws during assembly, as this may damage the material.
- Always use the provided anti-tip kit to secure the dressing table to a wall, especially if children are present. This prevents tipping hazards.
- Do not overload drawers or shelves. Distribute weight evenly.
- Keep electrical components (LED lights, power sockets) away from water or excessive moisture.
- Only use the power sockets for devices within their specified voltage and current limits.
- Unplug the dressing table from the power source before cleaning or performing any maintenance.
- Do not attempt to modify or repair the electrical components yourself. Contact qualified personnel for service.
3. Package Contents
Your Devoko Dressing Table is shipped in two separate packages. Please ensure you have received both packages and all components listed below before beginning assembly.

Figure 3.1: The Devoko Dressing Table is delivered in two distinct packages, which may arrive at different times. Verify both packages are received before proceeding with assembly.
3.1. Components List (Typical)
While specific part numbers are not provided, the following components are generally included:
- Main tabletop and frame panels
- Mirror with integrated LED lighting unit
- Drawer panels and slides (for 7 drawers)
- Open shelf panels (for 6 open compartments)
- Power outlet strip with 2 standard sockets and 2 USB ports
- Hair dryer holder
- Assembly hardware (screws, dowels, cam locks, etc.)
- Anti-tip kit
- Instruction manual (this document)
If any parts are missing or damaged, please contact Devoko customer support immediately.
4. Assembly Instructions
Assembly requires two people and approximately 2-3 hours. A Phillips head screwdriver and a hammer may be required (not included). Follow these steps carefully.
4.1. Preparation
- Clear a spacious area for assembly.
- Lay out all components on a soft, clean surface to prevent scratches.
- Identify all parts and hardware using the provided diagrams (if any, otherwise refer to the component list).
4.2. Step-by-Step Assembly
- Assemble the Base Frame: Begin by connecting the main side panels and back panels to form the foundational structure of the dressing table. Ensure all connections are secure.
- Install Drawer Slides: Attach the drawer slides to the interior of the base frame according to the pre-drilled holes. Ensure they are level and aligned.
- Assemble Drawers: Construct each of the seven drawers by joining the side, front, and back panels. Insert the bottom panel and secure it. Attach the drawer pulls.
- Insert Drawers: Carefully slide the assembled drawers onto their respective slides in the base frame. Test each drawer for smooth operation.
- Attach Tabletop: Secure the main tabletop surface to the assembled base frame.
- Assemble Mirror and Shelf Unit: Attach the side panels and back panel for the upper mirror and shelf unit. Install the internal shelves for the 6 open compartments.
- Mount Mirror Unit: Carefully lift and secure the assembled mirror and shelf unit onto the main tabletop. Ensure it is firmly attached and stable.
- Install LED Lights: The LED bulbs are pre-installed in the mirror frame. Connect the wiring as instructed (usually a simple plug-in connection to a power adapter).
- Install Power Outlet Strip: Secure the power outlet strip into its designated slot on the side of the mirror unit. Connect its power cable.
- Attach Hair Dryer Holder: Mount the hair dryer holder to the side of the dressing table as shown in the product images.
- Secure with Anti-Tip Kit: For safety, attach the anti-tip kit to the back of the dressing table and secure it to a wall stud using appropriate wall anchors. This step is critical to prevent accidental tipping.
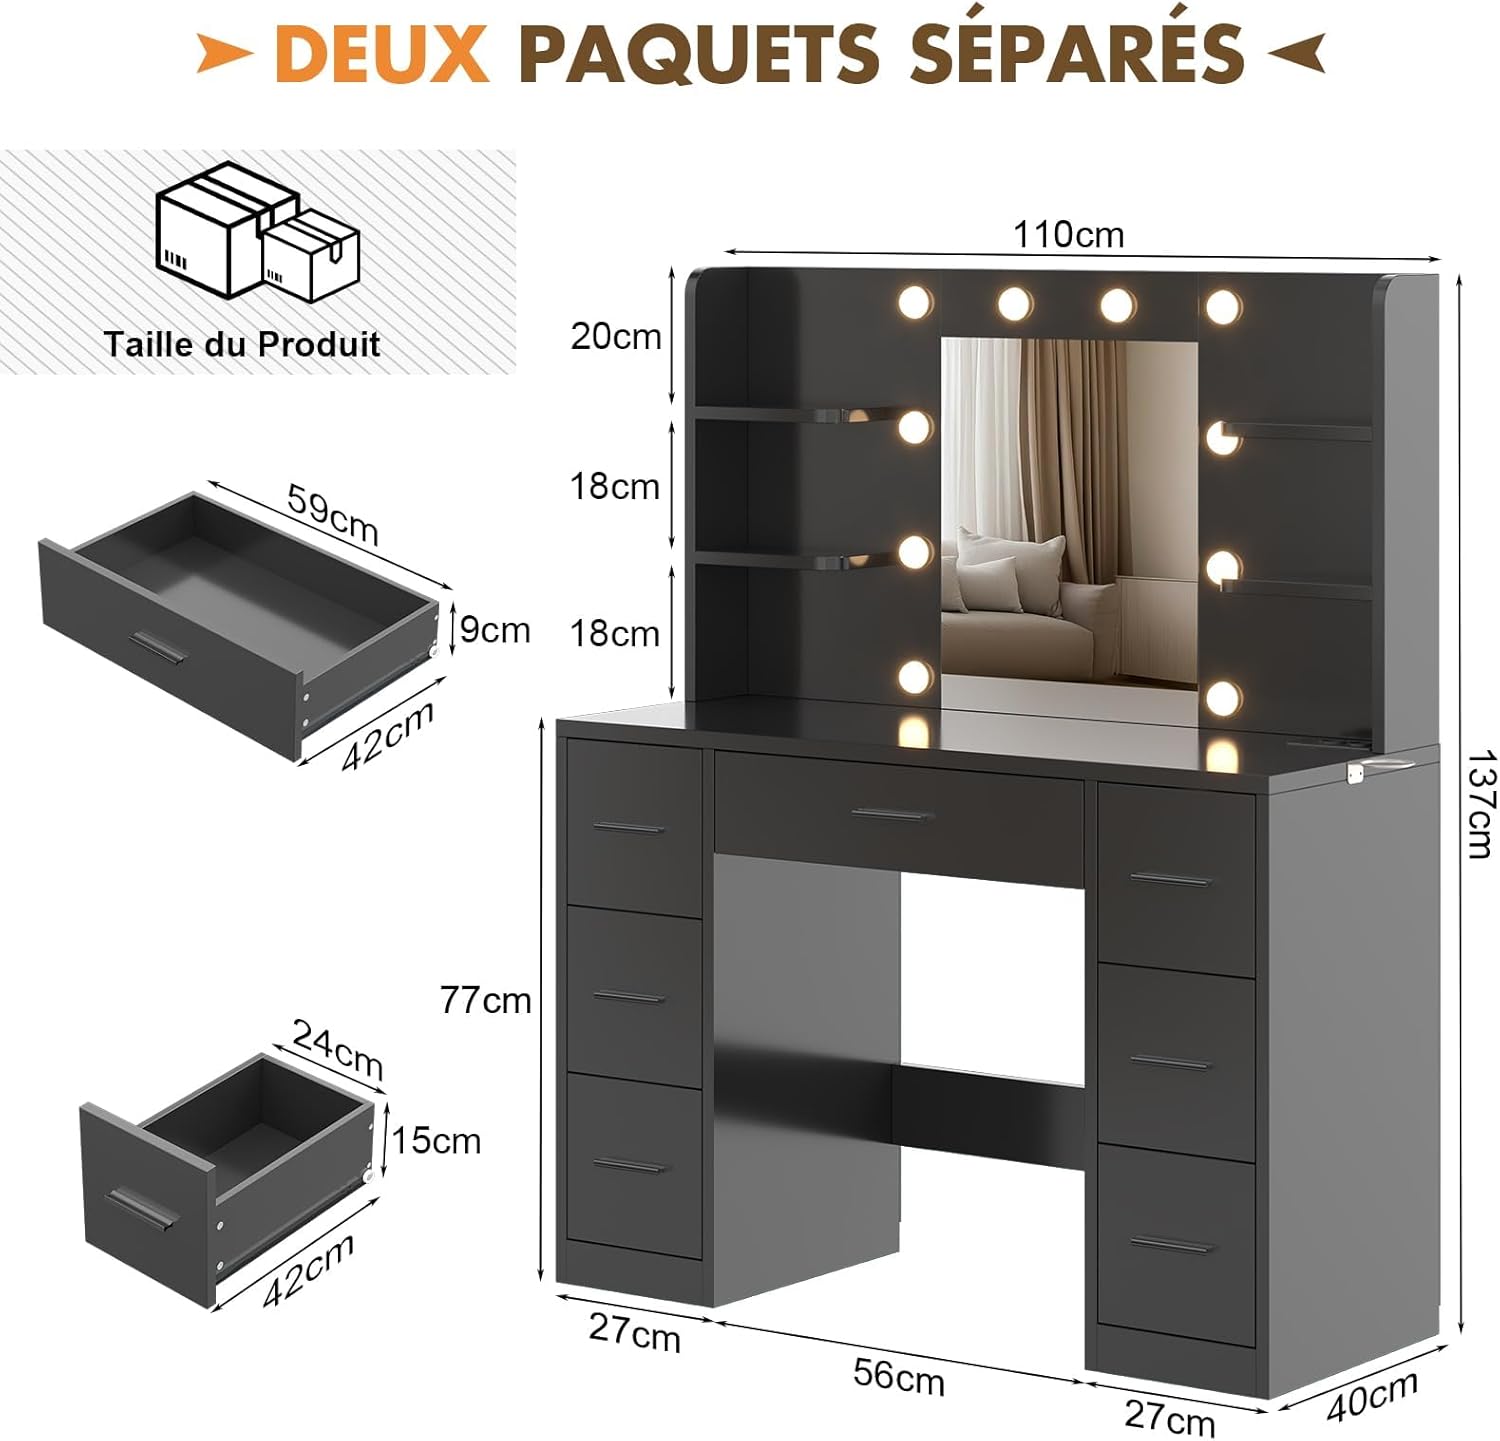
Figure 4.1: Dimensional overview of the dressing table and its main sections, illustrating how the components fit together during assembly.
5. Operating Instructions
5.1. LED Lighting System
The dressing table features 10 dimmable LED bulbs with adjustable color temperatures to suit your preference and lighting needs.
- Power On/Off: Locate the control switch (typically an inline switch on the power cord or a touch sensor on the mirror). Press once to turn the lights on or off.
- Change Color Mode: Short press the control switch to cycle through the three available color modes:
- Warm Yellow
- Warm White
- Cool White
- Adjust Brightness: Long press the control switch to continuously adjust the brightness level from 0% to 100%. Release the button when the desired brightness is reached.

Figure 5.1: Illustration of the three LED light color modes (Cool White, Warm White, Warm Yellow) and the method for adjusting brightness via the control switch.
5.2. Integrated Power Outlets
The dressing table is equipped with a convenient power strip featuring 2 standard AC sockets and 2 USB charging ports.
- AC Sockets: Plug in your hair dryer, curling iron, or other beauty appliances directly into the standard AC outlets. Ensure the appliance's power requirements do not exceed the dressing table's rated capacity.
- USB Ports: Use the USB ports to charge your mobile phone, tablet, or other USB-powered devices.
- Hair Dryer Holder: Utilize the dedicated holder to store your hair dryer conveniently when not in use, keeping your tabletop tidy.

Figure 5.2: Close-up view of the integrated power strip, showing the two AC outlets and two USB ports, along with the convenient hair dryer holder.
5.3. Storage Utilization
The dressing table offers extensive storage to keep your beauty essentials organized.
- Open Compartments: The 6 open compartments on the top section are ideal for frequently used items like cosmetics, skincare products, and perfumes, providing easy access.
- Drawers: The 7 spacious drawers underneath provide ample space for larger items, hairdressing tools, and items you wish to keep out of sight. Organize them using drawer dividers (not included) for maximum efficiency.

Figure 5.3: An aerial view of the dressing table with several drawers and open shelves displayed, highlighting the extensive storage capabilities for various beauty products and tools.
6. Maintenance
Proper care and maintenance will extend the life and appearance of your Devoko Dressing Table.
- Cleaning Surfaces: For general cleaning, wipe surfaces with a soft, damp cloth. For stubborn marks, use a mild, non-abrasive cleaner. Immediately follow with a dry cloth to prevent water spots or damage.
- Mirror Cleaning: Use a standard glass cleaner and a lint-free cloth for the mirror. Spray cleaner onto the cloth, not directly onto the mirror, to avoid liquid seeping into the frame or electrical components.
- Electrical Components: Ensure the dressing table is unplugged before cleaning near the LED lights or power outlets. Use a dry cloth to wipe these areas. Do not spray liquids directly onto electrical parts.
- Drawer Maintenance: Periodically check drawer slides for smooth operation. If they become stiff, a small amount of silicone spray lubricant can be applied.
- Hardware Check: Periodically check all screws and fasteners to ensure they remain tight. Retighten if necessary to maintain stability.
- Avoid Harsh Chemicals: Do not use abrasive cleaners, strong solvents, or ammonia-based products, as these can damage the finish.
7. Troubleshooting
If you encounter issues with your Devoko Dressing Table, refer to the following common problems and solutions:
| Problem | Possible Cause | Solution |
|---|---|---|
| LED lights do not turn on. |
|
|
| Power outlets/USB ports not working. |
|
|
| Drawers are stiff or do not slide smoothly. |
|
|
| Dressing table feels wobbly. |
|
|
If you experience a problem not listed above, or if the suggested solutions do not resolve the issue, please contact Devoko customer support for assistance.
8. Specifications
| Feature | Detail |
|---|---|
| Brand | Devoko |
| Model Number | 0244BE |
| Product Dimensions (Overall) | 110 x 40 x 137 cm (43.31"W x 15.75"D x 53.94"H) |
| Item Weight | 62.5 pounds |
| Color | Black |
| Material | (Not specified in input, assuming engineered wood/MDF) |
| Lighting Type | LED (10 dimmable bulbs) |
| Light Color Modes | Warm Yellow, Warm White, Cool White |
| Power Outlets | 2 Standard AC Sockets, 2 USB Sockets |
| Storage | 7 Drawers, 6 Open Compartments |
| Assembly Required | Yes |
| Product Care Instructions | Wipe with Damp Cloth, Wipe with Dry Cloth |
9. Warranty and Customer Support
Devoko is committed to providing high-quality products. For specific warranty information regarding your dressing table, please refer to the warranty card included with your purchase or visit the official Devoko website. Warranty terms typically cover manufacturing defects for a specified period from the date of purchase.
If you have any questions, require assistance with assembly, or need to report missing/damaged parts, please contact Devoko customer support. Have your model number (0244BE) and purchase details ready when contacting support.
Devoko Customer Support:
- Refer to your purchase documentation for direct contact methods.
- Visit the official Devoko website for FAQs and contact forms: Devoko Store on Amazon (This link is for the brand store, not direct support, but it's the closest available from the input).
Related documents0244BE

Ask a question about this manual
Ask about setup, troubleshooting, compatibility, parts, safety, or missing instructions. Manuals+ will review the question and use this page’s manual context to help answer it.