Product Overview
This manual provides detailed instructions for assembling and operating your Vziimo Retro Swing Clock Building Blocks Set. This kit allows you to construct a vintage-style pendulum clock with a functional timepiece.
Safety Information
WARNING: CHOKING HAZARD - Small Parts. Not suitable for children under 3 years. Recommended for ages 14 and up due to the complexity and small size of the building blocks.
Package Contents
Before beginning assembly, please verify that all components are present. Your package should contain:
- 751 Building Block Pieces
- Detailed Instruction Manual (this document)
- Clock Mechanism Components (including dial, hands, pendulum parts)
- Decorative Elements (e.g., electroplated metallic parts)
Note: Batteries are not included and must be purchased separately. The clock mechanism typically requires AA batteries. Refer to the clock mechanism section for details.
Assembly Instructions
Follow the step-by-step visual guide provided in the physical instruction booklet included with your set. The assembly process involves connecting 751 pieces to form the vintage swing clock.
Key Assembly Steps:
- Unpack and Sort: Carefully unpack all building block bags. It is recommended to sort pieces by color and type to facilitate assembly.
- Base Construction: Begin by constructing the base of the clock according to the instructions.
- Main Frame Assembly: Build the main frame, ensuring all connections are secure.
- Clock Face Integration: Integrate the clock face and dial into the upper section of the frame. The dial hands are designed to rotate.
- Pendulum Mechanism: Assemble the pendulum clockwork. This involves gears and a rotating shaft that controls the pendulum's swing.
- Battery Compartment: Construct the battery compartment, typically located at the back of the clock. Ensure it is accessible for battery insertion.
- Decorative Elements: Attach all decorative elements, including the electroplated metallic parts, to complete the vintage aesthetic.
Important: Pay close attention to the orientation of pieces, especially for the clock mechanism, to ensure proper functionality.
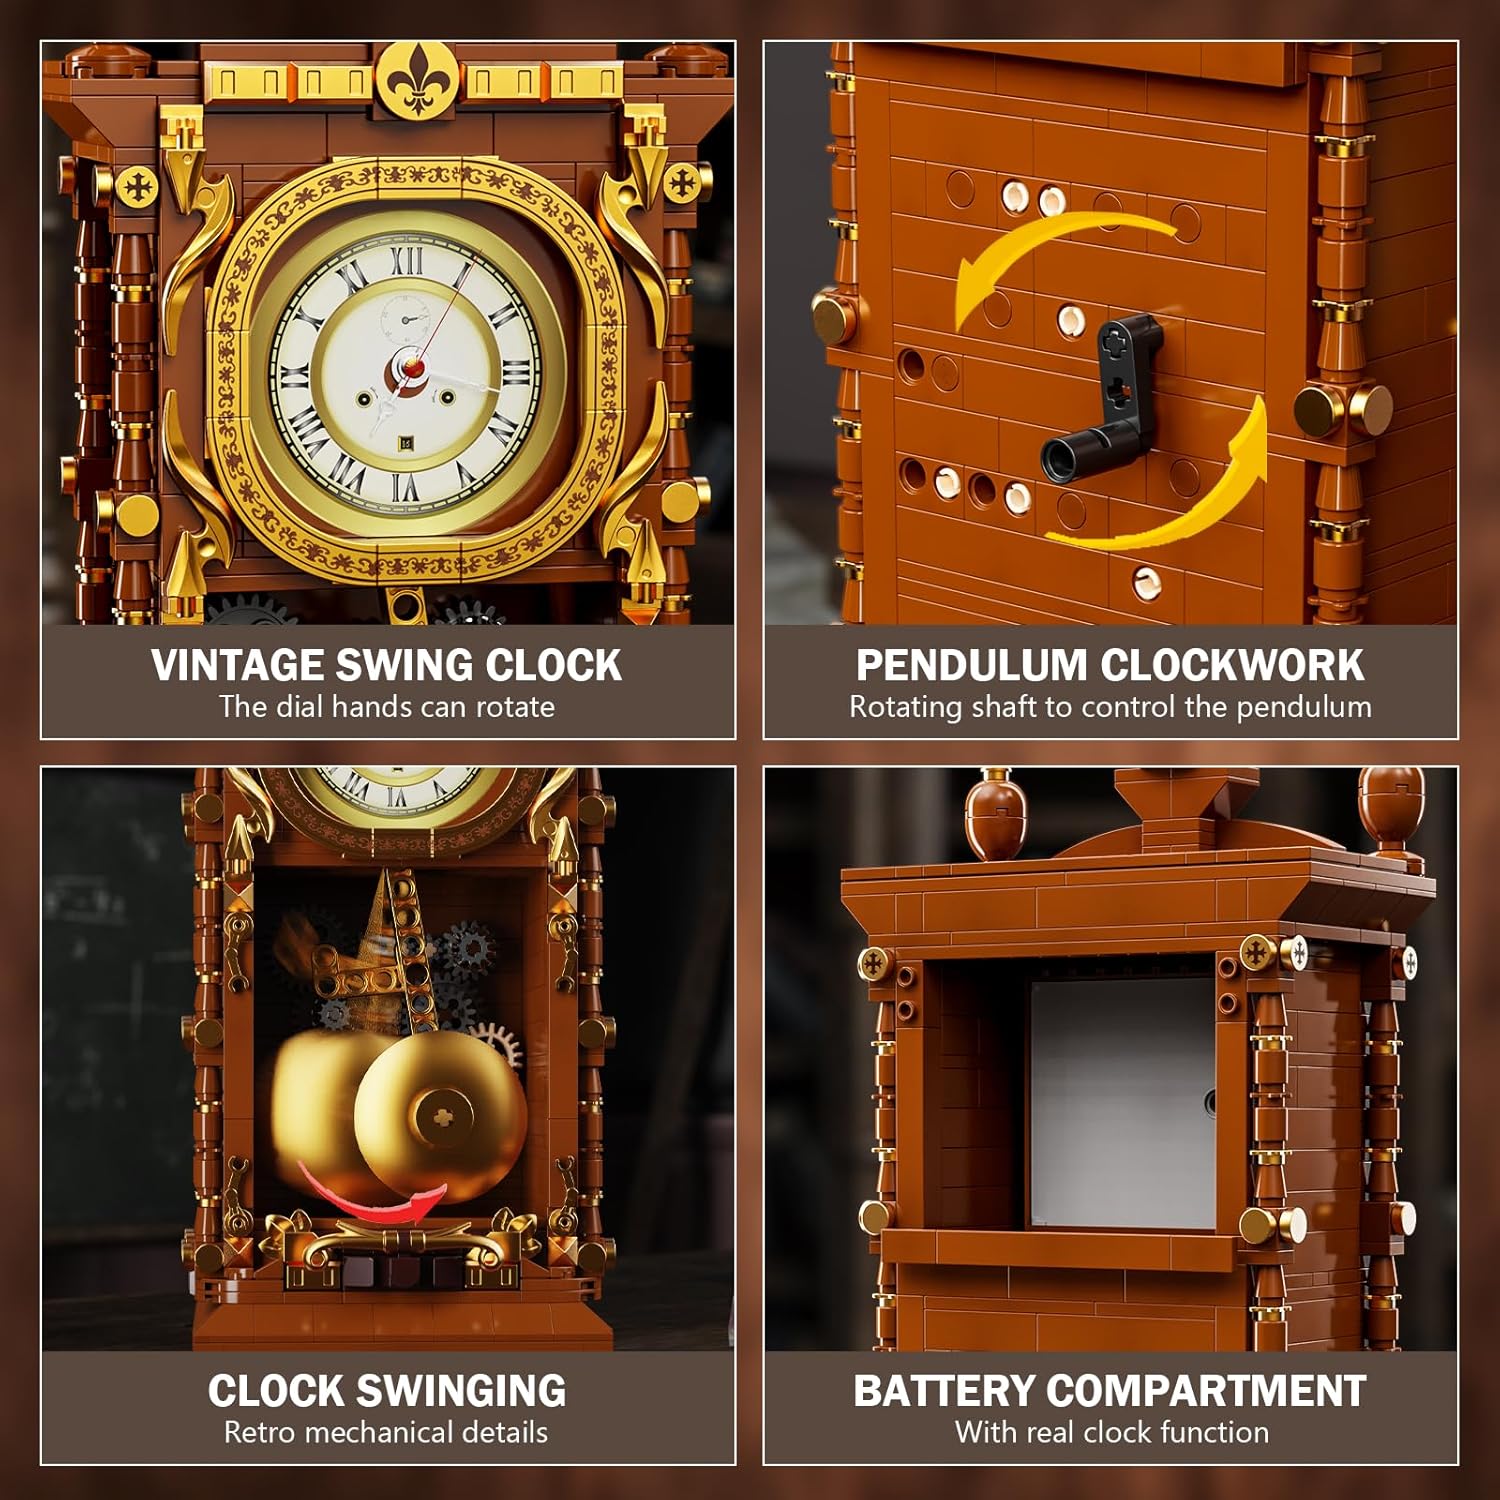
Image: The fully assembled Vziimo Retro Swing Clock, showcasing its intricate details and vintage design.

Image: A detailed view of the clock's vintage dial, highlighting the rotating hands and classic Roman numerals.

Image: An internal view of the clock mechanism, displaying the golden pendulum and visible gears that drive its movement.

Image: The back of the clock, illustrating the rotating shaft used to control the pendulum's movement.

Image: A side view revealing the integrated battery compartment, essential for the clock's functional operation.
Operating Instructions
Inserting Batteries
- Locate the battery compartment at the back of the clock.
- Open the compartment cover.
- Insert the required batteries (typically AA, not included) according to the polarity markings.
- Close the battery compartment cover securely.
Setting the Time
- Gently rotate the minute hand clockwise until the desired time is displayed. Avoid rotating the hour hand directly.
- Ensure the hands move freely and do not obstruct each other.
Activating the Pendulum
The pendulum is controlled by a rotating shaft located at the back of the clock.
- Once batteries are inserted and the time is set, gently turn the rotating shaft on the back of the clock.
- This action will initiate the pendulum's swing, adding to the clock's realistic functionality.

Image: The assembled clock after battery installation, demonstrating its fully functional timekeeping and pendulum movement.
Maintenance
- Cleaning: Use a soft, dry cloth to gently wipe dust from the clock's surface. Avoid using abrasive cleaners or solvents.
- Battery Replacement: Replace batteries as needed to maintain accurate timekeeping and pendulum function. Remove old batteries promptly to prevent leakage.
- Handling: Handle the assembled clock with care to prevent accidental disassembly or damage to the delicate clock mechanism.
- Storage: If storing the clock for an extended period, remove the batteries to prevent corrosion.
Troubleshooting
Clock Not Keeping Time / Pendulum Not Swinging
- Check Batteries: Ensure batteries are correctly inserted with the correct polarity and are not depleted. Replace if necessary.
- Mechanism Obstruction: Verify that no building blocks or debris are obstructing the gears or pendulum mechanism.
- Pendulum Activation: Confirm the rotating shaft at the back has been turned to activate the pendulum.
- Hand Alignment: Ensure the clock hands are properly aligned and not catching on each other or the dial.
Loose or Missing Pieces
- Re-attach: If a piece becomes loose, carefully re-attach it according to the instruction manual.
- Missing Parts: If you discover missing parts during assembly, please contact Vziimo customer service for assistance.
Specifications
| Feature | Detail |
|---|---|
| Model Name | Retro Swing Clock Set |
| Brand | Vziimo |
| Number of Pieces | 751 |
| Product Dimensions (L x W x H) | 5.04 x 4.17 x 11.54 inches |
| Item Weight | 1.65 pounds |
| Recommended Age | 14 years and up |
| Power Source | Battery (not included) |
| Special Features | Functional Timepiece, Swinging Pendulum, Electroplated Metallic Paint |

Image: A visual representation of the assembled clock's dimensions: 5.04 inches (length), 4.17 inches (width), and 11.54 inches (height).
Warranty and Support
Vziimo is committed to providing quality products. If you encounter any issues with your Retro Swing Clock Building Blocks Set, including missing parts or functional problems, please contact our customer support team.
For assistance, please refer to the contact information provided in your product packaging or visit the official Vziimo website.
Note: Please retain your proof of purchase for any warranty claims.


