1. Introduction
Thank you for choosing the WASJOYE Fingerprint Safe BXX (22.0L). This manual provides essential information for the safe and efficient operation of your new security product. Please read these instructions carefully before use and retain them for future reference.
2. Safety Information
- Always keep the emergency keys in a secure location outside the safe.
- Do not expose the safe to extreme temperatures or humidity.
- Ensure the safe is placed on a stable surface or securely mounted to prevent tipping.
- Avoid using abrasive cleaners on the safe's surface.
- If the safe is damaged, do not attempt to repair it yourself. Contact customer support.
3. Package Contents
Verify that all items are present in the package:
- WASJOYE Fingerprint Safe Body x 1
- Partition Board x 1
- Emergency Keys x 2
- Mat x 1
- Anchor Bolt Set x 1
- Instruction Manual x 1
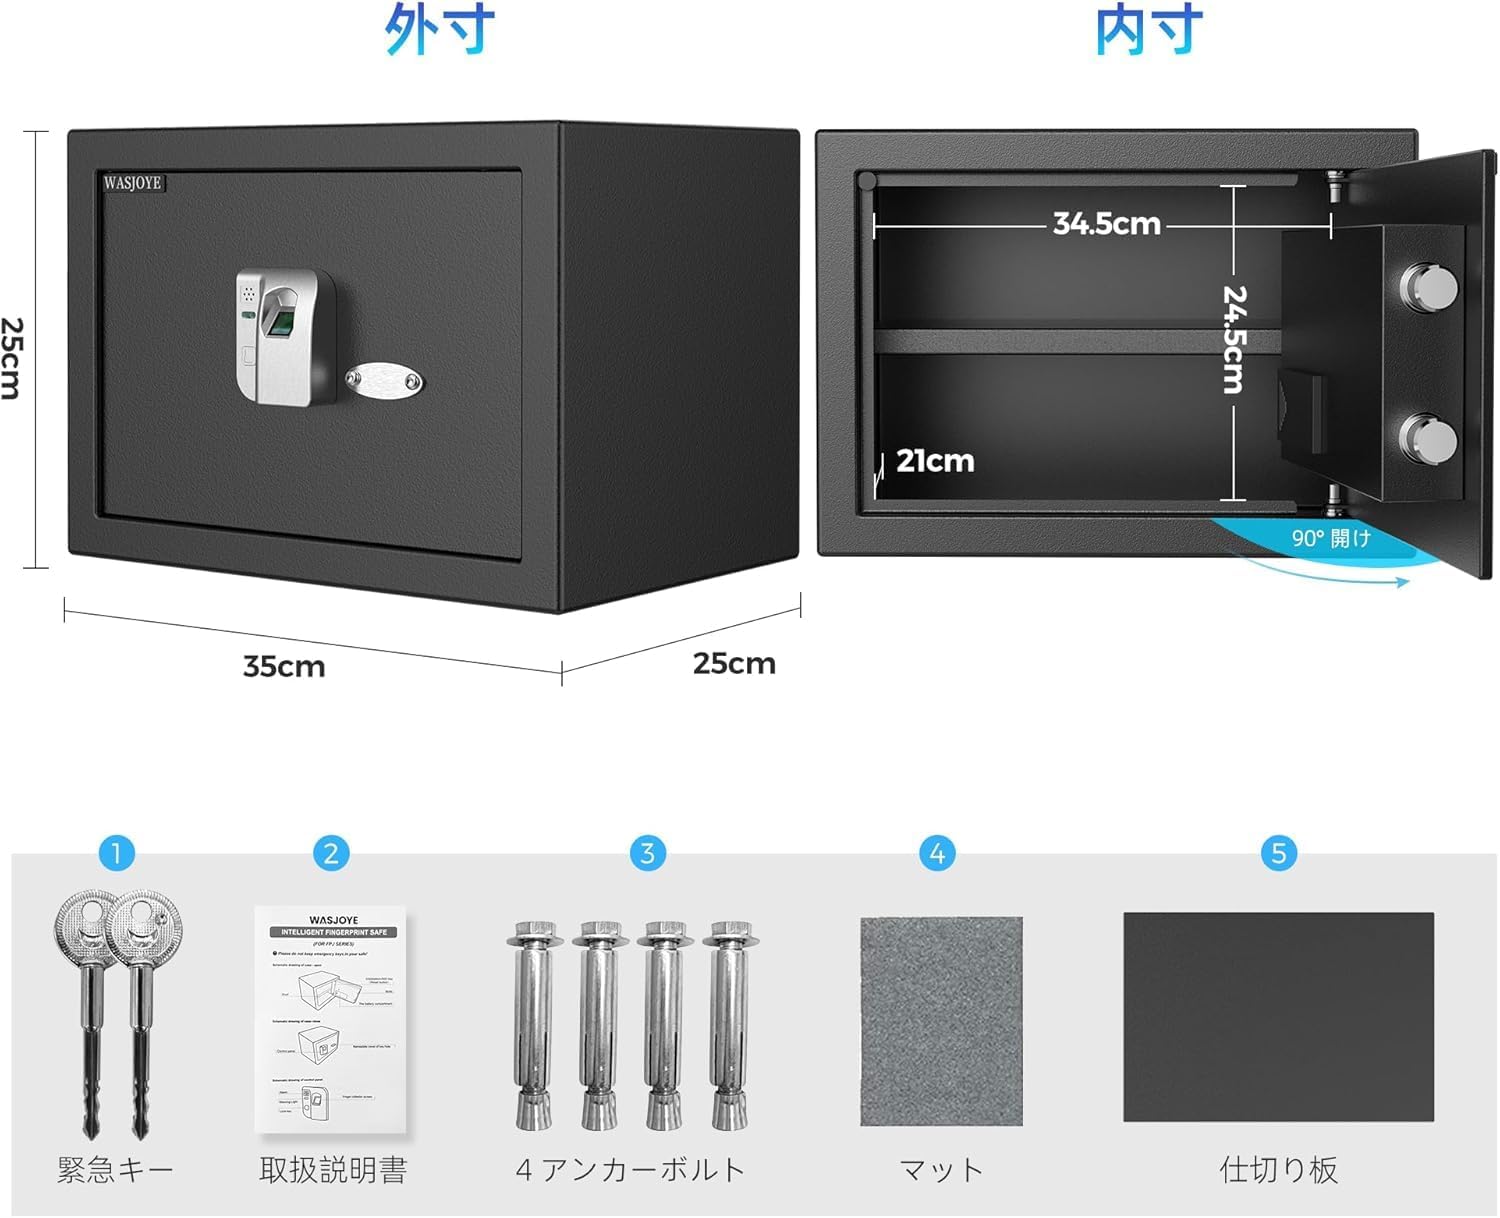
Image: All components included with the WASJOYE Fingerprint Safe BXX.
4. Setup
4.1 Initial Opening and Battery Installation
- Locate the emergency keyhole, usually hidden behind a cover on the fingerprint panel.
- Insert one of the emergency keys and turn it to unlock the safe door.
- Open the safe door. Inside, locate the battery compartment, typically on the back of the door or inside the safe.
- Install the required batteries (not included) according to the polarity markings.
- Close the battery compartment.

Image: The two methods for unlocking the safe: fingerprint recognition and emergency key.
4.2 Fingerprint Registration
The safe can store up to 32 unique fingerprints.
- With the safe door open, press the Reset button located inside the safe (often near the battery compartment).
- Place your finger on the fingerprint sensor. The indicator light will flash.
- Lift and place your finger multiple times from different angles until the indicator light confirms successful registration (e.g., a green light or a specific beep).
- Repeat for additional fingerprints if desired.

Image: Visual guide for registering and resetting fingerprints.
4.3 Mounting the Safe (Optional)
The safe can be securely fixed to a floor, shelf, or wall using the provided anchor bolts.
- Step 1: Mark Drilling Points
Place the safe in the desired location. With the door open, use a pencil to mark the positions of the two pre-drilled holes on the back or bottom of the safe onto the mounting surface. - Step 2: Drill Holes
Move the safe away. Use an appropriate drill bit to drill holes at the marked positions. Ensure the depth is sufficient for the anchor bolts. - Step 3: Insert Expansion Screws
Insert the expansion screws (or plastic sleeves, depending on the anchor bolt type) into the drilled holes. - Step 4: Secure the Safe
Align the safe's holes with the drilled holes. Insert the anchor bolts through the safe and into the expansion screws. Tighten the bolts firmly with a wrench until the safe is securely fastened.

Image: Step-by-step guide for securely mounting the safe.
5. Operating Instructions
5.1 Unlocking with Fingerprint
- Place a registered finger on the fingerprint sensor.
- The safe will unlock within approximately 0.5 seconds if the fingerprint is recognized. The door can then be opened.
5.2 Unlocking with Emergency Key
Use this method if batteries are depleted or if fingerprint recognition fails.
- Locate the emergency keyhole on the fingerprint panel.
- Insert an emergency key and turn it to unlock the safe.
- Open the safe door.
5.3 Fingerprint Reset
To delete all registered fingerprints and start over:
- With the safe door open, press and hold the Reset button for 10 seconds.
- Release the Reset button, then press it once briefly.
- You can now register new fingerprints as described in Section 4.2.
6. Maintenance
6.1 Battery Replacement
When the battery is low, the safe may indicate this with a specific light pattern or sound. Replace all batteries simultaneously with new ones of the same type to ensure optimal performance.
6.2 Cleaning
Wipe the safe's exterior with a soft, damp cloth. Do not use harsh chemicals or abrasive materials, as these can damage the finish or electronic components.
7. Troubleshooting
- Fingerprint not recognized: Ensure your finger is clean and dry. Try different angles or re-register your fingerprint. If issues persist, replace batteries.
- Safe does not open: Check battery level. If batteries are low or depleted, use the emergency key.
- Alarm sounds unexpectedly: The safe features an alarm for unauthorized access attempts or if the door is left ajar. Ensure the door is fully closed and locked.

Image: The safe's alarm system, designed to deter unauthorized access.
8. Specifications
Image: External and internal dimensions of the safe.
| Feature | Specification |
|---|---|
| Brand | WASJOYE |
| Model Number | BXX |
| External Dimensions (L x W x H) | 25 x 35 x 25 cm |
| Internal Dimensions (L x W x H) | 21 x 34.5 x 24.5 cm |
| Weight | 8.2 kg |
| Capacity | 22.0 Liters |
| Color | Black |
| Material | Alloy Steel |
| Lock Type | Biometric (Fingerprint) with Emergency Key |
| Fingerprint Capacity | Up to 32 fingerprints |
| Door Thickness | 4 cm |
| Bolt Dimensions | 2 x 2 mm (high-strength) |
| Features | Removable shelf, Anti-theft design, Floor/Wall mountable |
9. Warranty and Support
WASJOYE provides a one-year warranty for this product, covering manufacturing defects. Additionally, lifetime technical support is available to assist you with any questions or issues you may encounter during the product's lifespan.
For warranty claims or technical assistance, please contact WASJOYE customer service through your purchase platform or the contact information provided on the official WASJOYE website.