
1. Introduction
This manual provides comprehensive instructions for the installation, operation, and maintenance of your MekedeTech Android Car Stereo. This unit is specifically designed for Toyota 4Runner models manufactured between 2003 and 2009. It features an 8-Core A53 1.8GHz CPU, 4GB RAM, 64GB ROM, a 9-inch IPS touch screen with 1280*720 resolution, built-in 4G LTE, Wireless CarPlay, Android Auto, and DSP sound processing.
2. Safety Information
- Always ensure the vehicle is parked and the engine is off before attempting installation or maintenance.
- Disconnect the vehicle's battery before installation to prevent electrical shorts.
- Consult a professional if you are unsure about any installation steps.
- Do not operate the device in a manner that distracts you from driving.
- Keep the device away from water and extreme temperatures.
3. Package Contents
Verify that all items are present in the package:
- 9-inch Touch Screen Head Unit
- Power Harness (Plug and Play)
- Frame Kit for Toyota 4Runner (2003-2009)
- GPS Antenna
- USB Cables
- RCA Cables
- 4G LTE Antenna
4. Compatibility
This Android car stereo is designed for a perfect fit in Toyota 4Runner models from 2003 to 2009. The package includes a frame kit and a plug-and-play harness to retain factory steering wheel controls. Please ensure your vehicle's dashboard configuration matches the compatible layout.

Image: This image illustrates the compatible and incompatible dashboard configurations for the Toyota 4Runner. The top panel shows an incompatible dashboard (marked with an 'X'), while the bottom panel shows a compatible dashboard (marked with a checkmark).
5. Setup and Installation
5.1 Pre-Installation Check
- Confirm all package contents are present.
- Ensure your vehicle's dashboard is compatible.
- Gather necessary tools (e.g., trim removal tools, screwdrivers).
5.2 Installation Steps
- Disconnect Battery: Disconnect the negative terminal of your vehicle's battery.
- Remove Factory Radio: Carefully remove the existing factory radio and dashboard trim.
- Connect Harness: Connect the provided plug-and-play harness to the vehicle's wiring and the new head unit. Ensure all connections are secure.
- Antenna Connection: The factory AM/FM antenna may require an adapter (not included) for connection to the new unit.
- GPS and 4G LTE Antennas: Connect the GPS antenna and position it for optimal signal reception. Connect the 4G LTE antenna.
- Test Connections: Before fully reassembling, temporarily reconnect the battery and power on the unit to test basic functions (power, sound, touch screen).
- Secure Head Unit: Mount the new head unit into the dashboard using the provided frame kit.
- Reassemble Dashboard: Reinstall all dashboard trim pieces.
- Final Battery Connection: Reconnect the vehicle's battery.

Image: This image displays the original Toyota 4Runner dashboard radio (bottom) and the new MekedeTech Android Car Stereo installed (top), showcasing the integrated navigation interface.
5.3 Cooling Fan Setup
The unit supports an external cooling fan to manage temperature, especially during prolonged use or in hot climates. Follow these steps to activate the cooling fan:
- Connect Fan: Ensure the cooling fan is properly connected to the designated port on the head unit.
- Access Settings: On the head unit, navigate to Settings > Device > Sound.
- Enable AMP ON: Locate and enable the 'AMP ON' setting.
- Verify Fan Operation: The cooling fan should now be active, helping to maintain optimal operating temperature.

Image: This image details the cooling fan setup steps and highlights the unit's specifications: Octa-core CPU, 4GB RAM, 64GB ROM, and the Android system. It also shows temperature comparisons with and without a cooling fan.
6. Operating Instructions
6.1 Basic Operation
- Power On/Off: Press and hold the power button (if available) or turn on the vehicle ignition.
- Touch Screen: Navigate the interface using the responsive 9-inch IPS touch screen.
- Steering Wheel Controls: The unit supports factory steering wheel controls. These can often be programmed or mapped within the device settings.
6.2 Wireless CarPlay and Android Auto
The unit features built-in wireless CarPlay and Android Auto, allowing seamless integration with your smartphone.
For Wireless CarPlay (iOS System):
- Connect Bluetooth: On your iPhone, go to Bluetooth settings and pair with the car stereo's Bluetooth.
- Select Car Link: On the car stereo, open the 'Car Link' application.
- Wait for Connection: The system will automatically connect to CarPlay. (CarPlay can also be connected via USB cable).
For Wireless Android Auto (Android System):
- Connect Bluetooth: On your Android phone, go to Bluetooth settings and pair with the car stereo's Bluetooth.
- Select Car Link: On the car stereo, open the 'Car Link' application.
- Wait for Connection: The system will automatically connect to Android Auto. (Android Auto can also be connected via USB cable).

Image: This image illustrates the user interface for Wireless CarPlay and Android Auto, showing the connection steps for both iOS and Android devices.
6.3 Network Connectivity (4G LTE & WiFi)
The head unit supports both 4G LTE and WiFi for internet access.
- 4G LTE: Insert a compatible SIM card into the designated 4G LTE card slot. The unit has two SIM card slots: one on the back of the main unit and one on the RCA cable. This allows direct cellular network access without needing a phone hotspot.
- WiFi: Connect to a WiFi hotspot (e.g., from your smartphone) via the unit's WiFi module. Navigate to Settings > Network & Internet > Wi-Fi to connect.
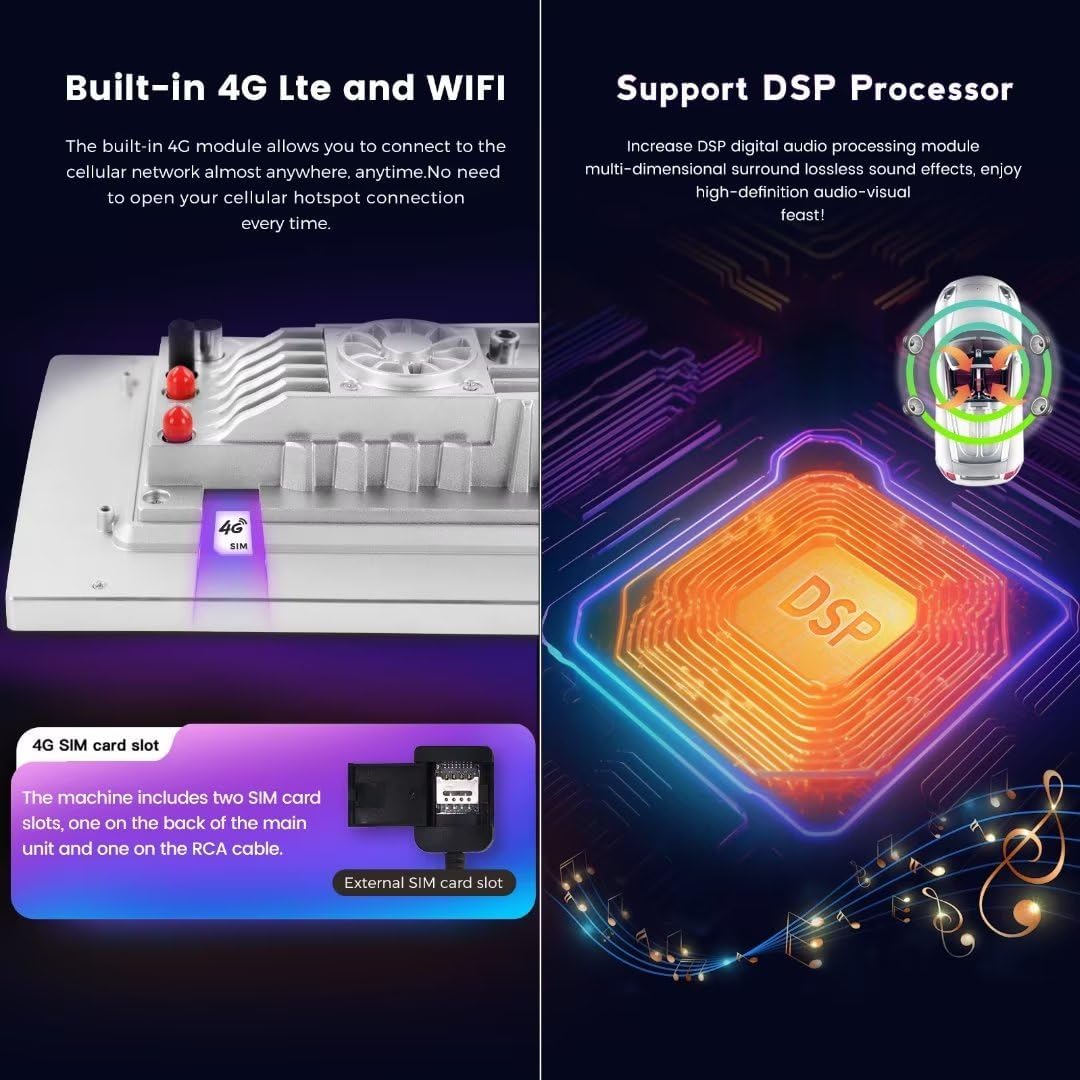
Image: This image highlights the built-in 4G LTE and WiFi capabilities, including the SIM card slot location. It also illustrates the DSP processor for enhanced audio quality.
6.4 GPS Navigation
The unit has built-in GPS navigation. Ensure the GPS antenna is properly installed for accurate positioning. You can use pre-installed maps or download additional navigation applications from the app store when connected to the internet.
6.5 FM Radio
Access the FM radio application to tune into local radio stations. Ensure the antenna is connected for optimal reception.
6.6 Media Playback
The unit supports various audio and video formats including APE, FLAC, WAV, MP3, WMA for audio, and MKV, RMVB, AVI, MP4, MDV for video. Media can be played from USB devices or internal storage.
6.7 App Installation
Once connected to the internet (via 4G LTE or WiFi), you can download and install various applications from the pre-installed app store, similar to a standard Android tablet.
7. Maintenance
- Cleaning: Use a soft, dry cloth to clean the screen and exterior. Avoid abrasive cleaners or solvents.
- Software Updates: Periodically check for software updates through the system settings to ensure optimal performance and access to new features.
- Temperature: Avoid exposing the unit to extreme temperatures. The cooling fan helps manage internal temperatures during operation.
8. Troubleshooting
If you encounter issues, refer to the following common problems and solutions:
| Problem | Possible Cause / Solution |
|---|---|
| No Power | Check power harness connections. Ensure vehicle battery is connected and charged. Check vehicle's fuse box. |
| No Sound | Verify speaker connections. Check volume levels. Ensure 'AMP ON' setting is enabled if applicable. |
| Wireless CarPlay/Android Auto Disconnects or Fails to Connect | Ensure Bluetooth is enabled and paired. Restart phone and head unit. Check 'Car Link' app. Try connecting via USB cable. |
| Poor Radio Reception | Ensure AM/FM antenna is properly connected. An antenna adapter may be required. |
| Steering Wheel Controls Not Working | Check harness connections. Access the unit's settings to program or map steering wheel buttons. |
| Unit is Loose in Dashboard | Ensure the frame kit is correctly installed and secured. Recheck mounting points. |
| Slow Performance / App Issues | Close unnecessary background apps. Clear cache. Consider a factory reset if issues persist (Settings > System > Reset options). |
| Poor WiFi Connection | Ensure the WiFi hotspot SSID is not hidden. Move closer to the hotspot source. |
9. Specifications
| Feature | Detail |
|---|---|
| Brand | MekedeTech |
| Model | 8-Core 4+64G |
| Operating System | Android 12 OS |
| CPU | 8-Core A53 1.8GHz |
| Memory | 4GB RAM, 64GB ROM |
| Screen Size | 9 inch IPS Touch Screen |
| Screen Resolution | 1280*720 |
| Power Output | 4*50W (200 Watts total) |
| Connectivity | Bluetooth, USB, Wi-Fi, Wireless, 4G LTE |
| Special Features | Wireless CarPlay, Android Auto, Built-in DSP, GPS Navigation, FM Radio |
| Compatible Devices | Smartphone |
| Audio Formats | APE/FLAC/WAV/MP3/WMA etc. |
| Video Formats | MKV/RMVB/AVI/MP4/MDV etc. |
| Item Weight | 3.5 Pounds |
10. Warranty
This MekedeTech product comes with a 1-Year Warranty from the date of purchase. Please retain your proof of purchase for warranty claims. The warranty covers manufacturing defects and malfunctions under normal use. It does not cover damage caused by improper installation, misuse, accidents, or unauthorized modifications.
11. Support
For technical assistance, troubleshooting, or warranty inquiries, please contact MekedeTech customer support. Refer to the contact information provided with your purchase or visit the official MekedeTech website for support resources.
