
1. Product Overview
The GEYA GRT6-A1 is a single-function electronic time relay designed for DIN rail mounting. It features a 'Delay ON' function, providing precise timing control for various industrial and home automation applications. This device supports a wide voltage range of AC/DC 24-240V and offers an adjustable time scale from 0.1 seconds to 10 days, divided into 10 distinct ranges. The relay status is indicated by an LED, and settings are easily adjusted via panel knobs.

Figure 1: Front view of the GEYA GRT6-A1 Delay ON Time Relay, showing the adjustment knobs and LED indicators.
2. Technical Specifications
The following table details the technical parameters for the GRT6-A1 time relay:

Figure 2: Detailed technical specifications for the GRT6 series, including the GRT6-A1 model.
| Parameter | Value (GRT6-A1) |
|---|---|
| Function | Delay ON |
| Supply Terminals | A1-A2 |
| Voltage Range | AC/DC 24-240V (50-60Hz) |
| Power Input | AC max. 6VA/1.3W |
| Supply Voltage Tolerance | -15%; +10% |
| Supply Indication | Green LED |
| Time Ranges | 0.1s - 10 days (potentiometer) |
| Time Deviation | 10% mechanical setting |
| Repeat Accuracy | 0.2% - set value stability |
| Output | 1 x SPDT (1NO1NC) |
| Current Rating | 10A / AC1 |
| Switching Voltage | 250VAC / 24VDC |
| Output Indication | Red LED |
| Mounting Type | DIN Rail EN/IEC 60715 |
| Protection Degree | IP40 (front panel) / IP20 (terminals) |
| Product Dimensions | 90 x 18 x 64 mm (3.7 x 0.9 x 2.95 inches) |
| Item Weight | 2.08 ounces |
3. Installation and Wiring
3.1 Mounting
The GRT6-A1 time relay is designed for DIN rail mounting. Ensure the DIN rail is securely installed in a suitable enclosure, providing adequate ventilation and clearance for wiring.

Figure 3: Dimensions of the GRT6-A1 relay for proper installation planning.
3.2 Wiring Diagram
Connect the relay according to the appropriate wiring diagram for your application. Ensure all connections are secure and comply with local electrical codes. The GRT6-A1 features screw-type terminals for reliable connections.

Figure 4: Wiring diagrams for single and double pole configurations, including a typical application example and function diagrams.
Terminal Designations:
- A1, A2: Supply Terminals
- S: Trigger Terminal (if applicable for specific functions)
- 15: Common Contact
- 16: Normally Closed (NC) Contact
- 18: Normally Open (NO) Contact
4. Operation
4.1 Function Selection
The GRT6-A1 model provides a 'Delay ON' function. Upon power application, the relay will wait for the set delay time before activating its output contacts.
4.2 Time Setting
The delay time is set using the two rotary knobs on the front panel:
- Knob 1 (Time Range): Selects the overall time scale (e.g., 1s, 10s, 1m, 10m, 1h, 10h, 1d, 10d).
- Knob 2 (Percentage): Fine-tunes the delay within the selected time range, from 10% to 100%.
The total delay time is calculated as: Time Range (Knob 1) x Percentage (Knob 2).
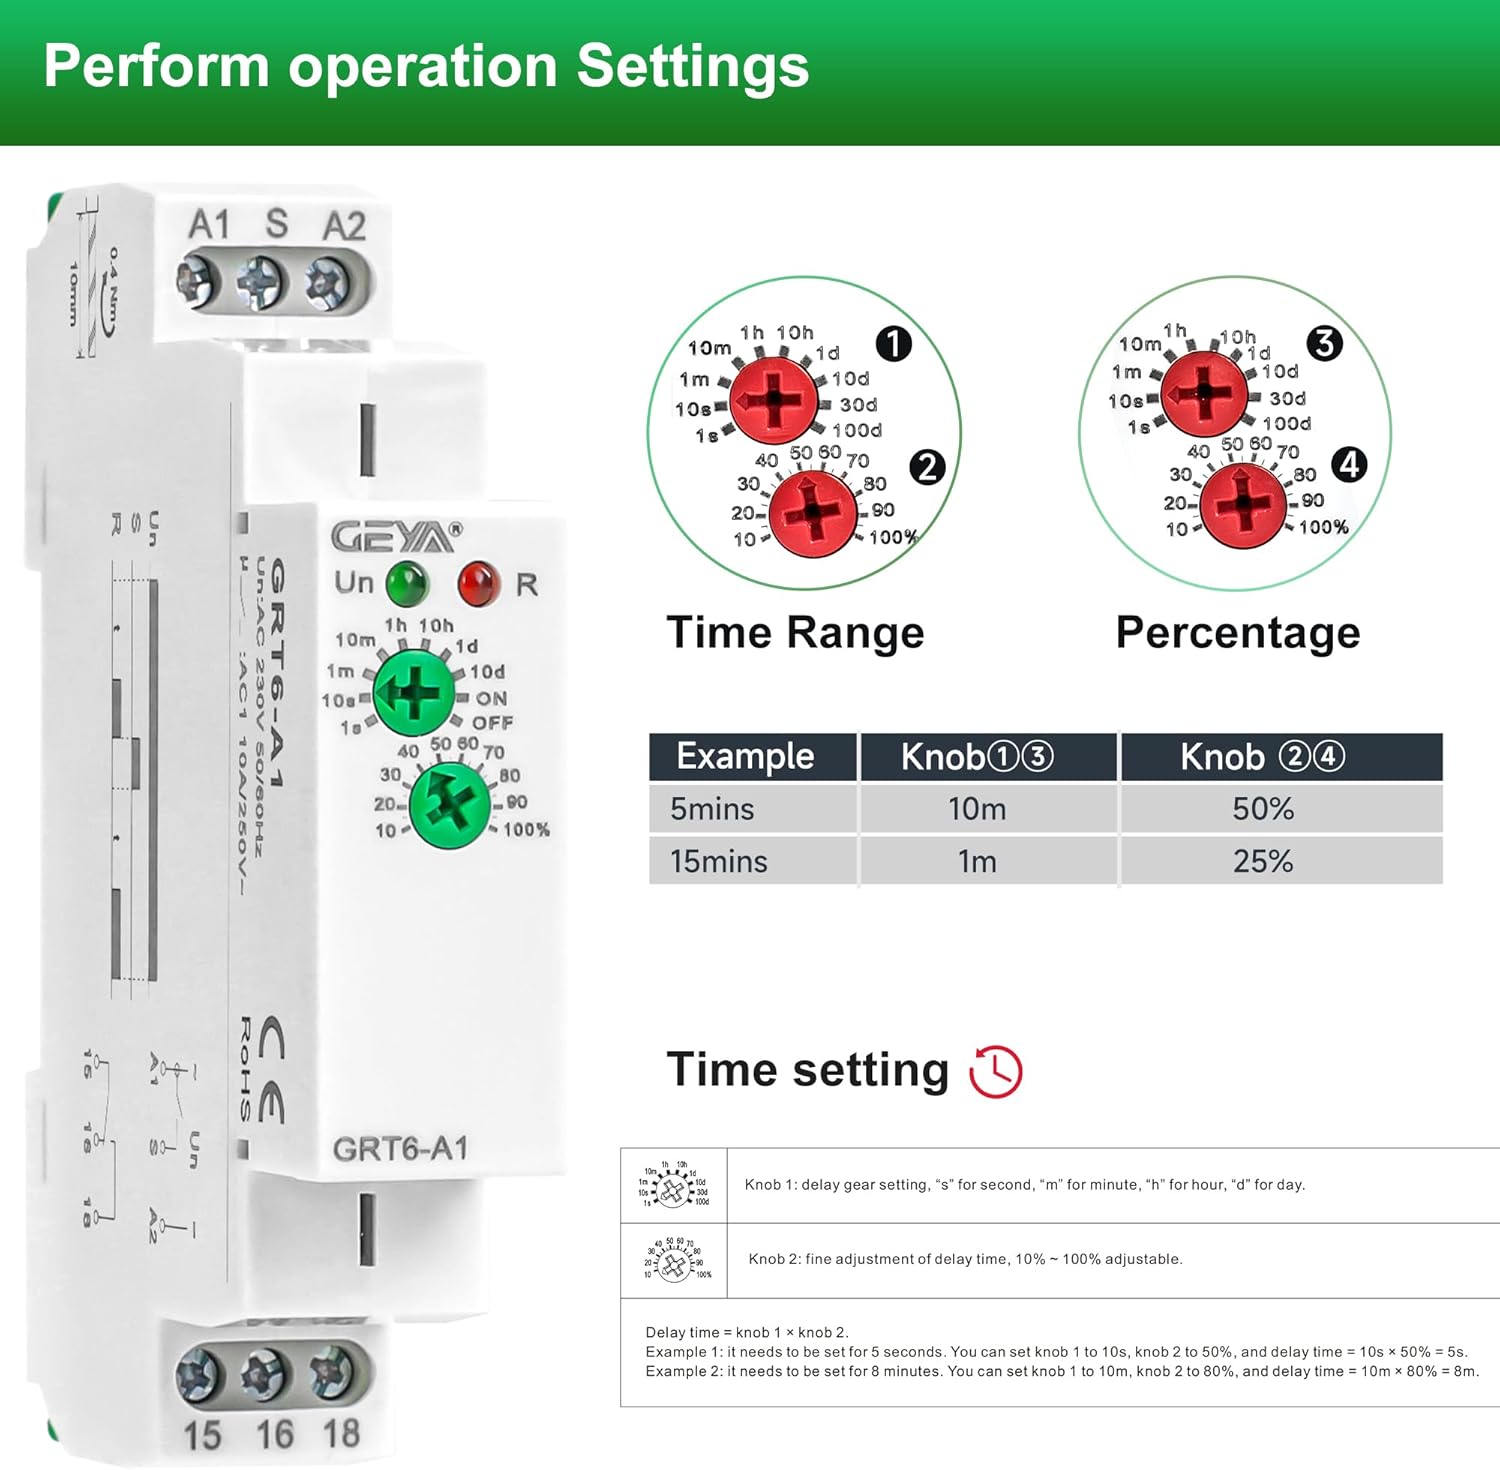
Figure 5: Illustration of the time range and percentage adjustment knobs.

Figure 6: Example demonstrating how to set a specific delay time (e.g., 30 minutes).
Example: Setting a 30-minute delay
- Set Knob 1 (Time Range) to '1h' (1 hour).
- Set Knob 2 (Percentage) to '50%' (50% of 1 hour).
- Resulting Delay: 1 hour * 50% = 30 minutes.
4.3 LED Indicators
- Green LED (Un): Indicates power supply status.
- Red LED (R): Indicates relay output status (ON/OFF).
5. Safety Information
Always adhere to the following safety guidelines during installation and operation:
- Installation and maintenance should only be performed by qualified personnel.
- Disconnect all power sources before working on the device or its connections.
- Ensure proper grounding to prevent electrical shock.
- Do not exceed the specified voltage and current ratings.
- Protect the device from moisture, dust, and extreme temperatures.
- Use appropriate wire gauges for connections to prevent overheating.
- The device housing is made of flame-retardant material for safety.

Figure 7: Key quality details including LED indicators, secure tunnel terminal blocks, and flame-retardant housing.
6. Maintenance
The GEYA GRT6-A1 time relay is designed for long-term, reliable operation with minimal maintenance. Periodically inspect the device and its connections for:
- Loose wiring connections.
- Signs of physical damage or overheating.
- Accumulation of dust or debris, especially around ventilation openings.
Clean the exterior with a dry, soft cloth if necessary. Do not use abrasive cleaners or solvents.
7. Troubleshooting
If the device does not function as expected, consider the following:
- No Power Indication (Green LED Off): Check the power supply voltage and connections to terminals A1 and A2. Ensure the voltage is within the specified AC/DC 24-240V range.
- Relay Not Activating: Verify the time setting (Knob 1 and Knob 2). Ensure the input signal (if used) is correct. Check the load connected to the output contacts (15, 16, 18) for proper wiring and functionality.
- Incorrect Delay Time: Re-check the settings of both time range and percentage knobs. Ensure they are set according to the desired delay calculation.
- Intermittent Operation: Inspect all wiring for loose connections or damaged insulation. Ensure the operating environment is within the specified temperature range (-20°C to +55°C).
If issues persist after basic checks, consult a qualified electrician or contact customer support.
8. Product Applications
The GEYA GRT6-A1 time relay is suitable for a variety of applications requiring precise time-delayed switching, including:
- Industrial automation and control systems.
- Pump decay time control after heating systems are switched off.
- Control of ventilation and cooling fans.
- Lighting control systems.
- Motor start-up delays.
- General electrical timing circuits in home improvement and construction.

Figure 8: Examples of environments where the GRT6-A1 time relay can be utilized.
9. Warranty and Support
For warranty information and customer support, please refer to the documentation provided with your purchase or contact GEYA customer service directly. Keep your purchase receipt as proof of purchase.

