
1. Introduction
This manual provides detailed instructions for the installation, operation, and maintenance of your Real HD 5 Port 10Gb RJ45 Web Managed Ethernet Network Switch. Please read this manual thoroughly before using the device to ensure proper setup and functionality.
2. Product Overview
2.1 Key Features
- 5 x 10 Gigabit RJ45 ports for high-speed network connectivity.
- 100Gbps switching capacity.
- Multi-Gigabit support: Compatible with 5G, 2.5G, 1000M, and 100M devices.
- Web-managed interface for secure setup and configuration.
- Supports VLAN, QoS, security, multicast, MAC address table, and diagnostic functions.
- Sturdy metal casing with built-in fan for efficient cooling.
- Supports both desktop and 19-inch standard rack installations.
2.2 Package Contents
- 1 x Real HD 5 Port 10Gb RJ45 Web Managed Ethernet Network Switch
- 1 x Power Adapter
- 1 x Rack Mount Kit
- 1 x User Manual (this document)
2.3 Physical Description
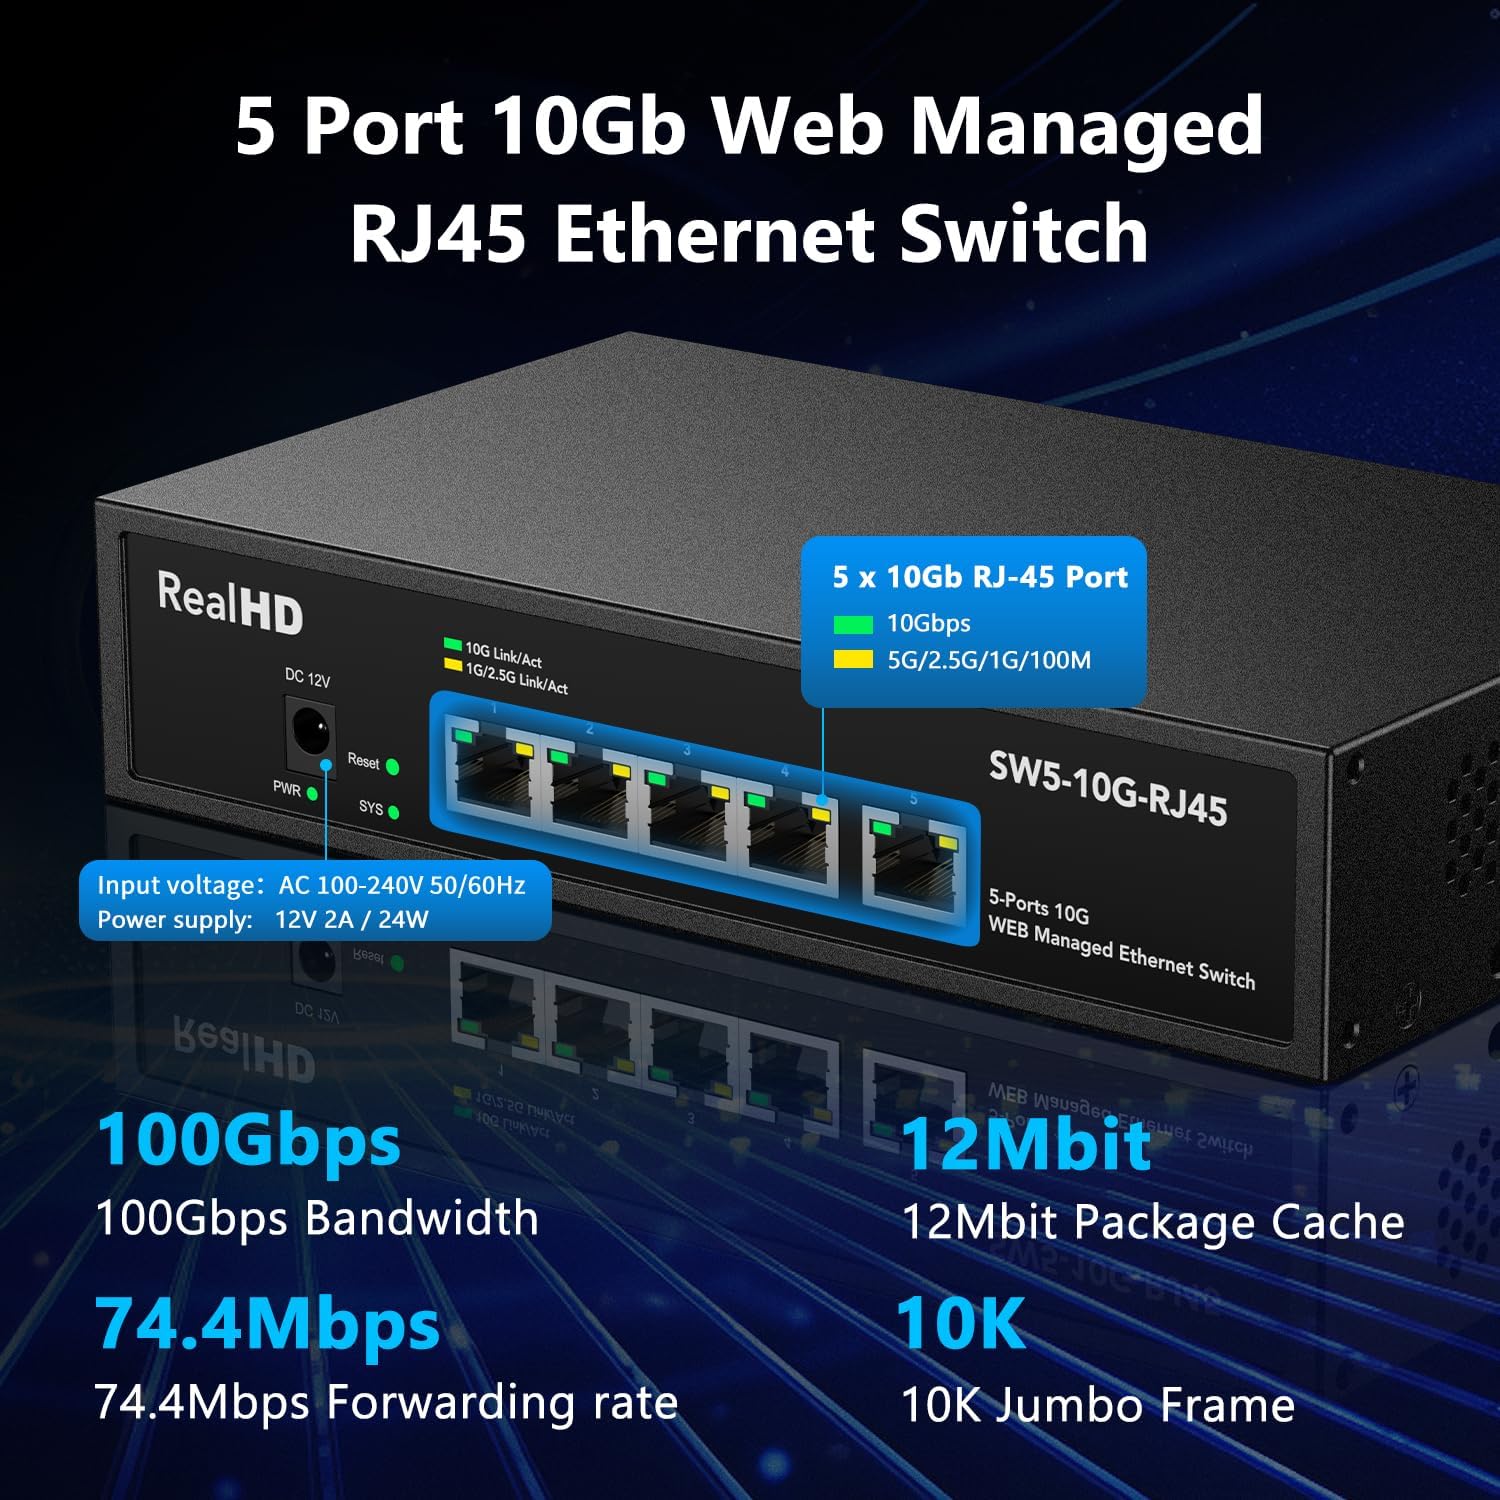
Front view of the Real HD 5 Port 10Gb RJ45 Web Managed Ethernet Network Switch, highlighting the 5 RJ45 ports, power input, reset button, and LED indicators.
The switch features five RJ45 ports on the front panel, each supporting 10Gbps, 5Gbps, 2.5Gbps, 1Gbps, and 100Mbps speeds. LED indicators for each port show link/activity status. A DC 12V power input, a reset button, and system status LEDs (PWR, SYS) are also located on the front panel.
3. Setup
3.1 Step 1: Unpacking
Carefully remove the switch and all accessories from the packaging. Inspect for any signs of damage. If any components are missing or damaged, contact customer support.
3.2 Step 2: Physical Installation
The switch can be installed on a desktop or mounted in a 19-inch rack.
- Desktop Placement: Place the switch on a flat, stable surface, ensuring adequate ventilation around the device.
- Rack Mounting: Attach the included rack mount ears to the sides of the switch using the provided screws. Secure the switch into a standard 19-inch equipment rack.

The switch supports both desktop and 1U rack mounting. Dimensions are provided for proper installation.
3.3 Step 3: Power Connection
Connect the provided power adapter to the DC 12V power input on the switch, then plug the adapter into a standard electrical outlet. The PWR LED will illuminate when the switch receives power.
3.4 Step 4: Network Connection
Connect your network devices (e.g., computers, servers, NAS, Wi-Fi 6 routers) to the RJ45 ports on the switch using Ethernet cables. For optimal 10Gbps network speeds, use CAT6A or higher-level pure copper Ethernet cables.

To achieve 10Gb network speeds, use CAT6A, CAT7, or CAT8 Ethernet cables. The switch is backward compatible with 5G, 2.5G, 1G, and 100M connections.
4. Operating Instructions
4.1 Basic Operation
Once powered on and connected, the switch operates automatically. It detects the speed of connected devices and negotiates the optimal connection speed (10Gbps, 5Gbps, 2.5Gbps, 1Gbps, or 100Mbps) for each port.
4.2 Understanding LED Indicators
- PWR LED: Illuminates green when the switch is powered on.
- SYS LED: Illuminates green when the system is operating normally.
- Port Link/Act LEDs: Each RJ45 port has two LEDs:
- Green LED: Indicates a 10Gbps link/activity.
- Yellow LED: Indicates a 5G/2.5G/1G/100M link/activity.
5. Web Management Interface
5.1 Accessing the Interface
To access the web management interface, connect a computer to any port on the switch. Configure your computer's IP address to be on the same subnet as the switch's default IP address (e.g., if the switch is 192.168.2.1, set your computer to 192.168.2.X, where X is not 1).
- Open a web browser.
- Enter the default IP address of the switch: 192.168.2.1
- At the login prompt, enter the default credentials:
- Username: admin
- Password: admin

The web management interface login screen, accessible via the default IP address.
5.2 Key Configuration Options
The web interface allows you to configure and monitor various network settings, including:
- VLAN: Create Virtual Local Area Networks for network segmentation and security.
- QoS (Quality of Service): Prioritize network traffic for critical applications.
- Security: Configure access control and other security features.
- Multicast: Manage multicast traffic, such as IGMP snooping.
- MAC Address Table: View and manage MAC address entries.
- Diagnosis: Access tools for network troubleshooting.
5.3 Saving Configuration
After making any changes in the web management interface, it is crucial to save your configuration to ensure it persists after a reboot. Look for a "Save" or "Apply" option within the interface, typically located in the top right corner or at the bottom of configuration pages. You may need to save changes twice: once for the current session and again to write them to non-volatile memory.
6. Maintenance
6.1 General Care
- Keep the switch in a cool, dry environment, away from direct sunlight and heat sources.
- Ensure proper ventilation to prevent overheating.
- Clean the exterior with a soft, dry cloth. Do not use liquid or aerosol cleaners.
6.2 Cooling System
The switch includes a built-in fan for active cooling. Ensure that the fan vents are not obstructed to maintain optimal operating temperature and device longevity.
7. Troubleshooting
7.1 Common Issues and Solutions
- No Power: Ensure the power adapter is securely connected to both the switch and a working electrical outlet. Check the PWR LED.
- No Network Connection:
- Verify that Ethernet cables are securely connected to both the switch and the network device.
- Check the Port Link/Act LEDs. If they are off, try a different cable or port.
- Ensure the connected device is powered on and functioning correctly.
- Slow Network Speeds:
- Confirm that you are using CAT6A or higher-level Ethernet cables for 10Gbps connections.
- Check the Port Link/Act LEDs to ensure the desired speed (green for 10Gbps) is indicated.
- Ensure all connected devices support 10Gbps for end-to-end high-speed performance.
- Cannot Access Web Management Interface:
- Verify your computer's IP address is on the same subnet as the switch's default IP (192.168.2.1).
- Ensure you are using the correct default username (admin) and password (admin).
- If the IP address was changed and forgotten, a factory reset may be required (refer to the reset button on the front panel).
8. Specifications
8.1 Technical Specifications
| Feature | Description |
|---|---|
| Brand | Real HD |
| Model Number | SW5-10G-RJ45 |
| Number of Ports | 5 |
| Interface | RJ45 |
| Data Transfer Rate | 100 Gigabits per second (total switching capacity) |
| Port Speed Support | 10Gbps, 5Gbps, 2.5Gbps, 1Gbps, 100Mbps |
| Switch Type | Managed |
| Casing | Metal |
| Cooling | Built-in Fan |
| Installation | Desktop, 19-inch Rack Mount |
| Item Weight | 1.21 kg |
| Included Components | 1 x 5 Port 10Gb Switch |
9. Warranty and Support
9.1 Warranty Information
This product comes with a 1-Year Warranty from the date of purchase. Please retain your proof of purchase for warranty claims. The warranty covers manufacturing defects and malfunctions under normal use.
9.2 Technical Support
For technical assistance, please contact Real HD customer support. Support hours are typically 9 AM - 5 PM CST. Contact information can usually be found on the product packaging or the Real HD official website.
