1. Introduction
This manual provides essential information for the proper installation, operation, and maintenance of your CUIPPWRJ Taker F722 F7 Flight Controller and 60A 4-in-1 ESC Stack. This high-performance stack is designed for RC drone racing applications, offering robust control and power delivery for 3-6S LiPo setups. Please read this manual thoroughly before use to ensure optimal performance and safety.
2. Package Contents
Verify that all items listed below are present in your package:
- 1 x F722 HD V2 Flight Controller
- 1 x TAKER H60_BLS 60A 4IN1 ESC
- 1 x Capacitor
- 1 x Adapter Compatible with Air Unit
- 1 x Adapter Compatible with Flight Controller
- 1 x XT60 Power Connector
- 4 x M3*30 Screws
- 4 x M3*25 Screws
- 8 x Nylon Nuts
- 8 x Grommets
- 2 x sh1.0 4pin Cables
- 1 x Camera Connection Cable
3. Specifications
F722 HD V2 Flight Controller
- MCU: STM32F722
- IMU: ICM42688-P (SPI)
- Air Unit Connection: Direct plug-in
- Black Box: 16M onboard
- USB Interface: Type-C
- OSD: BetaFlight OSD with AT7456E chip
- BEC: 5V@3A, 9V@2.5A dual BEC
- Firmware Target: GEPRCF722
- Size: 36.85 × 36.85 mm
- Mounting Hole: 30.5 × 30.5 mm
- Input Voltage: 3-6S LiPo
- UART: 5
- Weight: 8.1g
TAKER H60_BLS 60A 4IN1 ESC
- Input Voltage: 3-6S LiPo
- Continuous Current: 60A
- Burst Current: 65A (5 seconds)
- Support Protocol: Dshot 150/300/600
- Size: 42 × 45.7 mm
- Weight: 14.9g
4. Setup and Installation
Careful installation is crucial for the performance and longevity of your flight controller and ESC stack. Always ensure power is disconnected before making any connections.
4.1 Physical Installation
Mount the flight controller and ESC stack onto your drone frame using the provided M3 screws and grommets. Ensure proper orientation as indicated by the arrow on the flight controller board. The grommets help to isolate vibrations from the frame, which is important for flight performance.
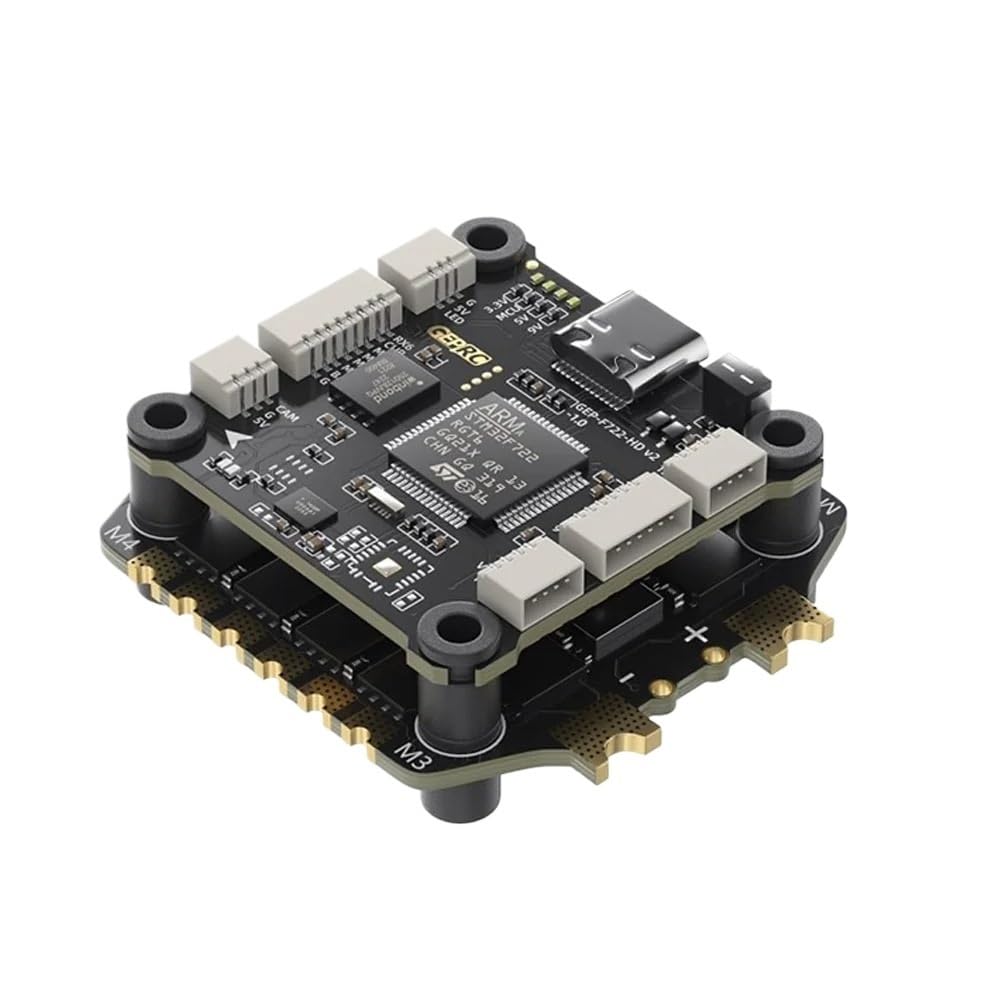
Image 1: CUIPPWRJ Taker F722 F7 Flight Controller and 60A ESC Stack. This image shows the assembled flight controller and ESC, highlighting the compact design and various connection points for motors, power, and peripherals.
4.2 Wiring Connections
Connect your motors to the ESC pads, ensuring correct motor order and rotation direction. Connect the main battery lead (XT60) to the ESC. Connect your receiver, FPV camera, VTX (video transmitter), and GPS (if applicable) to the appropriate UARTs and pads on the F722 Flight Controller. Refer to the detailed wiring diagram provided by the manufacturer for specific pinouts. The flight controller supports direct plug-in for compatible Air Units.
4.3 Firmware Flashing and Configuration
The flight controller comes pre-flashed with BetaFlight firmware. Connect the flight controller to your computer via the USB Type-C port. Use the BetaFlight Configurator software to update the firmware to the latest version (target: GEPRCF722) and configure all settings, including PID tuning, OSD elements, receiver protocols, and motor directions. Ensure all settings are correctly applied before attempting flight.
5. Operating Guidelines
Once installed and configured, the flight controller and ESC stack are ready for operation. Always perform pre-flight checks to ensure all components are functioning correctly and securely mounted.
- Power On: Connect the LiPo battery to the XT60 connector. The flight controller will initialize, indicated by LED lights.
- Arming: Arm the drone using your configured switch on the radio transmitter. Ensure propellers are clear before arming.
- Flight: Operate the drone using your radio transmitter. The F722 flight controller processes sensor data and pilot inputs to control the ESCs, which in turn drive the motors.
- Disarming: Disarm the drone after landing or in an emergency.
6. Maintenance
Regular maintenance helps prolong the life of your components and ensures safe operation.
- Inspection: Periodically inspect all solder joints and wire connections for damage or looseness.
- Cleaning: Keep the flight controller and ESC free from dust, dirt, and moisture. Use compressed air or a soft brush for cleaning.
- Firmware Updates: Regularly check for and apply the latest BetaFlight firmware updates to benefit from performance improvements and bug fixes.
- Component Check: Ensure all mounting hardware (screws, grommets) remains secure.
7. Troubleshooting
This section addresses common issues you might encounter.
- No Power: Check battery connection, XT60 connector, and main power leads for continuity. Ensure the battery is charged.
- Motors Not Spinning: Verify ESC calibration in BetaFlight. Check motor wiring and ensure Dshot protocol is correctly configured. Confirm the drone is armed.
- Flight Controller Not Connecting to PC: Ensure correct USB cable is used (data capable). Try a different USB port. Install necessary drivers (e.g., STM32 Virtual COM Port Driver, Zadig for DFU mode).
- Unstable Flight: Recheck PID tuning in BetaFlight. Inspect for loose components or excessive vibrations. Ensure propellers are balanced and undamaged.
- OSD Not Displaying: Verify OSD settings in BetaFlight. Check camera and VTX connections.
For more detailed troubleshooting, consult the BetaFlight documentation or online community forums.
8. Warranty and Support
This product is covered by a limited manufacturer's warranty against defects in materials and workmanship. Please retain your proof of purchase for warranty claims. For technical support, troubleshooting assistance, or warranty inquiries, please contact the CUIPPWRJ customer service department through your retailer or the official CUIPPWRJ website. Do not attempt to repair the unit yourself, as this may void the warranty.


