1. Introduction
This manual provides detailed instructions for the safe and efficient operation, setup, maintenance, and troubleshooting of your Furvveerr A3 L805 Multifunction DTF & DTG Printer. Please read this manual thoroughly before using the printer to ensure optimal performance and longevity of the device.
2. Safety Information
Always observe the following safety precautions:
- Ensure the printer is placed on a stable, level surface.
- Connect the printer to a grounded power outlet with the correct voltage.
- Do not expose the printer to direct sunlight, high temperatures, or excessive humidity.
- Keep ink and cleaning solutions out of reach of children and pets.
- Wear appropriate personal protective equipment (PPE) such as gloves and eye protection when handling inks.
- Never attempt to disassemble or repair the printer yourself. Contact qualified service personnel.
- Use only recommended inks and consumables to prevent damage and ensure print quality.
3. Package Contents
Verify that all items listed below are included in your package. If any items are missing or damaged, please contact your supplier.

The Furvveerr A3 L805 Multifunction DTF & DTG Printer, highlighting its control panel and vacuum suction platform.
- 1x A3 DTG Printer
- 1x A3 size clothes hanger
- 6 Ink Bottles (Note: Inks are not included and must be purchased separately)
- 1x Software (USB Manual included)
- 1x Ink Syringe
- 2x Ink Sack
- 1x White Ink Stir
- Power Cable

Visual representation of the package contents, including the printer, clothing holder, empty ink bottles, and various accessories.
4. Product Overview and Features
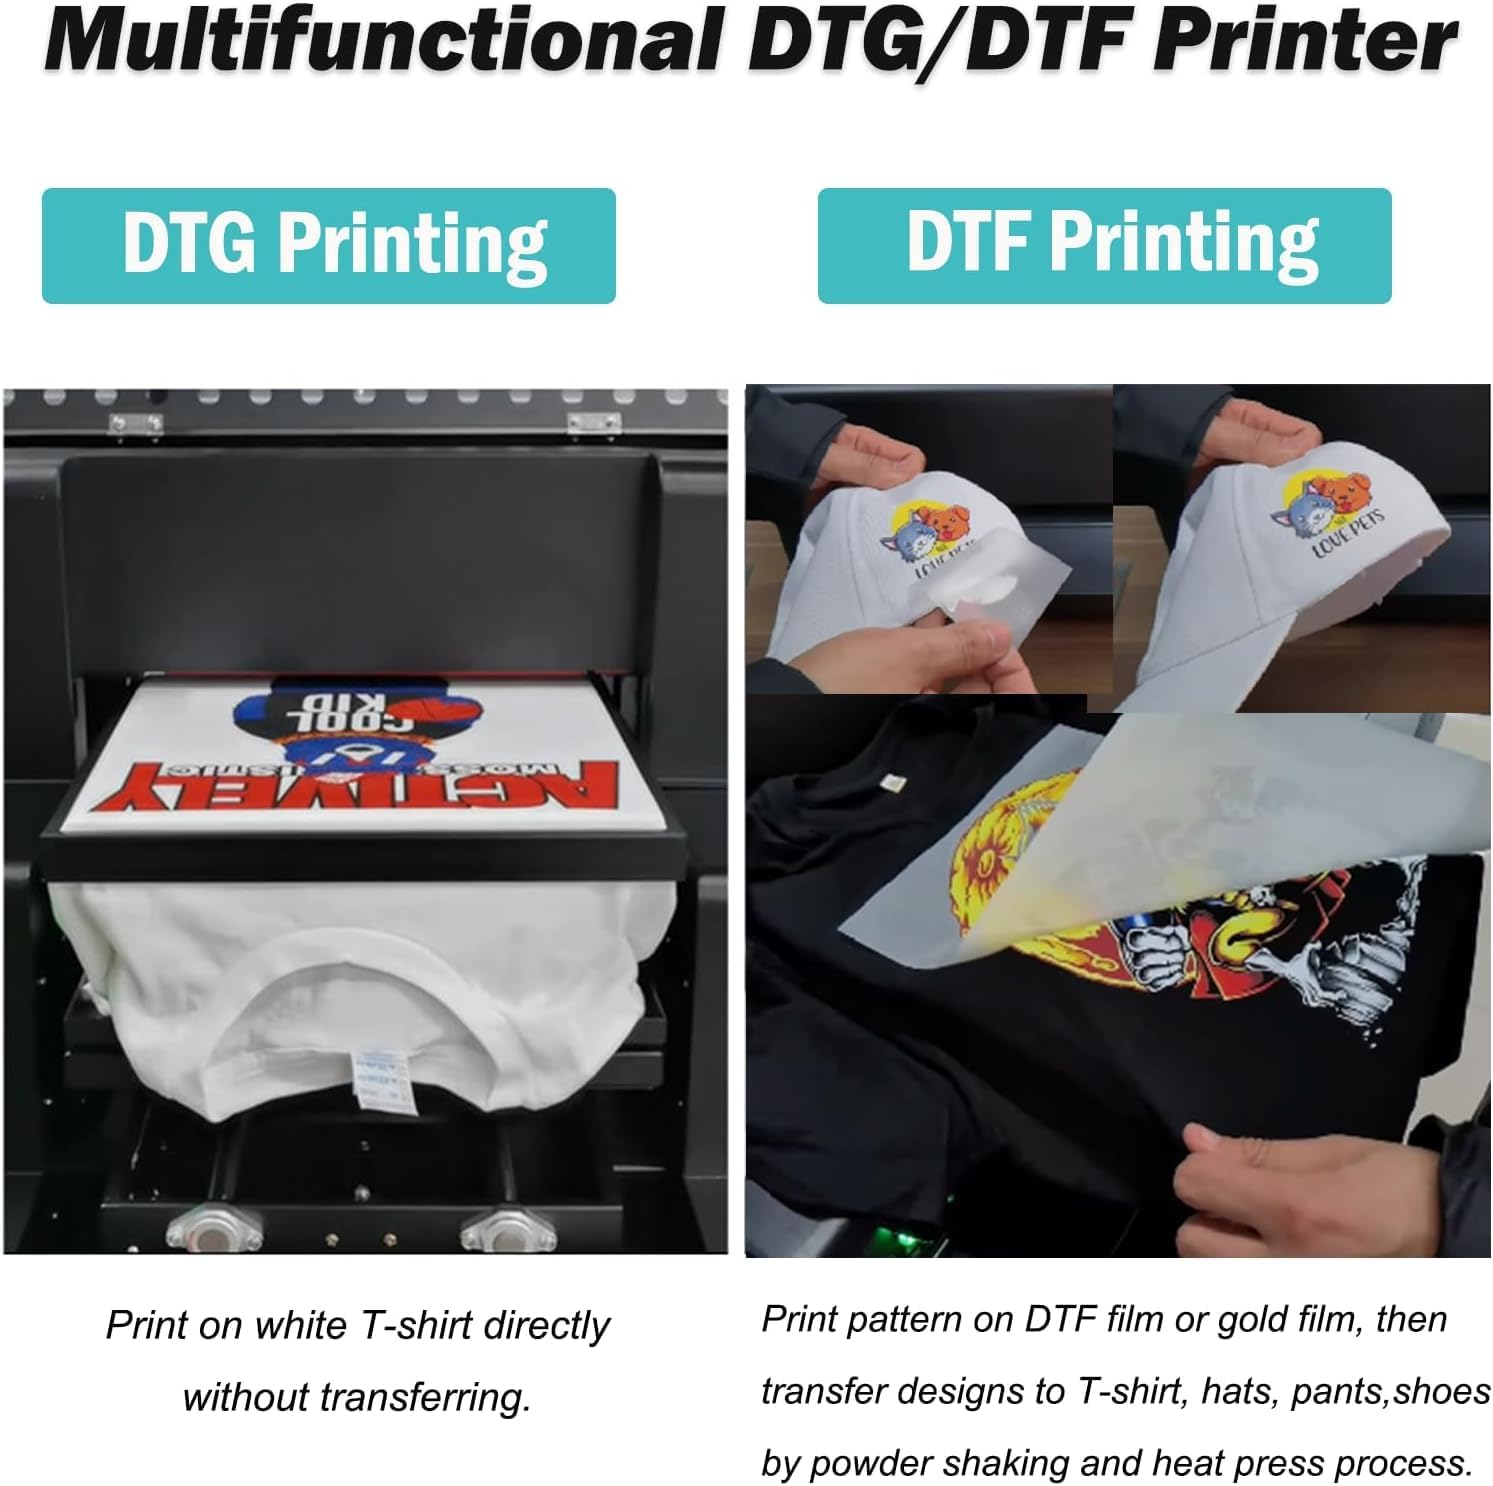
The Furvveerr A3 L805 is a versatile multifunction printer capable of both Direct-to-Film (DTF) and Direct-to-Garment (DTG) printing, offering high-resolution output for various fabric types.
4.1 DTF Printing Capability
DTF printing involves printing a design onto a special film, applying adhesive powder, and then heat-pressing the design from the film onto the target fabric. This method is suitable for most fabrics and colors, offering flexibility in material choice.
4.2 DTG Printing Capability
DTG printing allows for direct application of ink onto garments. This method is primarily suitable for cotton materials. For DTG printing, only DuPont DTG ink is recommended. DTF ink can be used directly on white garments in DTG mode; for other colors, the DTF process is advised.
4.3 High Precision L1805 Printhead
The printer is equipped with an EPSON L1805 6-color printhead (CMYK LC LM or CMYK+2W), providing a high resolution of 2880x1440dpi. This ensures vibrant colors, sharp details, and excellent saturation with a fast print speed of approximately 178 seconds in photo mode.
The advanced EPSON L805 printhead, capable of 1440x1440 DPI resolution and CMYK+2W 6-color printing for vivid and wear-resistant results.
4.4 White Ink Circulation System
An integrated white ink blending system and automatic cleaning function prevent clogging and protect the printhead, ensuring consistent performance and reducing maintenance efforts.
4.5 Vacuum Platform
The A3 DTG Printer features a built-in vacuum suction platform that securely holds printing materials, such as DTF printing film and bronzing paper, during the printing process. This prevents movement and misalignment, ensuring precise and reliable results.
4.6 Control Panel
The control panel includes an emergency stop switch, main light, multifunctional button, ink button, delete button, in and out/stop button, manual control, automatic stop, and paper button for intuitive operation.

Detailed view of the printer's control panel, indicating the emergency stop switch, ink tank, and various operational buttons.
5. Setup Instructions
5.1 Unboxing and Placement
- Carefully remove the printer and all accessories from the packaging.
- Place the printer on a sturdy, level surface in a well-ventilated area, away from direct sunlight and heat sources.
- Ensure adequate space around the printer for operation and maintenance.
5.2 Ink Installation
- Open the ink tank covers.
- Fill each ink tank with the corresponding color of DTF or DTG ink (CMYK, LC, LM, W). Refer to the ink bottle labels for correct placement.
- Close the ink tank covers securely.
- Perform an initial ink prime cycle as per the software instructions to ensure ink flows to the printhead.
5.3 Software and Driver Installation
- Insert the provided USB drive containing the software and drivers into your computer.
- Follow the on-screen instructions to install the printer drivers and AcroRIP White ver10.3 software.
- Restart your computer after installation is complete.
5.4 Connecting the Printer
- Connect the printer to your computer using the provided USB 2.0 cable.
- Plug the power cable into the printer and then into a grounded electrical outlet.
- Turn on the printer using the main power switch.
6. Operating Instructions
6.1 DTF Printing Process
The DTF printing process involves several steps to transfer your design onto fabric:
- Print on PET Film: Load the DTF film onto the vacuum platform. Use the printer software to print your design onto the PET film.
- Dusting Powder: Immediately after printing, evenly apply DTF adhesive powder over the wet ink on the film. Shake off any excess powder.
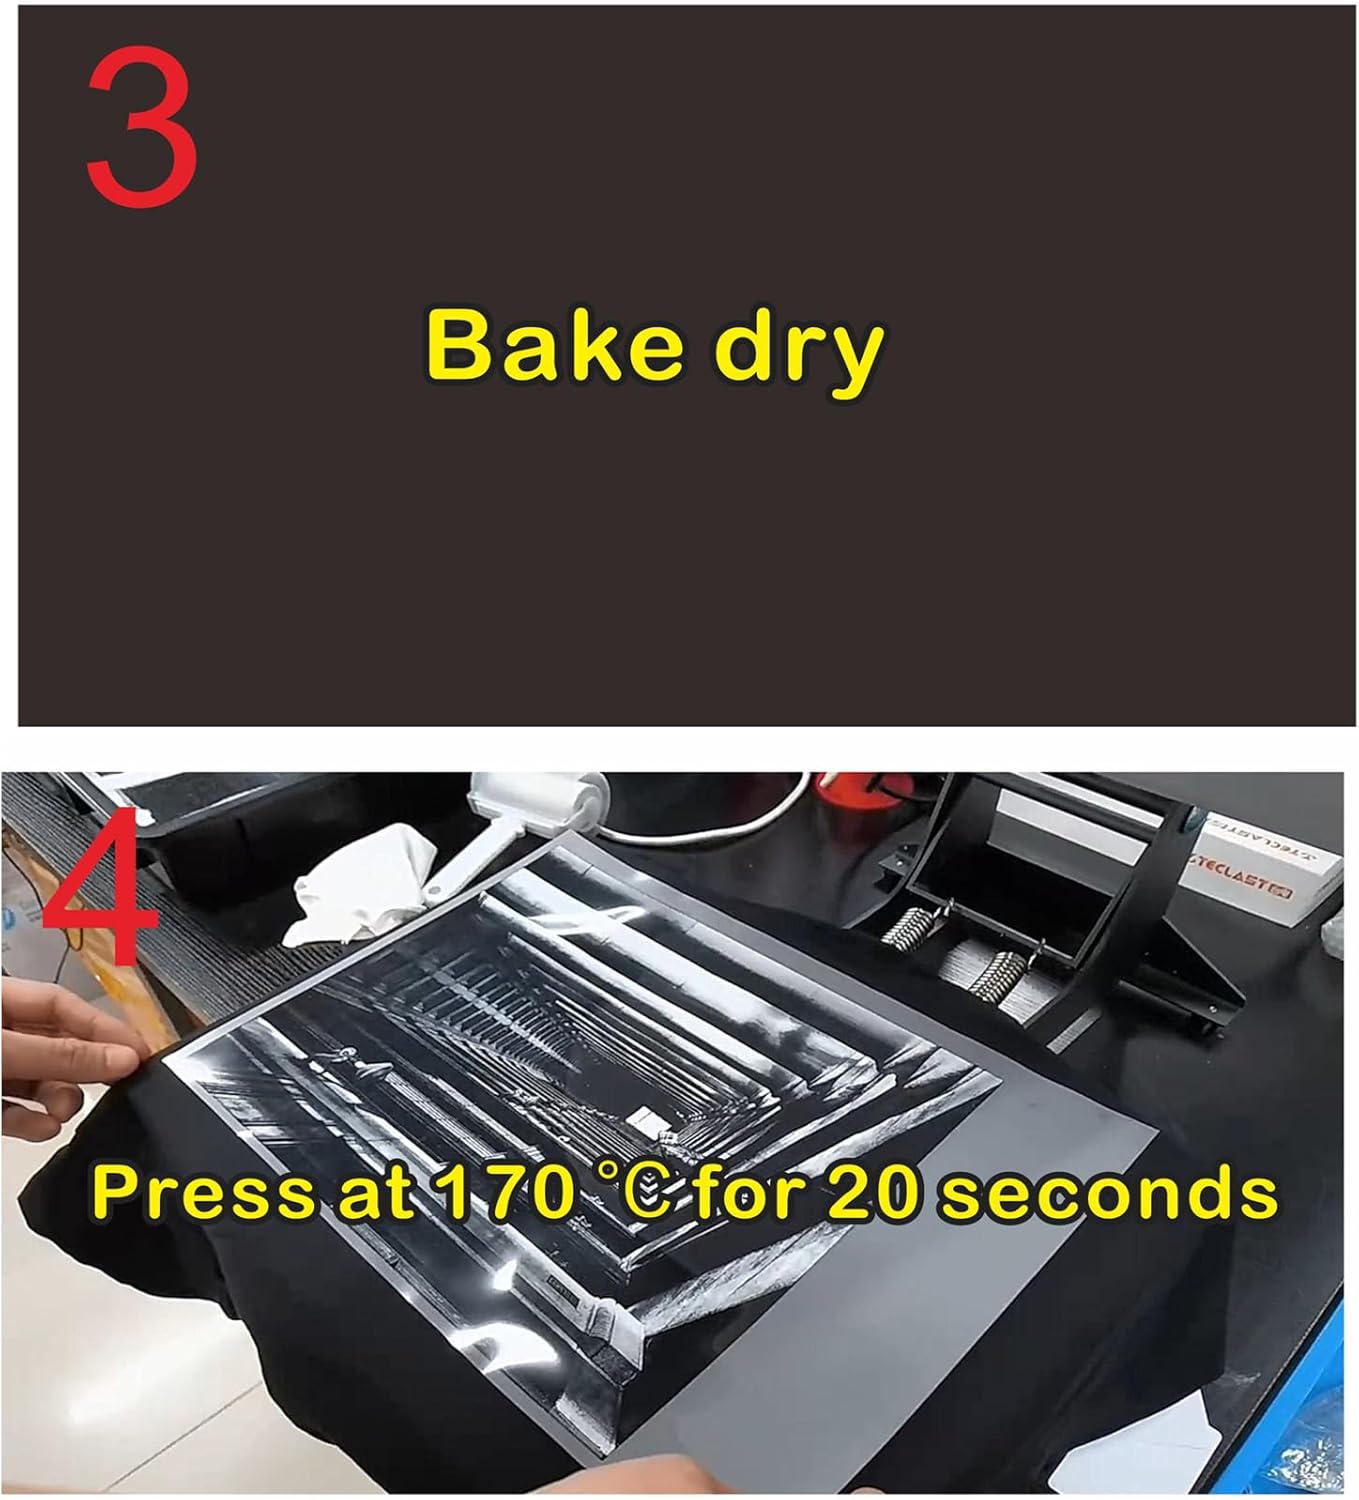
- Bake Dry: Cure the powdered film using a DTF oven or heat press. Follow the recommended temperature and time for your specific powder.
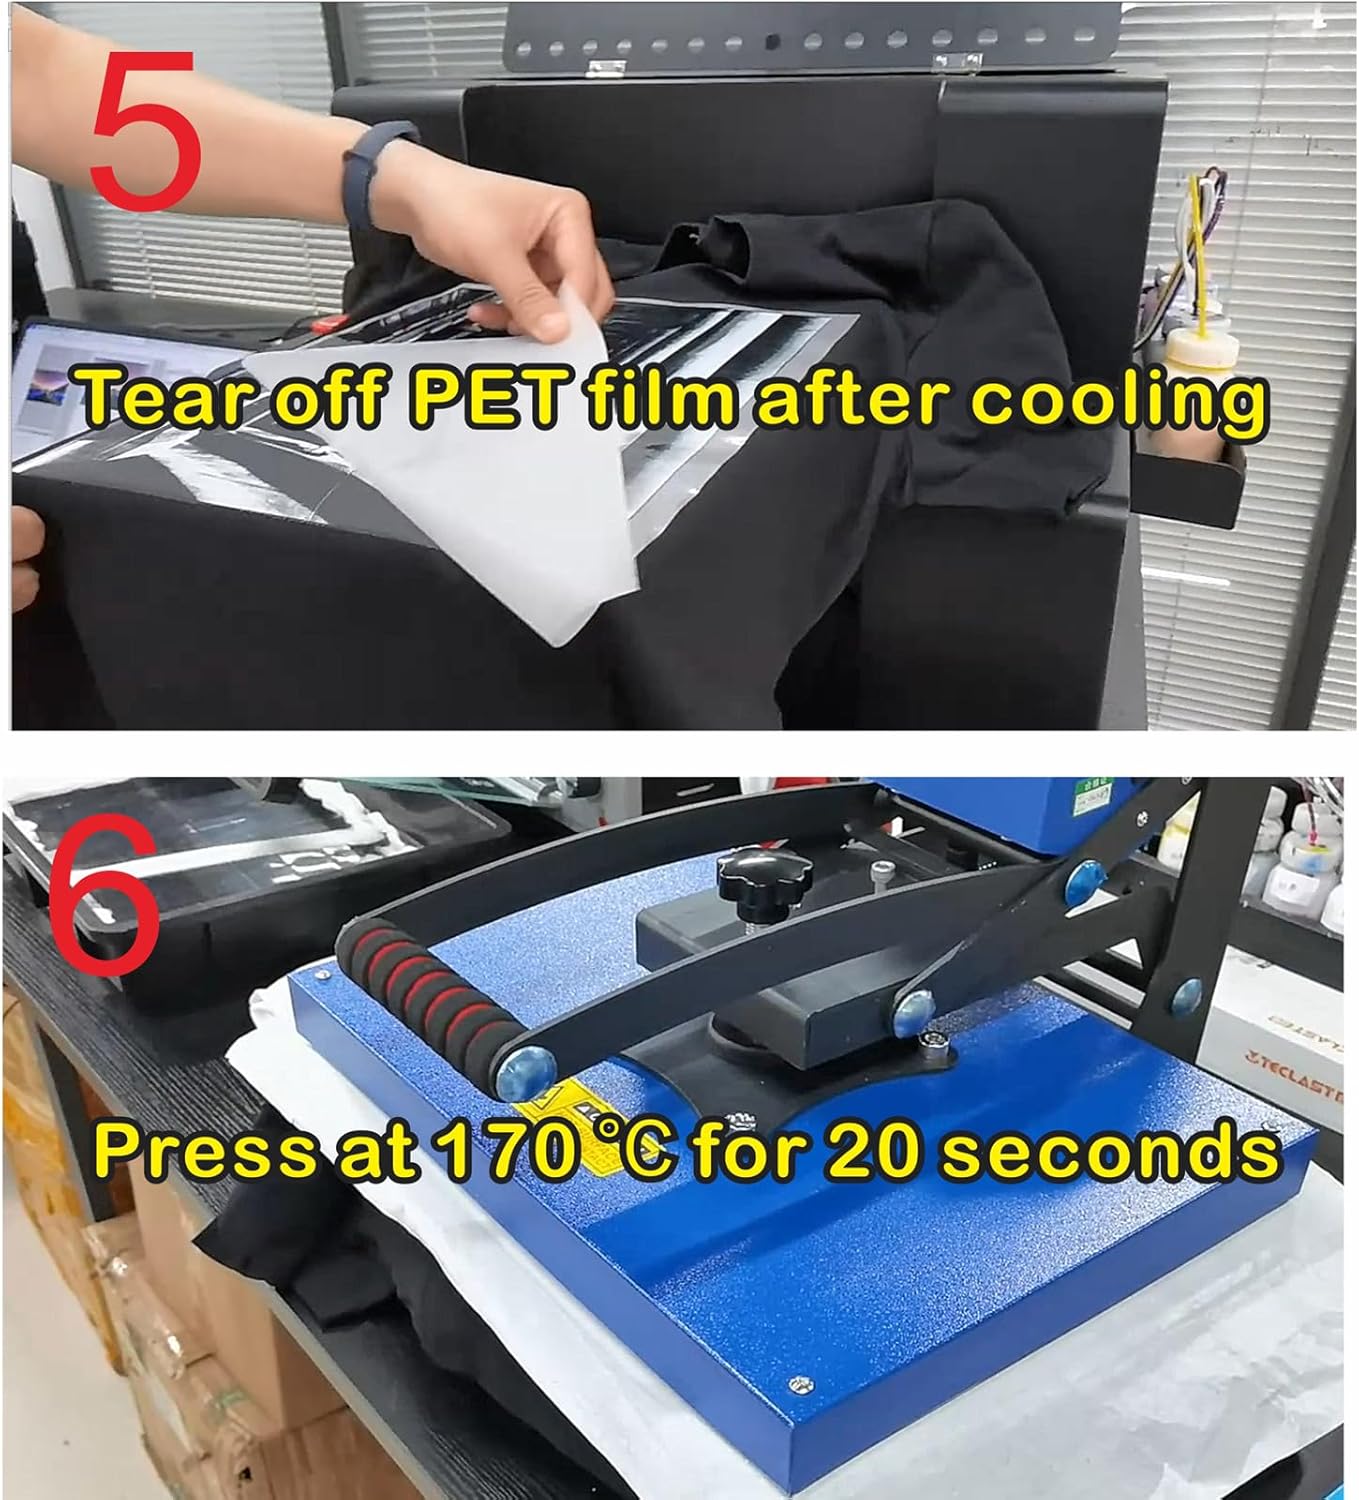
- First Press: Place the cured film onto the garment. Press at 170°C (338°F) for 20 seconds using a heat press.
- Peel Film: Allow the garment and film to cool completely. Carefully peel off the PET film.
- Second Press: For enhanced durability and finish, place a parchment paper or Teflon sheet over the design and press again at 170°C (338°F) for 20 seconds.
Step 1: Printing the design onto the PET film using the DTF printer.

Step 2: Applying adhesive powder to the wet ink on the DTF film.
Steps 4-6: Heat pressing the design onto the garment, peeling the film, and a final press for durability.
6.2 DTG Printing Process
For DTG printing, prepare your cotton garment and follow these steps:
- Pre-treatment (if necessary): For dark or colored cotton garments, apply a DTG pre-treatment solution and cure it according to the manufacturer's instructions. This is not typically needed for white cotton.
- Load Garment: Securely place the garment on the A3 size clothes hanger or directly on the vacuum platform.
- Print Directly: Use the printer software to send your design directly to the printer. The printer will apply the DTG ink onto the garment.
- Cure Ink: After printing, cure the ink on the garment using a heat press or conveyor dryer according to the ink manufacturer's specifications to ensure color fastness and durability.

The DTG printer in action, directly applying ink to a white t-shirt.
7. Maintenance
Regular maintenance is crucial for the longevity and optimal performance of your printer.
7.1 White Ink Circulation System
The printer features an automatic white ink circulation and blending system. Ensure this system is always active when the printer is on to prevent white ink pigment from settling and clogging the printhead. Perform manual cleaning cycles as recommended by the software or if print quality degrades.
7.2 Printhead Cleaning
If you notice streaking, missing lines, or poor color reproduction, perform a printhead cleaning cycle through the printer software. If issues persist, a more intensive cleaning might be required (refer to the USB Manual for advanced procedures).
7.3 General Cleaning
- Regularly wipe down the exterior of the printer with a soft, damp, lint-free cloth.
- Clean the vacuum platform to ensure proper suction and prevent debris from affecting print quality.
- Inspect ink tubes and connections for any leaks or blockages.
8. Troubleshooting
This section addresses common issues you might encounter. For more detailed troubleshooting, refer to the USB Manual provided with your printer.
| Problem | Possible Cause | Solution |
|---|---|---|
| Printer not powering on | Power cable disconnected; power outlet fault | Check power cable connection; try a different outlet. |
| Poor print quality (streaks, faded colors) | Clogged printhead; low ink levels; incorrect print settings | Perform printhead cleaning; refill ink tanks; verify print settings in software. |
| White ink clogging | White ink not circulated; printer idle for too long | Ensure white ink circulation system is active; perform daily printhead checks or small prints. |
| Printer not recognized by computer | USB cable issue; driver not installed correctly | Try a different USB port/cable; reinstall printer drivers. |
| Film/garment not held securely | Vacuum platform blocked; vacuum pump issue | Clean vacuum platform holes; check vacuum pump connection. |
9. Specifications
Detailed technical specifications for the Furvveerr A3 L805 Multifunction DTF & DTG Printer:
| Feature | Specification |
|---|---|
| Model Name | ZM-A3 flatbed printer |
| Brand | Furvveerr |
| Printing Technology | Inkjet |
| Print Media | Fabric |
| Max Input Sheet Capacity | 2 |
| Compatible Devices | Printer |
| Maximum Color Print Resolution | 1440 dpi |
| Maximum Black and White Print Resolution | 1440 dpi |
| Sheet Size | 297 millimeters |
| Dual-sided printing | No (Simplex) |
| Hardware Interface | USB 2.0 |
| Ink Color Configuration | CMYK, LC, LM, W |
| Printer Ink Type | Pigment-based |
| Supported Media Sizes | A3 |
| Maximum Media Size | Width 297mm * Length 420mm |
| Product Dimensions | 29.92 x 24.8 x 20.08 inches (760mm x 630mm x 510mm) |
| Max Print Speed Monochrome | 0.34 ppm (Photo mode: approx. 178 seconds) |
| Special Feature | Clog-Free, Refillable Ink Tank |
| Manufacturer | Wuhan ZMINKJET technology co. LTD |
10. Video Demonstrations
Watch these videos for visual guidance on various aspects of the printer's operation and capabilities.
Video 1: General overview and demonstration of the printer's functions.
Video 2: Demonstration of a specific printing process or feature.
Video 3: Further insights into the printer's capabilities.
Video 4: Operational guide or feature highlight.
Video 5: Advanced usage or maintenance tips.
Video 6: Practical application examples.
Video 7: Quick guide or tip for efficient printing.
11. Warranty and Support
11.1 Warranty Information
This product comes with a limited warranty. Please refer to the warranty card included in your package or contact the manufacturer/seller for specific terms and conditions regarding coverage, duration, and claims process.
11.2 Customer Support
For technical assistance, troubleshooting beyond this manual, or warranty claims, please contact Furvveerr customer support through the retailer where the product was purchased or refer to the contact information provided in your product documentation.


