
Dragonhawk L3 Tattoo Pen with 2 Batteries
Dragonhawk L3 Cordless/Cord Tattoo Gun Rotary Pen Machine User Manual
Model: L3 Tattoo Pen with 2 Batteries
1. Product Overview
The Dragonhawk L3 is a versatile cordless/cord rotary tattoo pen machine designed for professional artists. It features a powerful Mcore-L motor, a smart display, and comes with two power supply batteries. Its adjustable stroke length and universal cartridge compatibility make it suitable for various tattooing styles and techniques.

Image 1.1: The Dragonhawk L3 tattoo machine shown with its main body and two detachable battery packs, highlighting its compact and modular design.
2. Key Features
- Versatile 7 Stroke Options: Easily adjust stroke lengths to 2.4mm, 2.7mm, 3.0mm, 3.3mm, 3.6mm, 3.9mm, or 4.2mm using the adjustment knob. This allows for diverse tattooing applications.
- Professional Precision: The machine supports a needle length range of 0-4.5mm, ensuring accuracy for lining, shading, and blending. Its cordless operation provides enhanced freedom and control.
- Powerful Mcore Motor: Equipped with a robust Mcore motor, the L3 delivers consistent power and durability, facilitating smooth operation for demanding tasks like lining and color packing.
- Advanced Direct Drive System: Experience smooth, precise, and quiet operation with stable voltage and low noise, contributing to a comfortable tattooing experience.
- Universal Compatibility: The Dragonhawk L3 is designed to work with all standard cartridge needles, offering flexibility in needle selection.
- Smart Display: An integrated display provides real-time information on battery level, voltage, and timing.
3. Components and Controls
Familiarize yourself with the main components and controls of your Dragonhawk L3 machine.
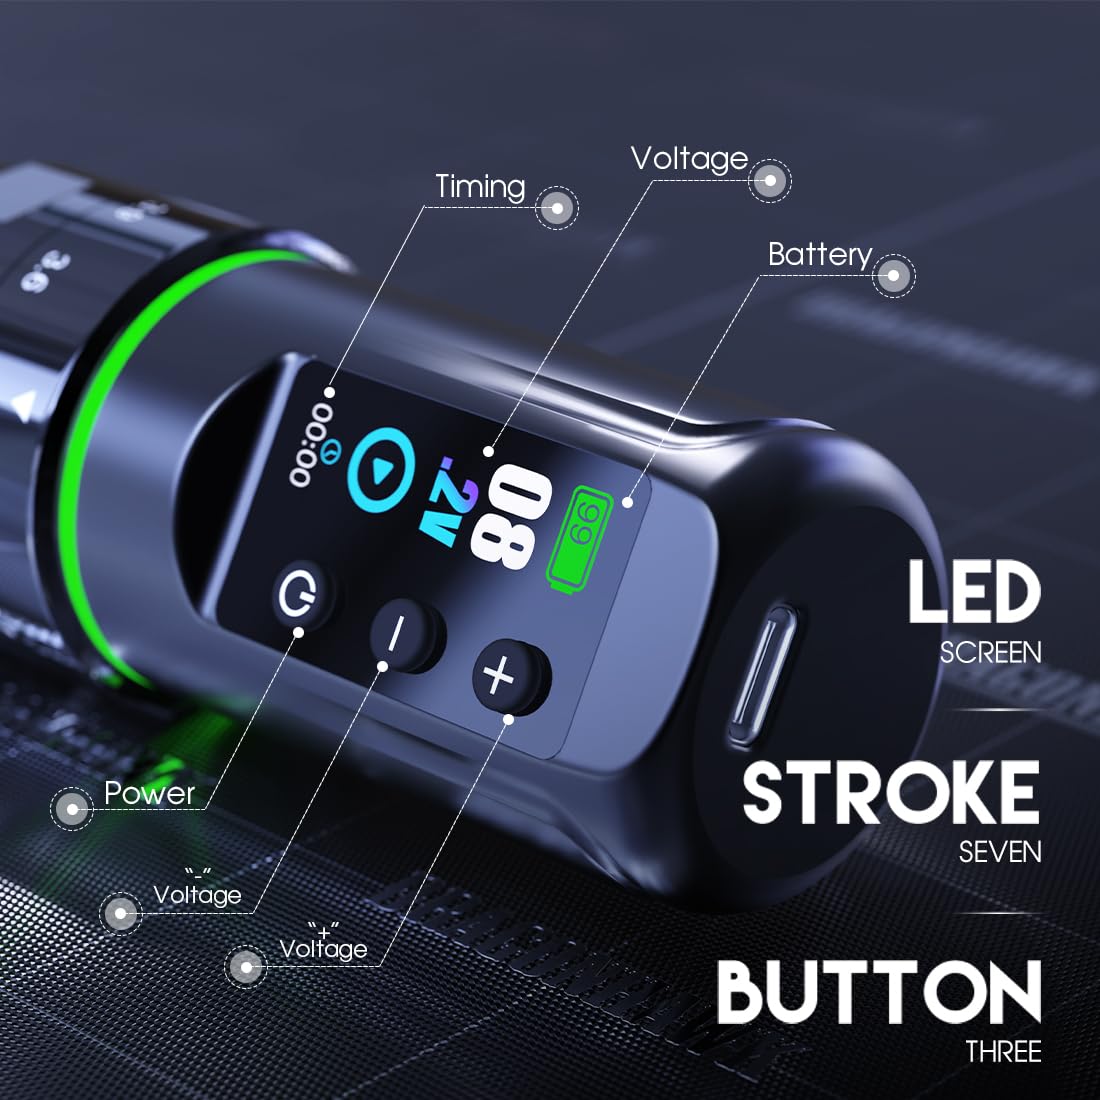
Image 3.1: Detailed view of the L3's smart display and control buttons. The display shows battery percentage, current voltage, and a timer.
3.1. Main Components
- Machine Body: The main housing of the tattoo pen.
- Detachable Battery Pack: Provides power for cordless operation. The L3 comes with two battery packs.
- Smart Display: Shows battery level, voltage, and operation time.
- Control Buttons: Power button, Voltage Up (+), Voltage Down (-).
- Stroke Adjustment Knob: Located on the machine body, used to select stroke length.
- Needle Cartridge Port: Where standard cartridge needles are inserted.
- Type-C Charging Port: For recharging the battery packs.
4. Setup
4.1. Charging the Battery
Before first use, fully charge both battery packs. Connect the provided Type-C charging cable to the charging port on the battery pack and plug the other end into a compatible USB power adapter (not included). The display will indicate charging status. A full charge typically takes approximately 2 hours and provides 5-7 hours of working time.

Image 4.1: Illustration of the battery pack with its internal components visible, indicating the 2000mAh capacity and the estimated charging and working times.
4.2. Attaching the Battery Pack
To attach a battery pack, align the connection points on the battery with those on the machine body. Gently push and twist the battery pack clockwise until it clicks securely into place. To detach, twist counter-clockwise and pull apart.

Image 4.2: The detachable battery pack shown separated from the main machine body, illustrating the connection mechanism for easy replacement.
4.3. Inserting Needle Cartridges
Ensure the machine is powered off. Select your desired standard cartridge needle. Gently push the needle cartridge into the cartridge port at the front of the machine until it seats firmly. To remove, simply pull the cartridge straight out.
5. Operating Instructions
5.1. Powering On/Off
Press and hold the power button (circular icon) on the smart display for a few seconds to turn the machine on or off. The display will illuminate upon power-on.
5.2. Adjusting Voltage
Once powered on, use the '+' and '-' buttons on the display to increase or decrease the operating voltage. The current voltage setting will be shown on the display. Adjust the voltage according to your tattooing needs and needle type.
5.3. Adjusting Stroke Length
The Dragonhawk L3 offers 7 adjustable stroke lengths. Rotate the stroke adjustment knob located on the machine body to select your desired stroke: 2.4mm, 2.7mm, 3.0mm, 3.3mm, 3.6mm, 3.9mm, or 4.2mm. Ensure the machine is off or paused when adjusting the stroke to prevent accidental activation.

Image 5.1: The machine body highlighting the stroke adjustment knob and the various stroke length indicators (2.4mm to 4.2mm) around it.
6. Maintenance and Care
6.1. Cleaning
After each use, clean the exterior of the machine with a soft cloth dampened with a suitable disinfectant solution. Do not immerse the machine in liquid. Ensure no liquids enter the internal components or charging port. Always follow proper sterilization protocols for all equipment that comes into contact with skin or bodily fluids.
6.2. Storage
Store the Dragonhawk L3 in a clean, dry, and cool environment, away from direct sunlight and extreme temperatures. When storing for extended periods, ensure the battery packs are partially charged (around 50%) to prolong battery life.
6.3. Battery Care
- Avoid fully discharging the battery frequently.
- Do not expose batteries to high temperatures.
- Use only the provided Type-C cable for charging.
- If a battery pack shows signs of damage or swelling, discontinue use immediately and dispose of it properly.
7. Troubleshooting
| Problem | Possible Cause | Solution |
|---|---|---|
| Machine does not turn on. | Battery is discharged or not properly attached. | Charge the battery fully. Ensure the battery pack is securely attached to the machine body. |
| Machine runs weakly or inconsistently. | Low battery charge, incorrect voltage setting, or needle issue. | Recharge the battery. Increase the voltage setting. Check if the needle cartridge is properly inserted and not damaged. |
| Display is not working. | Machine is off or battery is completely drained. | Turn on the machine. Charge the battery. If the issue persists, contact support. |
| Stroke adjustment is stiff. | Debris or lack of lubrication. | Ensure the area around the adjustment knob is clean. Do not force the adjustment. If necessary, contact support for guidance. |
8. Specifications
Technical specifications for the Dragonhawk L3 Tattoo Machine:

Image 8.1: Visual representation of the Dragonhawk L3 machine alongside a list of its key technical parameters.
| Parameter | Value |
|---|---|
| Weight | 222g |
| Dimensions (Diameter x Length) | 32mm x 141mm |
| Working Time (per battery) | 5-7 hours |
| Stroke Length Options | 2.4mm, 2.7mm, 3.0mm, 3.3mm, 3.6mm, 3.9mm, 4.2mm |
| Motor Speed (at 8V) | 6500 RPM |
| Charging Port | Type-C |
| Working Voltage | 4V-12V |
| Battery Capacity | 2000mAh |
| Color | Black |
| Water Resistance Level | Not Water Resistant |
9. Safety Information
Please read and adhere to the following safety guidelines to ensure safe operation and prevent injury or damage to the machine:
- This device is intended for professional use by trained and qualified tattoo artists only.
- Always wear appropriate personal protective equipment (PPE), including gloves, during operation.
- Ensure all needles and cartridges are sterile and disposed of properly after single use.
- Do not operate the machine if it is damaged or malfunctioning.
- Keep the machine away from water and other liquids as it is not water resistant.
- Do not attempt to disassemble or repair the machine yourself. Refer to qualified personnel for service.
- Keep out of reach of children and untrained individuals.
- Always disconnect power before cleaning or performing maintenance.
10. Warranty and Support
Dragonhawk products are designed for durability and performance. Your Dragonhawk L3 machine includes coverage for peace of mind.
For any inquiries, technical assistance, or warranty claims, please reach out to Dragonhawk customer support through the Amazon messaging system. Provide your order details and a clear description of the issue to facilitate a prompt resolution.
For additional resources and video tutorials, you may visit the official Dragonhawk YouTube channel: Youtube.com/@Dragonhawkofficial.
Related documentsL3 Tattoo Pen with 2 Batteries


Ask a question about this manual
Ask about setup, troubleshooting, compatibility, parts, safety, or missing instructions. Manuals+ will review the question and use this page’s manual context to help answer it.